Make Sure Your Flow Works
Learning Objectives
After completing this unit, you’ll be able to:
- Identify test cases for a flow.
- Explain what a flow interview is.
- Test a flow from Flow Builder.
As an admin or developer, you know you should test all customizations before rolling them out to users, and flows are no different. Testing lets you fine-tune the flow’s behavior, identify and fix bugs, and otherwise make sure your users have a successful experience. And of course, you also benefit, because you’re much less likely to spend time later responding to panicked emails from your users.
Before You Start
Before you dive into this unit, we suggest you complete the Build a Simple Flow project—this unit builds on what you learn there.
Create a Test Plan
Before you start testing, draft a list of test cases, and identify what you expect the result to be. Consider things like:
- When you expect actions to occur
- When you expect actions to not occur
- How formulas should resolve
Using an example from Build a Simple Flow, for the New Contact flow you work on in that module, there are four major test cases.
Toggle setting |
Matching record |
Expected result |
|---|---|---|
Deselected |
Doesn’t exist |
A contact is created. |
Deselected |
Exists |
A contact is created. |
Selected |
Doesn’t exist |
A contact is created. |
Selected |
Exists |
A contact is updated. |
Once you identify what to test for, it’s time to test the flow.
Testing Options in Flow Builder
You don’t have to leave Flow Builder to make sure your flow works. The button bar includes two buttons for running a flow: Run and Debug.
-
Run runs the most recent saved version of the flow that you have open.
-
Debug does everything that Run does, but with some superpowers thrown in. It lets you enter values for the flow’s input variables and display debug details while running the flow. That way, you can verify how the flow processes data.
Note
When you click Debug and opt to show details, you see the flow’s screen (1) and the debug details (2). As you step through the flow, new details are added to the right-hand panel.

[Alt text: An instance of the New Contact flow in debug mode.]
Introducing Flow Interviews
Each time a flow runs, a flow interview starts. A flow interview is an instance of a flow.
Think of Choose Your Own Adventure books. A flow is like the book itself, which provides choices to the reader and instructions for each choice. A flow interview is like the reader. As you read, you make choices and follow the instructions for those choices. Each time you or another person reads the book, you can take a different path through the book and experience a different story.
The same goes for flow interviews. Based on the data provided for that interview, either by input variables or input components on a screen, each interview can take a different path through the flow and result in different actions being performed.
To see interviews in action, verify the four cases from your test plan.
Test Your Flow from Flow Builder
- From Flow Builder, click Debug. Make sure that Show details of what's executed and render flow in Lightning runtime is selected. Otherwise, you won’t see any debug details. Since this flow doesn’t have Subflow elements, don’t worry about that setting.
- Click Run.
- Validate the first test case.
- Enter a first and last name, and choose an account.
- Leave the toggle unselected.
- Click Next.
- Review the debug details.
The first card identifies who started the flow interview. Since you started it, you should see your name and user ID.
The second card summarizes how the inputs from the screen were stored for the flow interview to use. For example, because you left the toggle unselected, the {update_toggle} value is set to false.
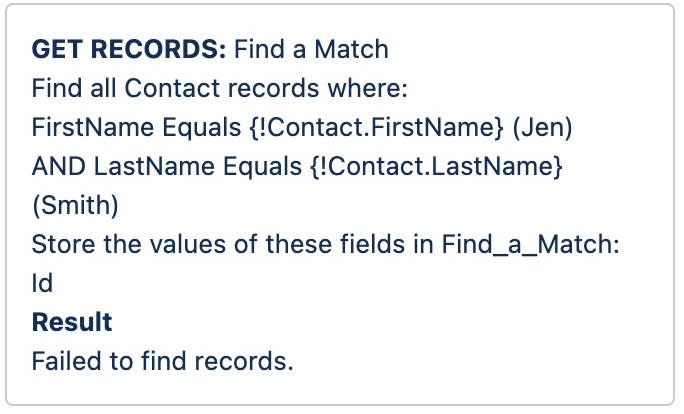
The third card pulls up the existing record if there is a match with the inputs used on the screen. A match was not found for the inputs used, so the result comes up with the message, “Failed to find records.”
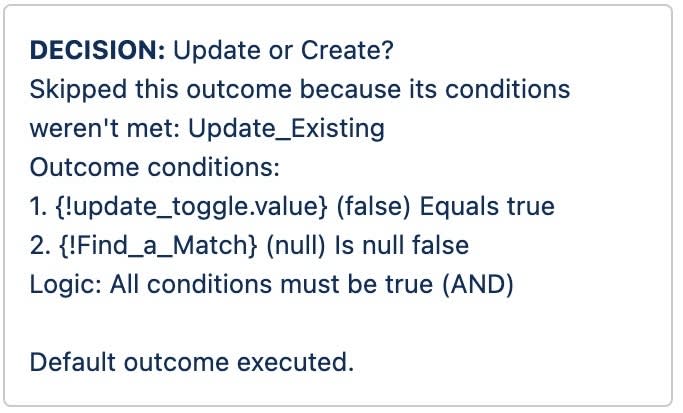
The fourth card summarizes how the Update or Create? decision was evaluated. Because {!update_toggle.value} was false, the interview takes the Create New path and goes directly to the Create Contact element.
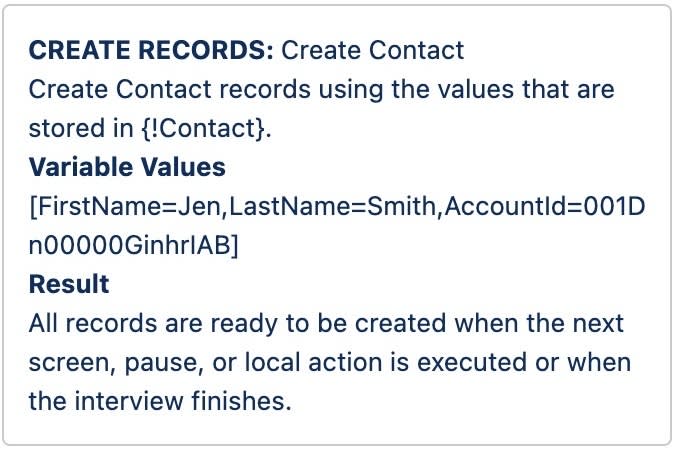
The fifth card summarizes the Create Contact element. The interview used the values in the {!contact} variable to create a contact record.
- Enter a first and last name, and choose an account.
Now that you reviewed the test details, verify the expected results for this test case. To see your results, follow these steps.
- Confirm that the Transaction Committed card appears at the end of the debug details.

- Exit Flow Builder.
- On a Setup page, a record page, or a home page, click the
 to open App Launcher, then search for and select Sales.
- Click the Contacts tab.
- In the Recently Viewed list, you should see a contact whose name matches what you entered and is a child of the account you selected.
- Repeat for the other three test cases. For cases that include a matching record, use the same first name, last name, and account you used for the first test case.
If any of the test cases have unexpected results, use the Debug Details to backtrack and figure out what went wrong. Once all the test cases pass, you’re ready to put the flow in your users’ hands.
