Roll Back Changes After an Error
Learning Objectives
After completing this unit, you’ll be able to:
- Determine whether to use a fault path in each flow.
- Add a Roll Back Records element to a flow.
- Add a Custom Error element to a flow.

The Problem with Fault Paths
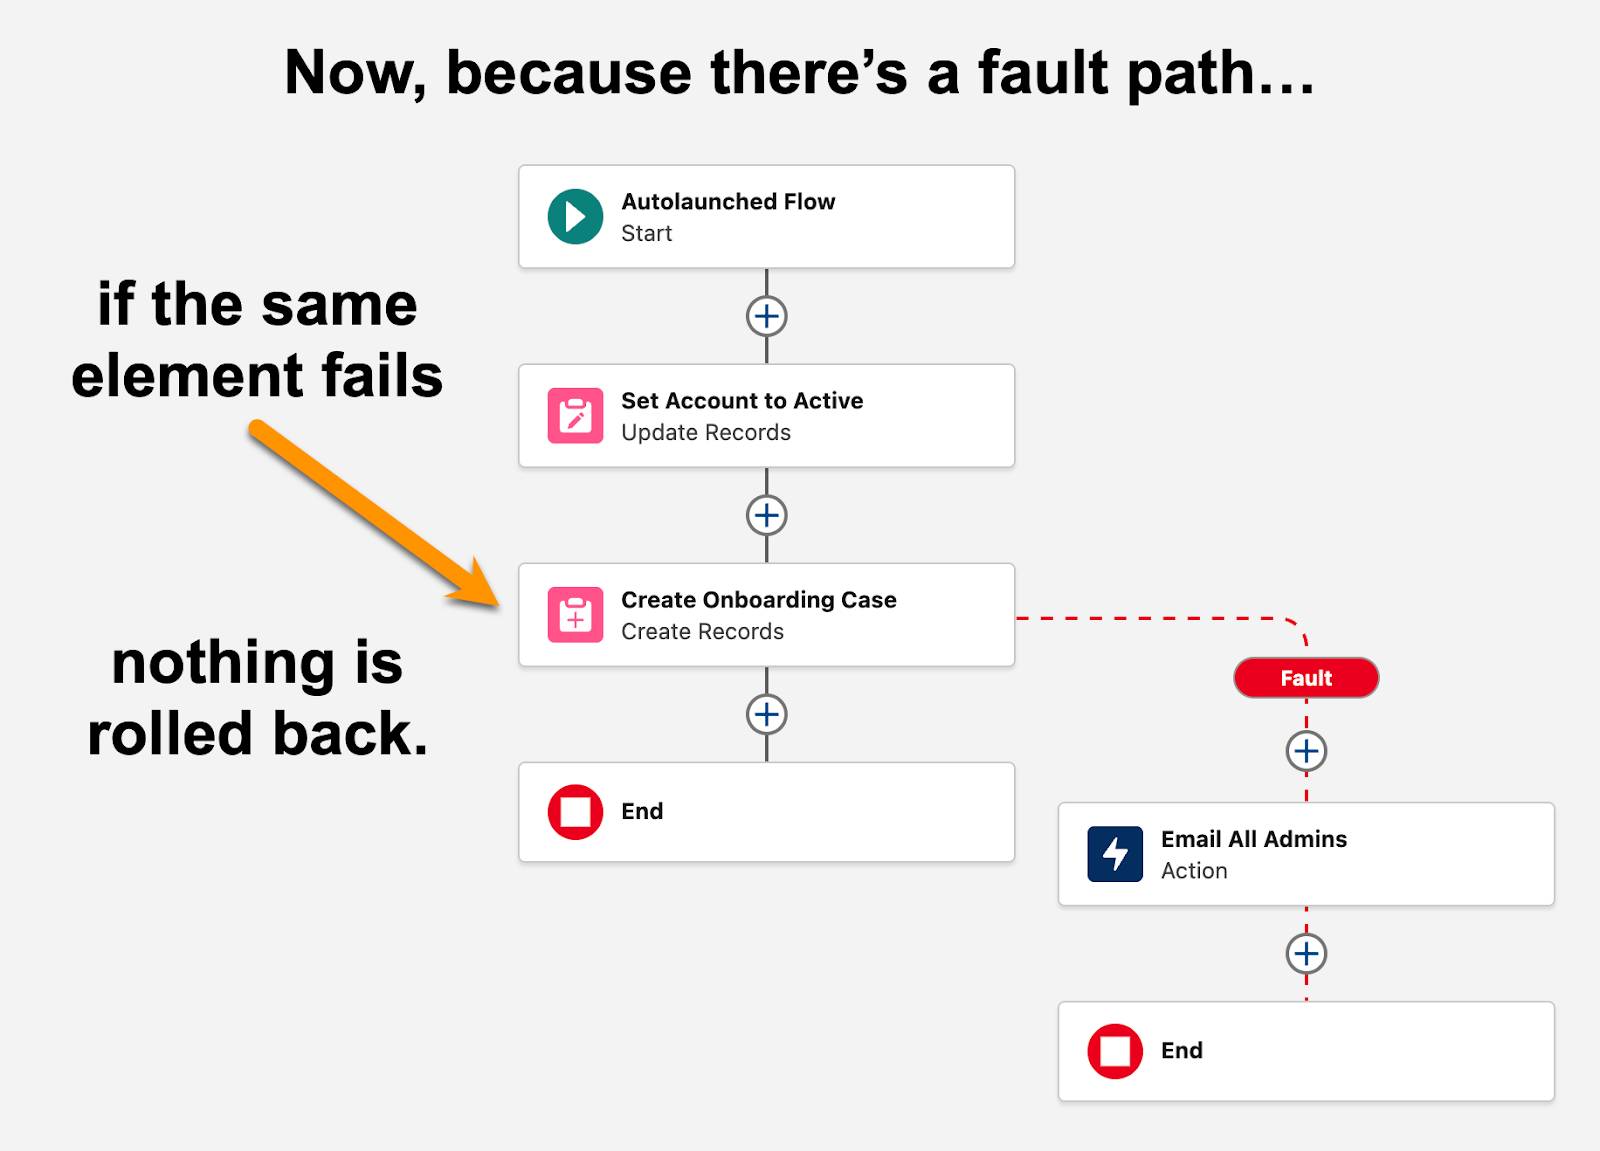
Flows have an important built-in feature that protects your data if a flow’s run is only partially successful: rolling back a transaction. This feature reverses every database change made in that transaction, returning the data to its previous state, before the transaction is committed to the database.
Let’s look at an example of how rolling back works, and how important it can be. Imagine a flow with only two elements: The first element updates an account to Active status, and the second element creates a case to onboard the customer. If the flow fails on the second element, Salesforce rolls back the first element’s account update. Although the account update element finished before the flow encountered an error on the case creation, it’s part of the same transaction, so Salesforce reverses the account update too.

If the transaction weren’t rolled back, the account update would still happen even though the case creation failed. The flow would update the account’s status to Active, but wouldn’t create an onboarding case, so the customer wouldn’t receive the welcome, training, and one-on-one attention that’s critical to their success.
Sounds like rolling back can be pretty valuable, right? It’s not always necessary, but it's important when partial flow completions could cause problems for your organization. However, if a flow’s error sends it down a fault path, the transaction is not rolled back. In the previous example, if we add a fault path to the Create Onboarding Case element, the account update still happens even if the case creation fails.
Record-triggered flows have an additional peril to consider. If an error occurs with no fault path, Salesforce displays an error message, blocking the change that triggered the flow. However, if an error sends the flow down a fault path, Salesforce completes the change that triggered the flow, even though the flow failed.
Thankfully, Flow Builder has two elements that can force a flow to roll back a transaction. Each element works in a specific flow type.
-
Screen Flows: Use the Roll Back Records element. This element just rolls back the current transaction.
-
Record-Triggered Flows: Use the Custom Error element. This element shows an error message of your design to the user, and rolls back the current transaction.
Let’s look at how you can use these elements in a fault path.
Add a Roll Back Records Element to a Screen Flow
Look at the Guided Opp Create flow that comes with the package you installed in the Flow Implementation I badge.
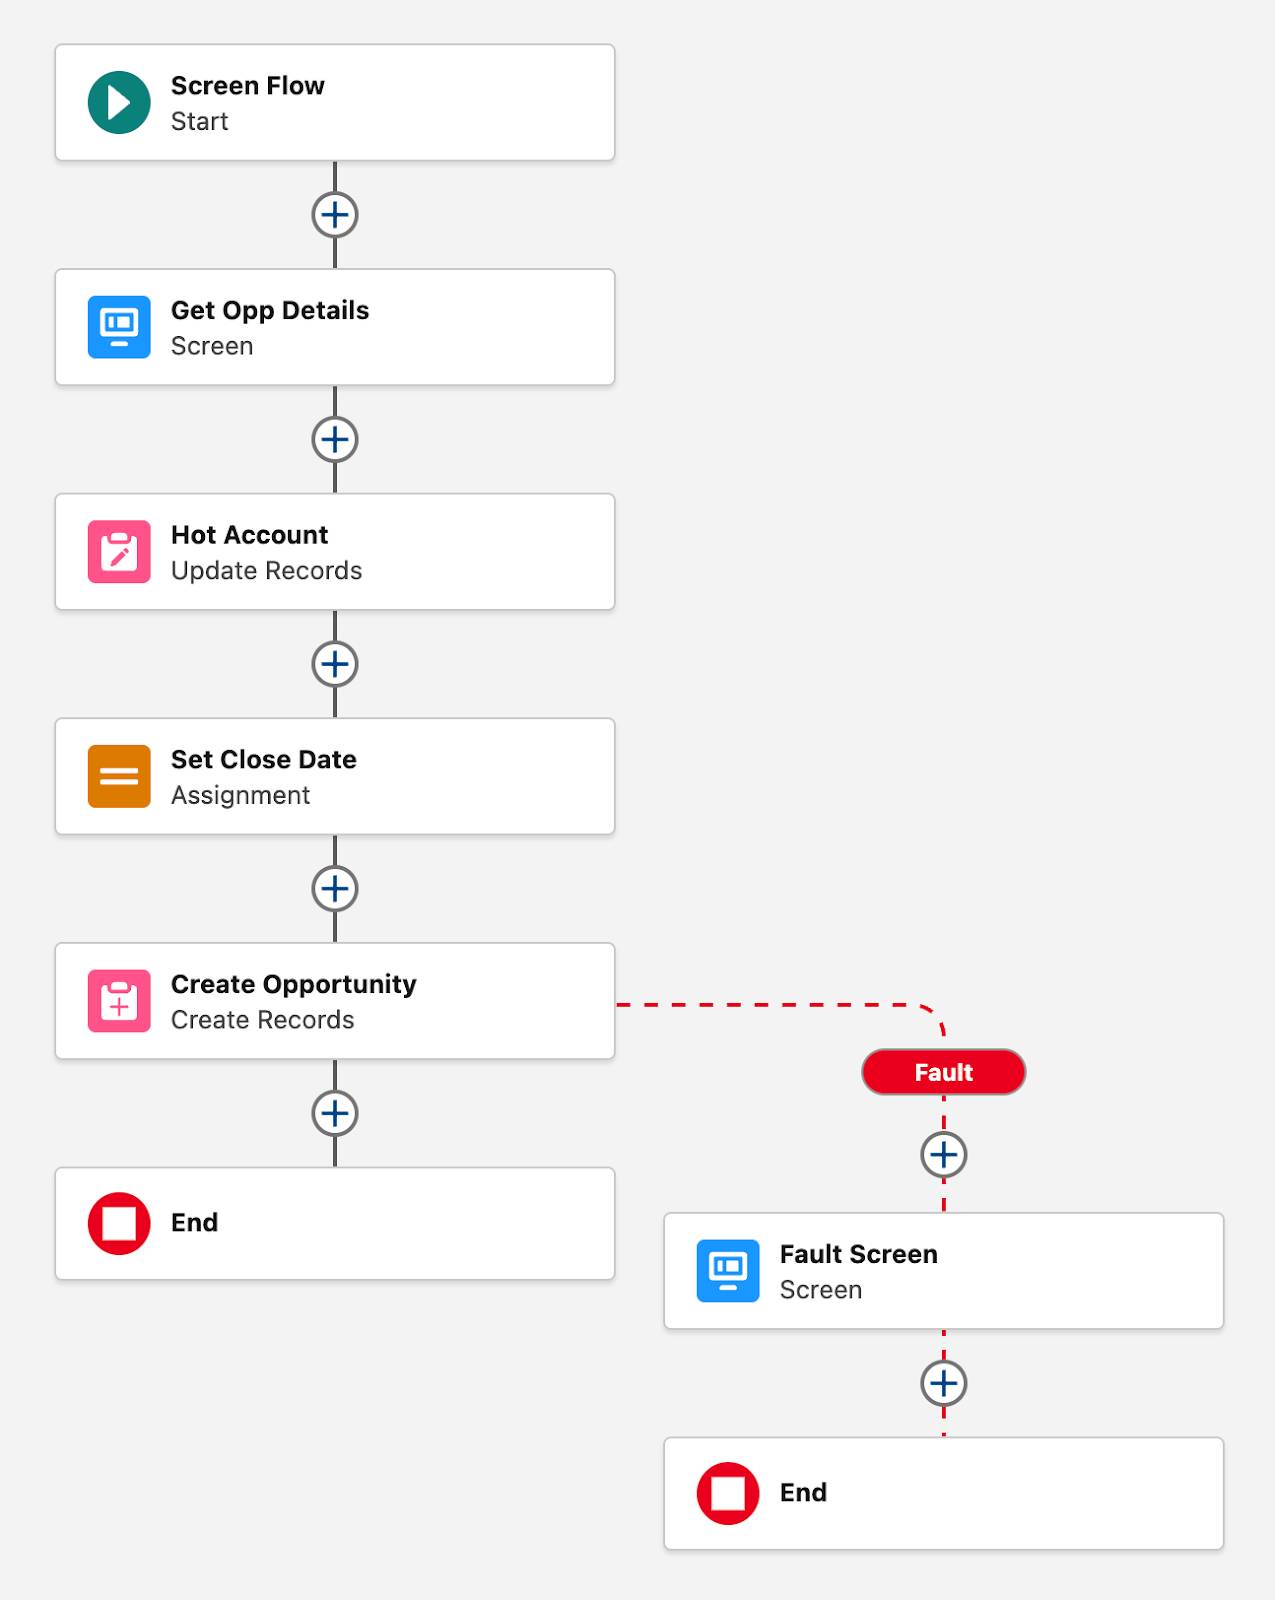
In the previous unit, you added a fault path on the Create Opportunity element and a Screen element that shows error details to the user. However, if the flow throws an error on the Create Opportunity element, the flow still saves the Hot Account element’s record changes to the database, because errors that take a fault path don’t roll back the changes made in previous elements. Let’s add a Roll Back Records element to the fault path, so the flow doesn’t save the Hot Account changes if the Create Opportunity element fails.
Add a Roll Back Records Element
- Open the Guided Opp Create flow. (This flow comes with the package you installed earlier in this badge.)
- On the fault path, before the Fault Screen element, click
 .
.
- Select Roll Back Records.
- For Label, enter
Roll Back Update and New Opp.
- Click Done.

- Save the flow.
That’s all there is to it. Now if the Create Opportunity element fails, the flow rolls back the Update Account element’s changes.
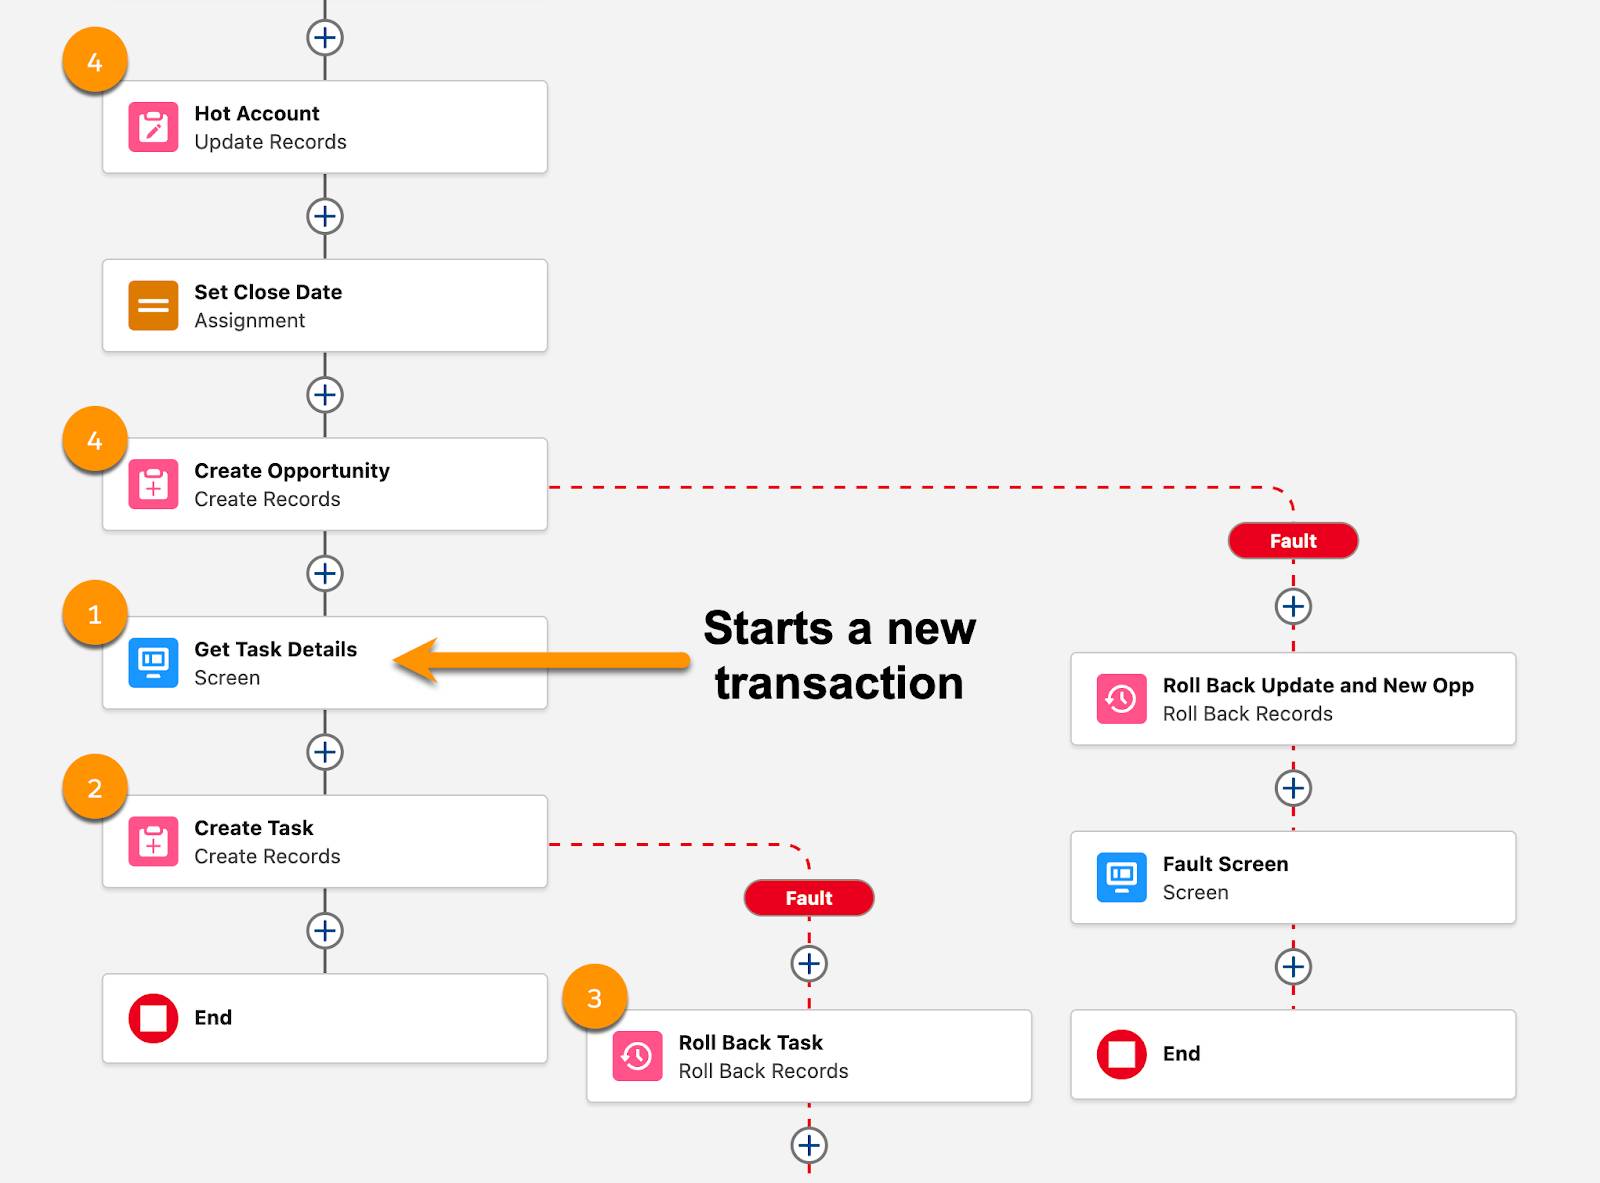
Let’s expand this scenario further. What if, after the Create Opportunity element, there were another Screen element (1) and another Create Records element (2)?

The Roll Back Records element rolls back only the changes made in the current transaction. Remember, when the flow encounters a screen element, the flow ends the current transaction and starts a new transaction. If you add a Roll Back Records element (3) to a fault path from the Create Task element, it doesn’t roll back the changes from the Update Account or Create Opportunity elements (4), because they were made in a different transaction.
Add a Custom Error Element to a Record-Triggered Flow
In record-triggered flows, you can add the Custom Error element to show an error message of your choice to the user. This element also rolls back the current transaction, and blocks the change that triggered the flow.
Let’s look at another example. The Save At Risk Account flow (which also comes with the package you installed in the previous badge) runs when an account is marked At Risk. It creates a case that directs Pyroclastic support leads to review open cases, and it creates a task for the account owner to reach out to the customer. Both of these steps are critical to save the account. Let’s add a fault path with a Custom Error element to ensure that all of the records are created.
Add a Custom Error Element
- Open the Save At Risk Account flow.
- Hover over the Create Case element, and click
 .
.
- Select Add Fault Path.
- On the fault path, click
 .
.
- Select Custom Error.
- For Label, enter
Error and Roll Back.
- For Where to Show the Error Message, make sure In a window on a record page is selected.
- In the Error Message section, in the space below the Resource Picker field, enter:
Please send this error message to the Salesforce admin team.
{!$Flow.FaultMessage}
- Hover over the Create Task element, and click
 .
.
- Select Add Fault Path.
- On the new fault path, click
 .
.
- Select Connect to element.
- Click
 on the Error and Roll Back element.
This effectively combines the two fault paths so that both Create Records elements use the same Custom Error element when they fail.
- Save the flow.

Now when a user makes a change that triggers this flow and it fails to create the case or the task, the change is blocked, the whole flow is rolled back, and the user sees a detailed error message front-and-center.

Use a Custom Error Outside of Fault Paths
The Custom Error element doesn’t have to be used in fault paths. It can be placed on a normal flow path and run even when the flow doesn’t encounter an error. Remember, the Custom Error element also rolls back the current transaction and blocks the change that triggered the flow. So you can use these capabilities to control the completion of the flow and the triggering record change.
For example, Pyroclastic Inc. lets its users delete accounts, but they want to prevent the deletion if the account’s Status isn’t set to Prospect. Normally, if an admin wanted to prevent record changes in Salesforce, they’d create a validation rule to block the change. However, validation rules can’t be triggered from record deletions. So how can you prevent the deletion?
Record-triggered flows can be triggered by record deletions! So instead, create a record-triggered flow that runs when an account with a Status not equal to Prospect is deleted. In that flow, add a Custom Error element. When an account is deleted improperly, the flow is triggered. It displays the custom error message and blocks the account deletion.

Knowledge Check
The knowledge check below isn’t scored—it’s just an easy way to quiz yourself on your understanding of Salesforce behavior as it relates to flow errors, fault paths, and rolling back, before you complete the hands-on challenge. To get started, drag the description in the right column to the Behavior column next its matching Scenario on the left. When you finish matching all the items, click Submit to check your work. To start over, click Reset.
Resources