Schedule a Series of Emails
Learning Objectives
After completing this unit, you’ll be able to:
- Understand how segments are created.
- Explain two ways to find campaign KPIs.

Event Follow-Up Email Series
Back at Ursa Major Solar, Erin has returned from the Alternative Energies Expo and has an idea for engaging all the new people that the team met. She goes to customer pros, Lincoln and Ada, to round up common questions and recommendations. Lincoln develops a timely series of emails to send to people who expressed interest in solar technology. Ada raises her hand to help build the email series.

Plan an Email Series
Before Ada starts building, the team jots down a few to-do items.
- Get some images from the marketing team.
- Plot out the timing and content for each email.
- Identify criteria to segment the recipient list.
- Identify some target KPIs.
When it’s time to review KPIs, the team hopes to have a solid click-through rate and some new sales opportunities.
Ada will schedule three emails over two months, and focus content on solar benefits, cost offsets, and installation FAQs. To target the right group, she’ll build the segment off of lead source and opportunity fields.
Build an Email Series
Ada starts by logging in to Salesforce and creating a campaign. She chooses to start from the Message Series option, and names it AEE Follow-Up.

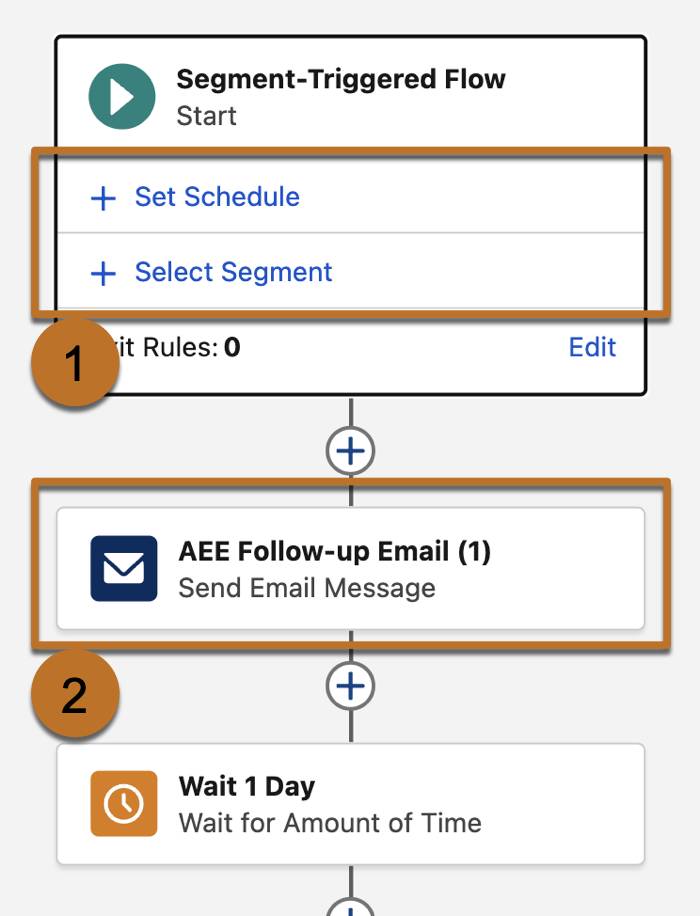
A message series campaign is created in Flow Builder, a tool that helps you automate complex activities into multistep processes called flows. Similar to a single email campaign, a series campaign contains three primary parts: a schedule and segment (1), and related email content (2).
There are a few ways to customize a message series.
- Work on the campaign record, and add message and wait elements from the Next Steps section.
- Open the flow and add or create each part from the canvas.
- Build the segment and content first and then bring them together in the flow.
Ada decides to build her assets first, and then work in Flow Builder.
Identify the Audience
The audience for a message series campaign is based on a segment, which works like a dynamic list of targeted recipients. In a series, everyone in the segment receives each email based on the same schedule settings. Ada’s ready to get started. Let’s look at how it’s done.
- Open the Segments tab, and then click New.
- Give the segment a name, such as AEE Leads.
- On the segment canvas, drag these attributes from Related Attributes and set the AND/OR selector.

- Lead | Lead Source: Is Equal To = AEE 2025
- Lead | Is Converted: Is Equal To = False
- Selector: AND
- Click Save.
Now, Ada’s segment is available to use with emails.
Create Email Content
Since Ada chose a message series, her campaign record comes preset with two draft emails. To get started, she reopens the AEE Follow-Up campaign that she created and opens the emails for editing. Here’s how it’s done.
- From the campaign record, choose an email to work on and click Edit.
- In the Settings panel, select the Promotional message purpose, and enter a subject line and preheader.
- Continue adding components and content as needed.
- Decide whether to customize styles for the email or specific components.
- Add merge fields to personalize content.
- Add the required Physical Address and Unsubscribe merge fields.
- To check formatting and verify that merge fields render as expected, click Preview.
- In the toolbar, click Save, and then click Publish.

After Ada edits the other default email, she creates a third follow-up email from the Content tab by clicking Add and choosing the content type Email.
Combine Work in a Campaign Flow
Now that Ada’s got everything ready to go, let's see how she can bring it all together in the Flow Builder canvas.
Here’s how it’s done.
- From the AEE Follow-Up campaign, click Open Flow.
- In the Start element, click Select Segment.
- In the Segment field, search for AEE, and then select the AEE Leads segment.
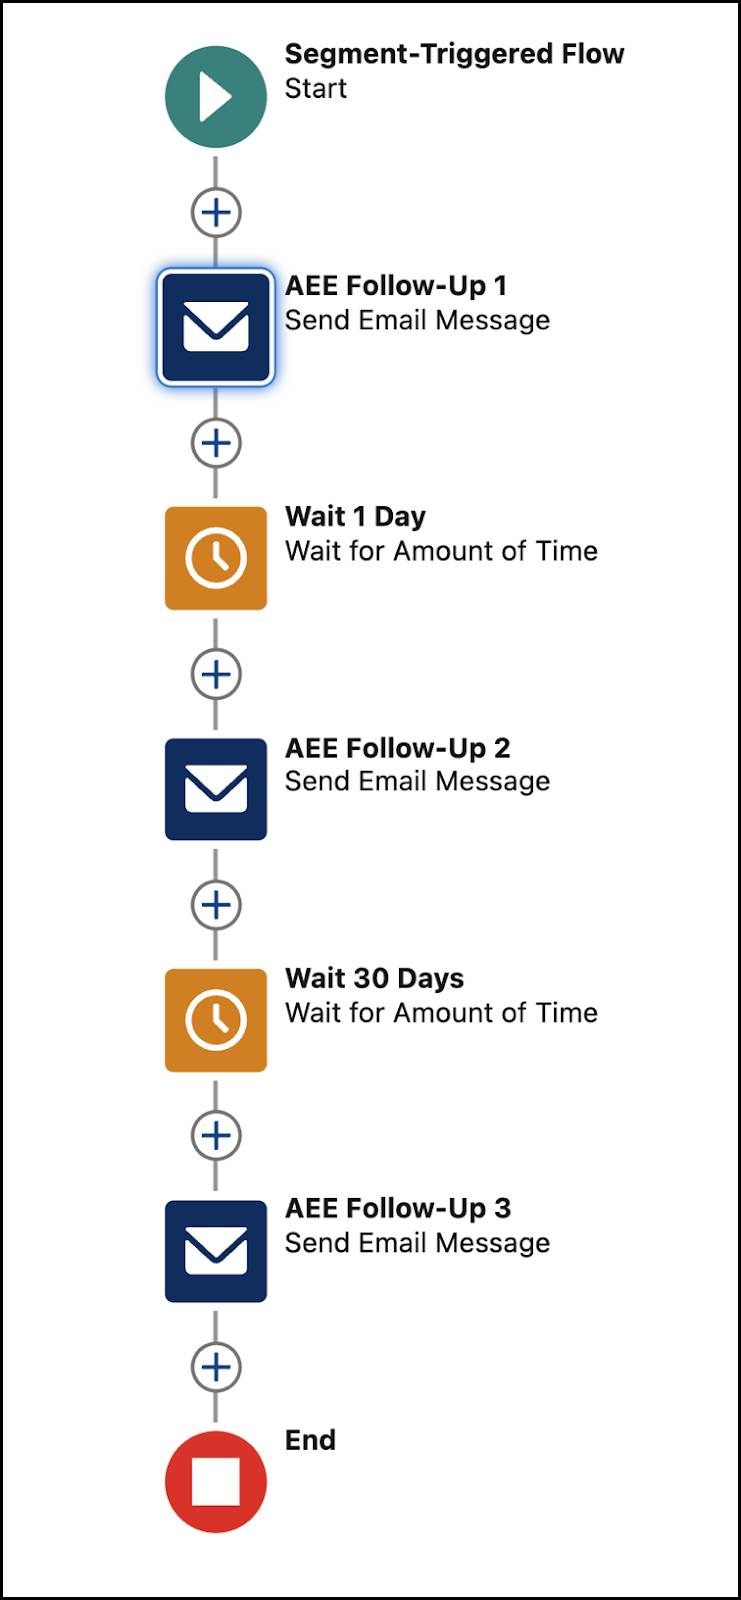
- Confirm that the email elements refer to the Follow-Up 1 and 2 emails that you created.
- If for any reason the emails aren’t already connected, click the Send Email Message element, and then select the correct email in the Select Email Content section.
- For each email element, review or update the fields in the Select Sender and Select Communication Subscription sections.
- Decide how long you want to wait between sending each email.
- Click the Wait for Amount of Time element.
- In the fields provided, enter
1 day.
- Add another Wait element and the Follow-Up 3 email to the flow canvas.
- To add an element, click the
 [Alt text: Add Element icon], and then select Send Email Message or Wait for Amount of Time.
- In the email element’s editing panel, search for and select the Follow-Up 3 email. Select a sender email address and a communication subscription.
- For the Wait element, enter a duration.
- Add and configure other elements as needed.
- Open the Start element, and click Set Schedule.
- In the Set a Schedule panel, select Run Once and Start Immediately after Activation.
- In the toolbar, save the flow, and then click Activate.
Salesforce checks the data for leads that originated from the expo mixer. Those people are added to the segment, and the first email is queued for sending immediately. Later, the same people (minus any converted leads) will receive the second email, and so on.
Note: When you start with a campaign, we create a related flow and relate it to the campaign automatically. If you create assets separately and create a flow from scratch, you must also add a campaign in the Associated Record field on the flow record. Because tracking and reporting are managed primarily by the campaign, skipping this step can cause you to miss out on this valuable data!

Email Series Outcome
Ada checks her reports, and sees awesome click-through rates on the email. She subscribes to the report and sets notifications to Weekly.
Creating an email series allowed Ursa Major Solar to schedule emails in advance for a targeted group. They can also continue to monitor performance and tweak the content over time. Nice work, team!
Resources
- Salesforce Help: Promote Your Business with Salesforce Starter
- Salesforce Help: Marketing Cloud Next
- Video: Tour Starter Marketing
- Video Playlist: Customizing Emails