Configure an eCDN
Learning Objectives
After completing this unit, you’ll be able to:
- List the steps you need to take to configure an eCDN on Salesforce Agentforce Commerce for B2C.
- Explain how site URL alias files relate to instances.
- Describe how Agentforce Commerce for B2C works with a zone.
- Explain how the eCDN CNAME alias works.
- Explain why you’d update a zone certificate.
What’s the Plan?
The embedded CDN (eCDN) is a geographically distributed network of proxy servers that support Agentforce Commerce for B2C storefronts. Linda Rosenberg, Cloud Kicks admin, knows that configuring a Agentforce Commerce for B2C eCDN improves availability and performance, ultimately enhancing the ability to scale her sites.
She likes that the Agentforce Commerce for B2C eCDN takes security a step further by providing an eCDN web application firewall (WAF), which is all about security standards compliance. See the Check Your Firewall for Security Compliance unit, in the Salesforce B2C Commerce Storefront Security Strategies Trailhead module, for details.
Linda creates a task list so she knows exactly what she has to do to implement Agentforce Commerce for B2C eCDN.
Step |
Task |
|---|---|
1 |
Configure a hostname alias. |
2 |
Create a zone. |
3 |
Add a SSL certificate to an eCDN zone and configure domain name system (DNS) mapping. |
4 |
Update an eCDN zone's certificate. |
5 |
Configure a zone. |
6 |
Add hostnames (subdomains). |
Configure a Hostname Alias
To create short, meaningful URLs for external search engines to index, Linda needs a hostname alias. She must configure at least one hostname alias that’s the current hostname on which the instance is running. She can also create a simpler alias that reflects her store or brand name. Putting a simple Page URL in the alias list, such as www.cloudkicks.com, enables shoppers to get to the storefront without typing in the full Salesforce Agentforce Commerce for B2C URL, such as this.
http://www.mystore.com/on/demandware.store/Sites-MYS-Site/default
Here’s how to create a hostname alias.
- In Business Manager, click App Launcher , and then select Merchant Tools | Site | SEO Aliases.
- In the text area, create a set of hostname alias rules such as these.
     { "__version": "1",
"settings": {
   "http-host": "www.cloudkicks.com",
   "https-host": "www.cloudkicks.com"
} }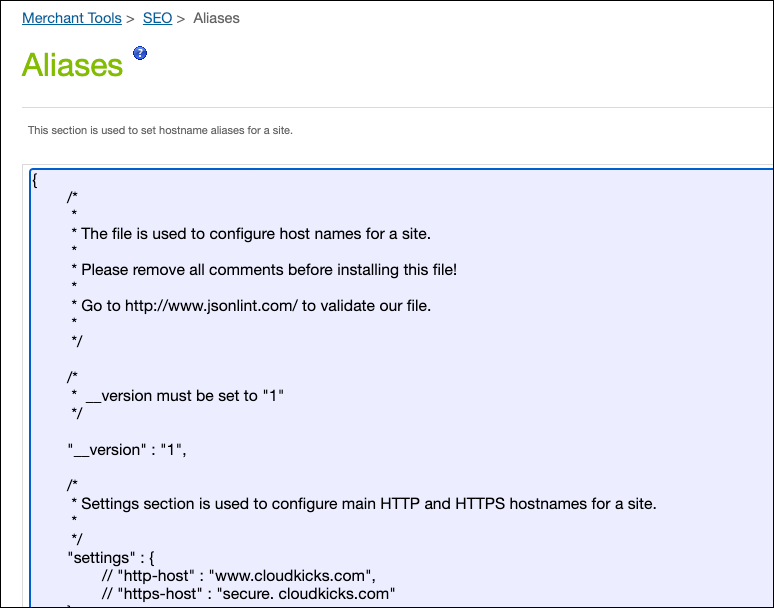
Here are some tips.
- To ensure that your rules are valid JSON, test them against a debugging tool.
- Remove comments from your mapping files and use colons (:) instead of equal signs (=) to separate property and value.
- Site URL alias files are instance-specific. Because each instance has its own alias file, these files are not included in data replication. This prevents you from overwriting these settings on production with the staging configuration.
4. When you are satisfied that your alias field is valid, copy it into the editor and click Apply.
See the Salesforce B2C Commerce Hostname Aliases Trailhead module for details.
Create a Zone
Agentforce Commerce for B2C uses the hostname alias files for the development and production instances across all realms to derive the zone names. For example, if the hostname alias file for Linda’s production instance contains an entry for www.cloudkicks.com, Agentforce Commerce for B2C creates the cloudkicks.com zone.
Linda always registers a domain name with her DNS provider before she creates a zone. That’s because, once she creates a zone, she can’t delete it in Business Manager. She has to contact customer support to remove it.
If you have an existing Cloudflare account, Agentforce Commerce for B2C can take ownership of your storefront hostname in the Agentforce Commerce Cloudflare account. Agentforce Commerce for B2C can also maintain all other hostnames in your Cloudflare account. All new zones created by default are proxy zones and do not require support to help create them.
Here’s how to create zones.
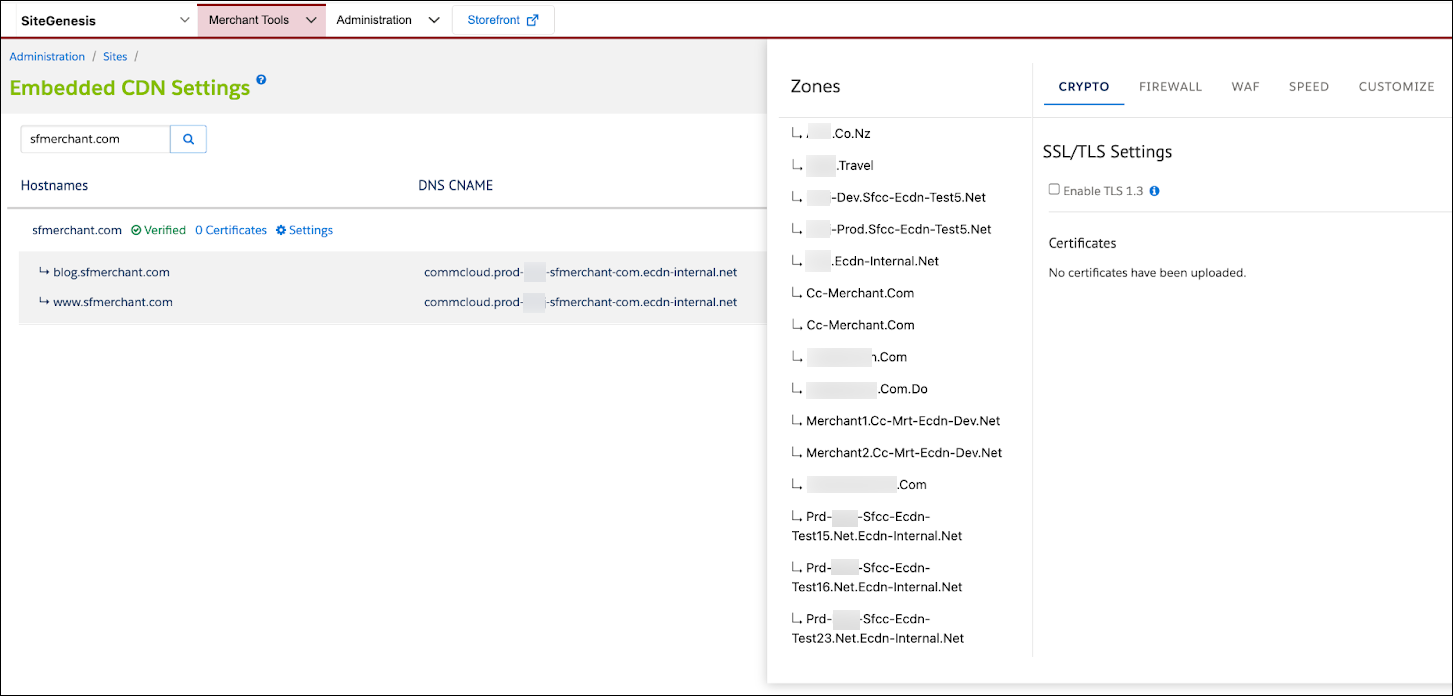
- In Business Manager, click App Launcher and then select Administration | Sites | Embedded CDN Settings.
- Click Add Hostnames.
- For each hostname that you want to add, click Create Zone.

Hostnames are automatically added after the zone is created, configured and the zone status is set to verified.
- If you're creating a new zone, click the Refresh Status link to refresh the status of the individual zone while creation is in progress.
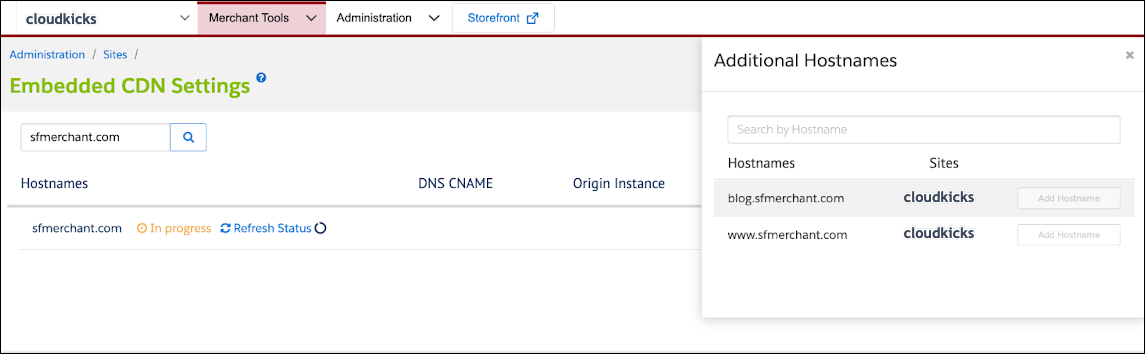
- Click Verify Configuration to check the status of hostname validation. Verification can take up to 24 hours.
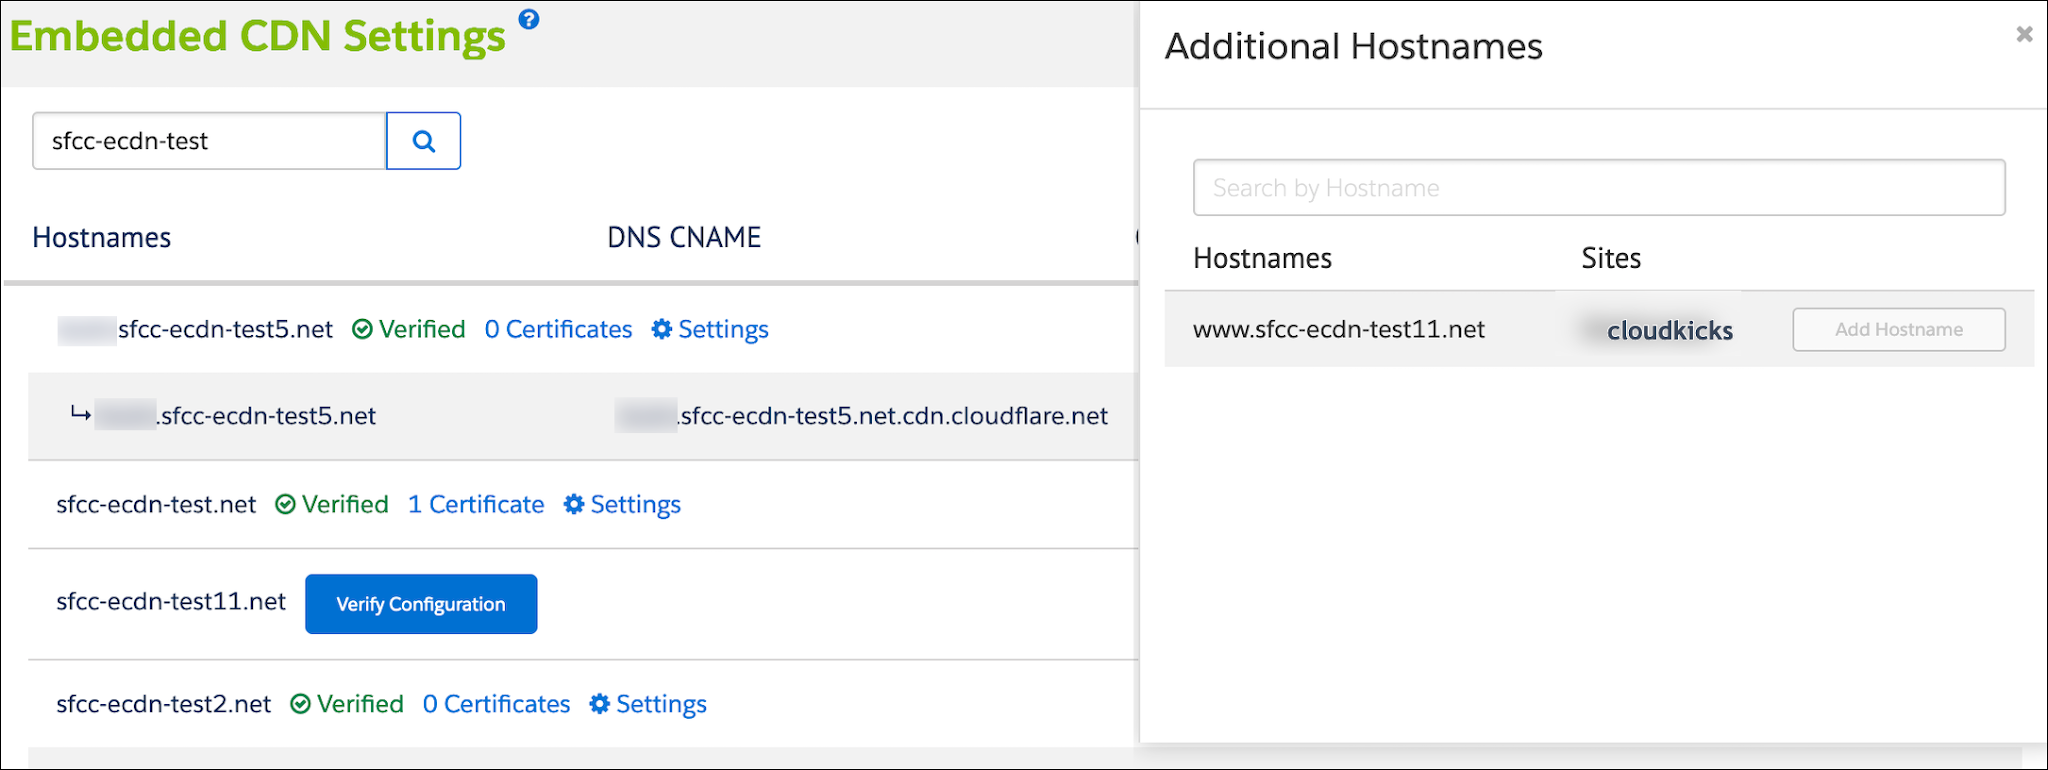
Add an SSL Certificate
Next, Linda adds SSL certificates to her hostnames for the zones and maps her origin endpoints. Here’s what she needs to consider.
- When directing root domains to the eCDN CNAME alias, you must use an external service to redirect from the root domain to the subdomain.
The DNS request for comment (RFC) does not support pointing root domains directly to Agentforce Commerce for B2C. The DNS is the hierarchical and distributed naming system used to identify computers reachable through the internet or other internet protocol networks. DNS best practices are documented in dozens of different RFC documents.
- When setting up redirects, make sure you set them up for both HTTP and HTTPS.
- To permanently serve traffic from the root domain (cloudkicks.com) instead of a subdomain (www.cloudkicks.com), use a DNS-level solution to direct root domains to the eCDN CNAME alias.
Here’s how to add SSL certificates to your hostnames and map DNS values from Agentforce Commerce for B2C to your DNS provider account:
- In Business Manager, click App Launcher, and then select Administration | Sites | Embedded CDN Settings.
-
Certificates or Settingsfor the zone that you’re adding a certificate to.
- On the Crypto tab, select the zone from the list.
- Click Add Certificate.
- Enter the SSL certificate and private key information from your certificate provider.
- Select the hostname to which you want to assign the SSL certificate.
- Click Upload Certificate.
- Copy the displayed verification text into your own DNS portal.
- To check the status of hostname validation, click Verify HostName. This can take up to six hours.
- Once the hostname is active, create a canonical name (CNAME) record that points traffic, by SSL for SaaS V2, to the new zone.
- Configure DNS mapping for the zone, with Cloudflare, for example.
- Log into your DNS provider account.
- Search for your zone and select it from the list.
- On the DNS tab, locate the hostname that you want to map.
- Replace all text after “is an alias of” with the DNS CNAME from Business Manager.
- In the Status column, click the cloud until it shows a gray cloud with the tooltip “DNS Only.”
If you already have the same root domain with your DNS provider in a separate account, you must point the DNS to the new zone and not the standard or root zone. This proves that you want traffic to come to the new zone instead of the standard or root zone.
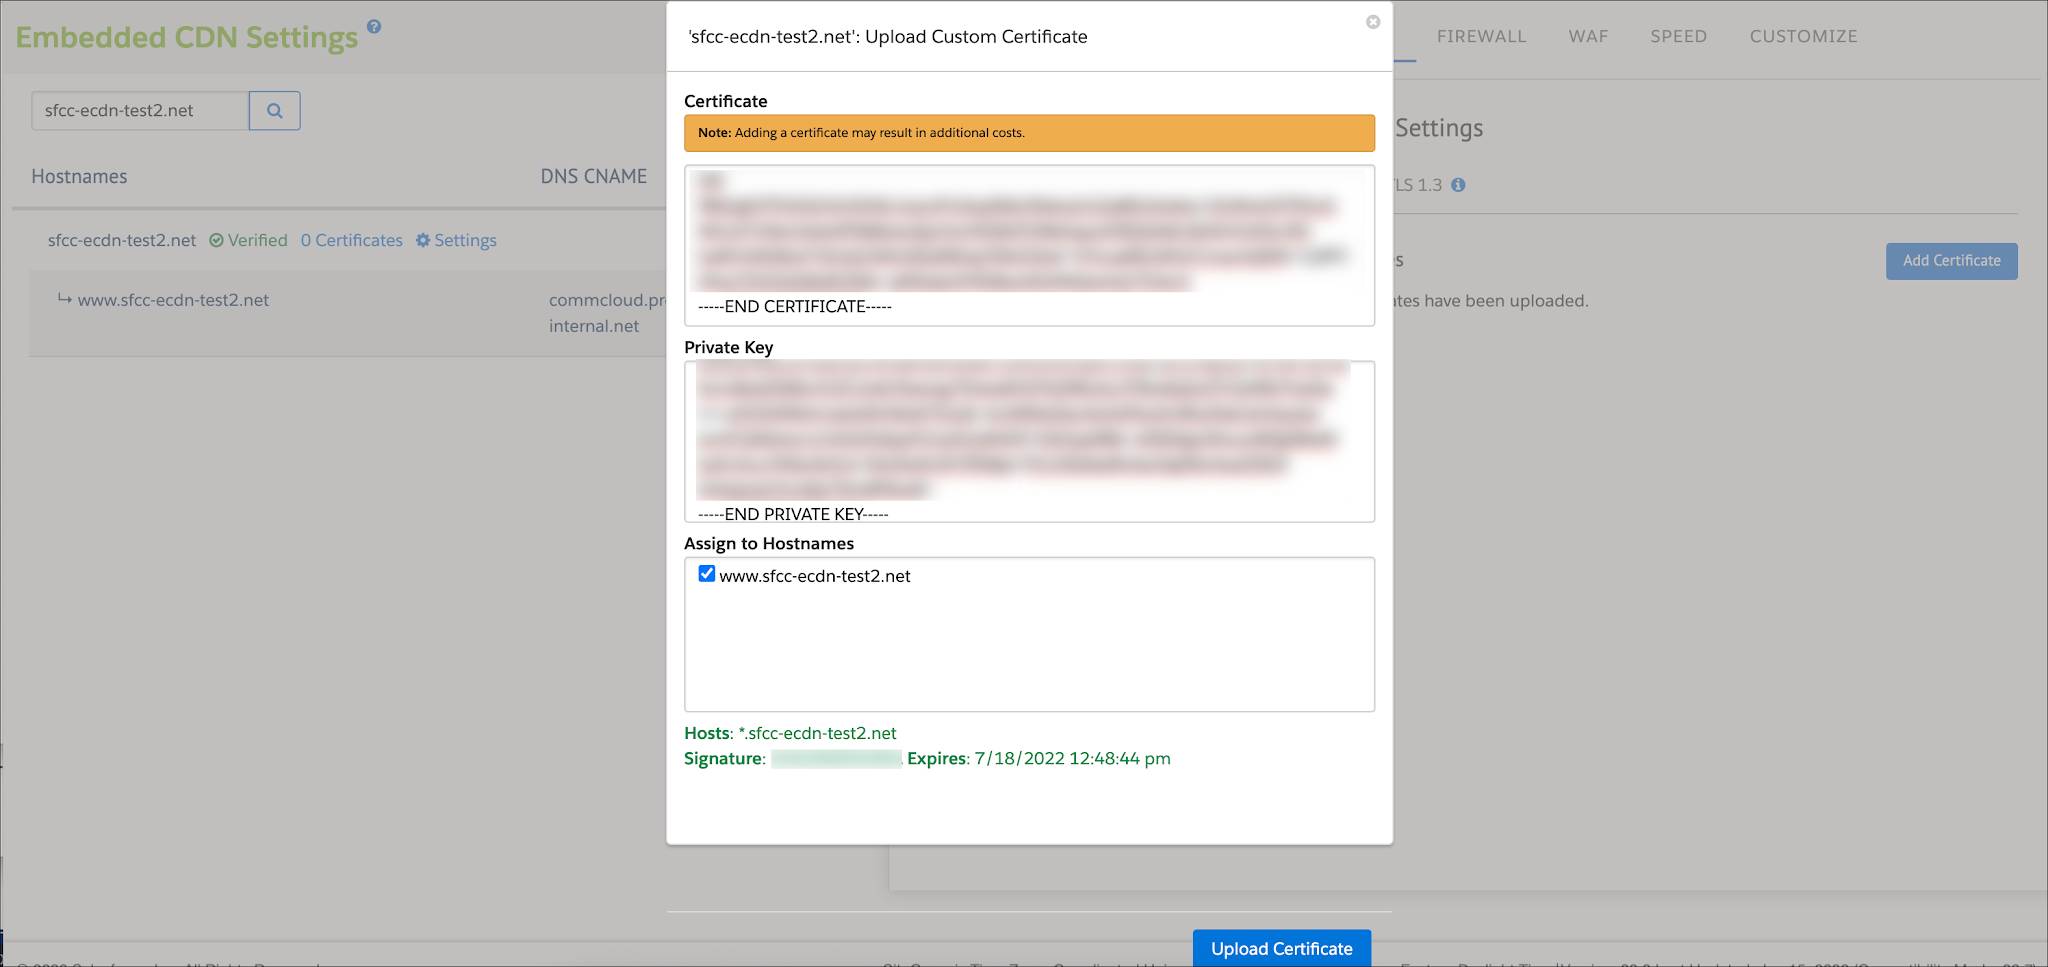
Update an Zone Certificate
When your SSL certificate expires, or you have to update the hostnames assigned to an SSL certificate, here’s how you update the zone certificate.
- In Business Manager, click App Launcher, and then select Administration | Sites | Embedded CDN Settings.
- Select a zone from the hostnames list and click Settings | Add Certificate.
- On the Crypto tab, select a zone from the list.
- Click the Rotating icon on the certificate you want to update.
- Paste the certificate and private key information from your Certificate Authority provider.
- Click Update Certificate.
To update which hostnames are assigned to a certificate in a proxy zone, add a certificate, add the hostnames correctly, then delete the old certificate. For availability reasons, we recommend adding all hostnames to a certificate before deleting the old certificate. You don’t want to cause downtime.
Next Steps
In this unit, you learned how to configure an eCDN from configuring a hostname alias to updating an eCDN zone’s certificate. Next, configure a zone and add a subdomain.
Resources
- Trailhead: Salesforce B2C Commerce Storefront Security Strategies
- Salesforce Help: eCDN Web Application Firewall
- Salesforce Help: Configure an External CDN or Third-Party Proxy
- Salesforce Help: Hostname Aliases
- Trailhead: Salesforce B2C Commerce Hostname Aliases
- External Link: JSONLint - The JSON Validator
- Salesforce Help: Storefront Network Access
- Salesforce Help: Private Keys and Certificates
- External Link: Wikipedia: CNAME Record