Set Up Consent Authorization
Learning Objectives
After completing this unit, you’ll be able to:
- Configure additional fields for New Authorization Form and New Authorization Form Text windows.
- Create an Authorization Form record.
- Create an Authorization Form Text record.
- Associate the Authorization Form record with the Authorization Form Text record.
- Activate a Data Use Purpose record.
More About Authorization Forms
Cumulus’s customers are spread nationwide and therefore have different language preferences. Authorization forms let Sofia present disclosure and consent information based on the customer’s preferred location and language. Authorization forms are also required to activate Data Use Purpose records.
In this unit, Matt sets up consent authorization by making the following changes in the org.
- Configure the New Authorization Form and New Authorization Form Text windows.
- Create records for the Authorization Form and Authorization Form Text, and then link the two records.
- Activate the Data Use Purpose record.
Follow along with Matt.
Add Fields for New Authorization Form Window
Agentforce Financial Services includes two fields for the New Authorization Form window to capture additional consent information.
-
Associated Regulation: Policy related to the authorization form.
-
Consent Duration Day Count: Number of days the authorization remains valid.
It would be easier to add this information to authorization forms if the fields are available while creating the forms. So Matt configures these two fields for his admin profile and Sofia’s profile.
- Click
 and then Setup.
- In the Quick Find box, enter
profiles, and select Profiles.
- Click the admin’s profile. Matt selects System Administrator.
- Under the Field-Level Security section, next to Authorization Form, click View.
- Click Edit.
- For Associated Regulation and Consent Duration Day Count, enable Edit Access.

Matt repeats the steps to grant access to Sofia’s profile.
Create an Authorization Form
Now Matt is ready to create an authorization form for mortgage servicing disclosure. The disclosure informs Rachel about Cumulus’s policy regarding the assignment, sale, or transfer of the loan to another lender.
- From the App Launcher (
 ), find and select Authorization Form.
- On the Authorization Forms list page, click New.
- On the New Authorization Form window, specify this information.
- Name:
Mortgage Servicing Disclosure - Revision Number:
2022 - Fill in the Effective From Date and Effective To Date fields.
- Default Auth Form Text: We configure this field later in the unit. Leave it blank for now.
- Associated Regulation:
RESPA - Consent Duration Day Count:
365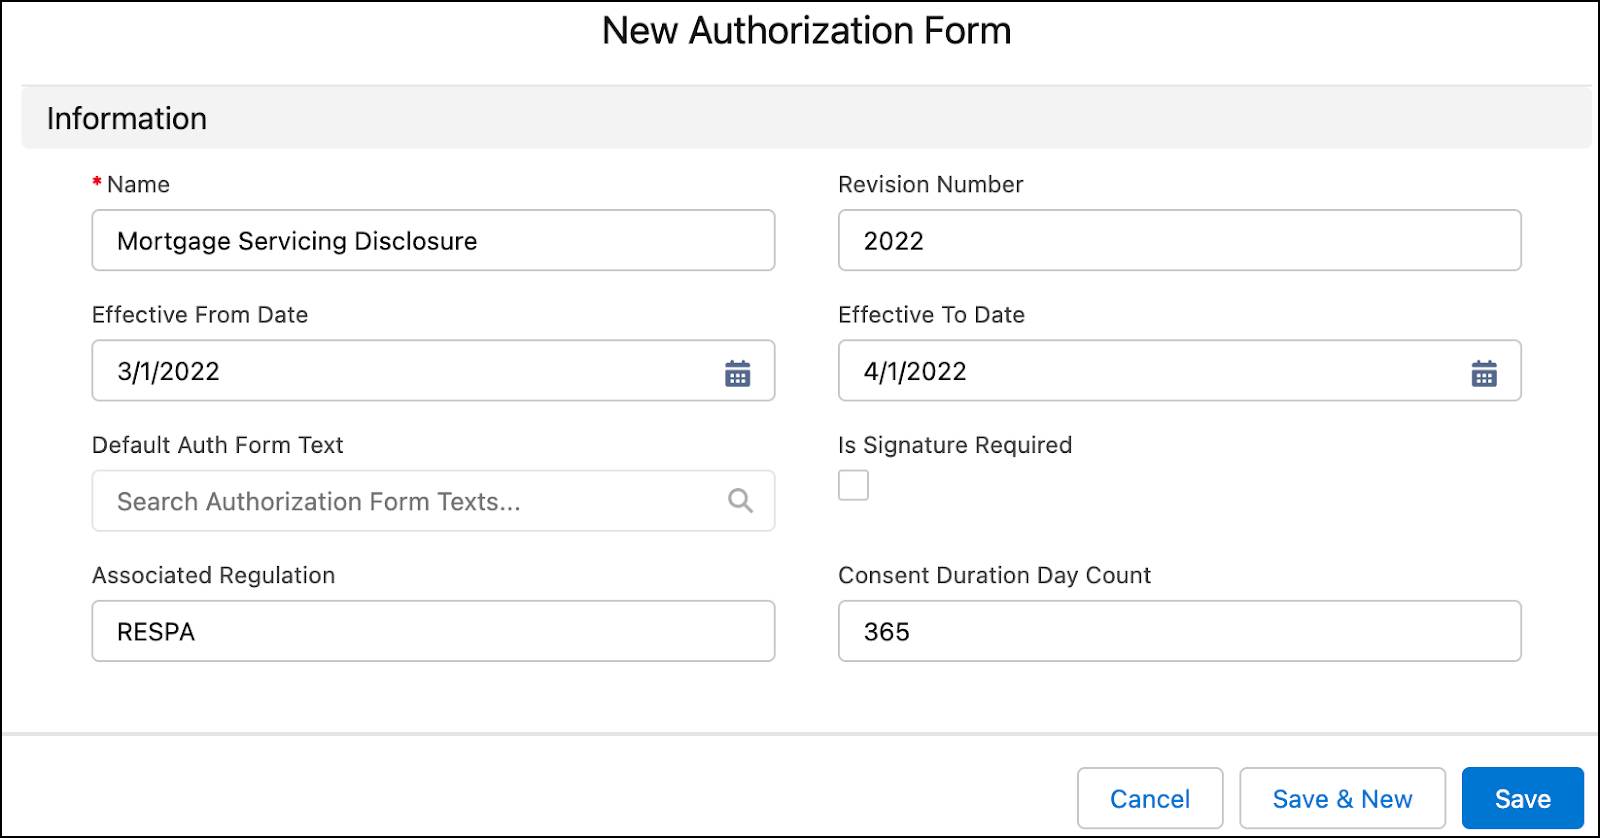
- Name:
- Save your work
Authorization Form Text
An Authorization Form Text record contains the disclosure statement that is presented to the customer when asking for their consent. You can define multiple versions based on the customer’s location and language preferences. For example, you can create two versions of the good faith estimate disclosure—one for English and another for Spanish.
Add Fields for New Authorization Form Text Window
Similar to the New Authorization Form window, Agentforce Financial Services also provides additional fields for the New Authorization Form Text window: Is Active, Is Read Only, and Last Activation Date Time.
Matt remembers how he had added the additional fields to the New Authorization Form window. The process is similar for the New Authorization Form Text window. So he goes into Setup and adds the three fields to both Sofia’s and his profile.

Create an Authorization Form Text
Here’s how Matt creates an Authorization Form Text record for Cumulus’s mortgage servicing policy.
- From the App Launcher (
 ), find and select Authorization Form Text.
- On the Authorization Form Texts list page, click New.
- On the New Authorization Form Text window, specify this information.
- Name:
Mortgage Servicing Disclosure English - Authorization Form: Mortgage Servicing Disclosure
- Locale: English (United States)
- Summary Auth Form Text:
The servicing of your mortgage loan may be transferred, assigned, or sold. “Servicing” refers to collecting your principal, interest, and escrow account payments.
If the text is available on the web (like a company website), specify the URL in the Full Authorization Form Url field. If the text is available in an uploaded document file, select it in the Content Document field.
- Enable Is Active.

- Name:
- Click Save.
Matt creates another Authorization Form Text record for Spanish-speaking customers.

Only one Authorization Form Text per locale can be active at a time for a specific authorization form.
Associate Authorization Form with Authorization Form Text Record
Authorization form? Check. Authorization form text? Done. Now it’s time to link the two and here’s how Matt does that.
- From the App Launcher (
 ), find and select Authorization Form.
- On the Authorization Forms page, for Mortgage Servicing Disclosure, click
 and then select Edit.
- In the Default Auth Form Text field, select Mortgage Servicing Disclosure English.

- Save your work.
Activate Data Use Purpose
Remember the Data Use Purpose record named Mortgage Initiation that Matt created earlier? It’s not active yet. Here’s how he activates the record.
First, Matt creates an Authorization Form Data Use Purpose record from the Mortgage Initiation record.
- From the App Launcher (
 ), find and select Data Use Purpose.
- On the Data Use Purposes page, click Mortgage Initiation and then the Related tab.
- On the Authorization Form Data Uses component, click New.
- On the New Authorization Form Data Use window, specify this information.
- Name:
Mortgage Initiation - Authorization Form: Mortgage Servicing Disclosure

- Name:
- Save your work.
Next, Matt activates the Data Use Purpose record.
- While still on the Mortgage Initiation data use purpose page, click Edit.
- On the Edit Mortgage Initiation page, enable Is Active.

- Save your work.
What’s Next
Having prepared the org and set up content authorization, Matt is done setting up Disclosures and Consent Management. In the final unit, Sofia generates an info authorization request and tracks its status. Onward and upward!
Resources