Get Started with the Developer Console
Learning Objectives
After completing this unit, you’ll be able to:
- Name several uses for the Developer Console.
- Decide whether to use the Developer Console or a different developer tool.
- Set up workspaces to organize your tabs.
An asteroid is hurtling toward your spaceship. You, as the commander of the spaceship, are responsible for your crew’s safety. Luckily, your ship is powered by Salesforce, so you have a handy console where you can monitor and program your systems as you prepare to take evasive action.
Similarly, you can steer your company’s Salesforce org toward customer success using the Developer Console. So, here comes the first question that you likely have before taking the controls: What is the Developer Console?
What Is the Developer Console?
The Developer Console is an integrated development environment (more typically called an IDE) where you can create, debug, and test apps in your org.
It’s your one-stop solution for a variety of development tasks.
- Navigate, open, create, and edit Apex classes and triggers, Aura components, and Visualforce pages and components.
- Browse packages that you’ve created in your org.
- Generate logs for debugging and analyze them using different perspectives.
- Test your Apex code to ensure that it’s error free.
- Identify and resolve errors by setting checkpoints in your Apex code.
- Write and execute SOQL and SOSL queries to find, create, and update the records in your org.
When Do You Use the Developer Console?
Now that you’re in the cockpit, you’re probably looking at the different options available to control your Salesforce-powered spaceship. To control a Salesforce org, some of the options available to you are the Salesforce Extensions for Visual Studio Code, the Developer Console, and third-party developer tools like the ones that you can download from AppExchange.
The Developer Console is connected to one org and is browser-based. If you want your changes to be effective immediately and you don’t want to install anything on your computer, we recommend the Developer Console. If you want to connect to multiple orgs, compare or synchronize files, or use version control, the Salesforce Extensions for Visual Studio Code is your best option.
Accessing the Developer Console
The first thing you learn as a commander is how to access your console. After logging in to your org, click Developer Console under the quick access menu ( ) or your name.
Lightning Experience |
Salesforce Classic |
|---|---|
|
|
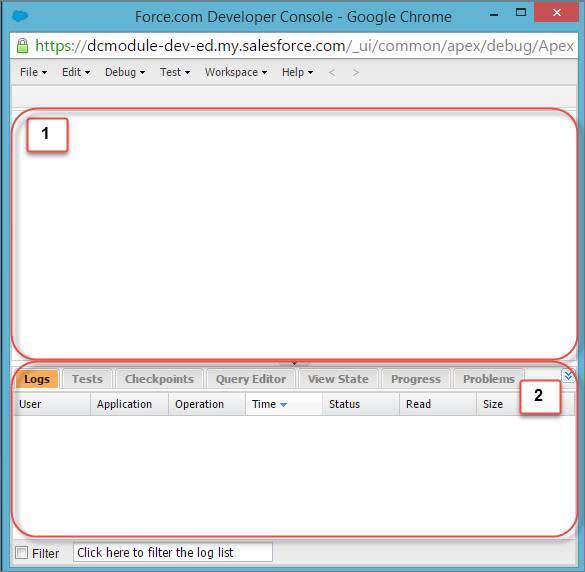
When you open the Developer Console for the first time, you see something like this.

The main pane (1) is the source code editor, where you can write, view, and modify your code. The tabs pane (2) is where you can view logs, errors, and other information, and write queries to interact with the records in your org.
Set Up Your Workspace
After you’ve opened the Developer Console, the next step is to decide how to set up your workspace.
What Is a Workspace?
If your pit stops are on the Moon and Mars, you have a different set of system checks and flight paths for each location. It would be confusing and overwhelming to have information about landing on Mars in front of you while you maneuvered your spaceship toward the Moon. Similarly, workspaces in the Developer Console help you organize information to show just what you need as you work on each of your development tasks. Although it sounds like a fancy term, a workspace is simply a collection of resources, represented by tabs, in the main panel of the Developer Console. You can create a workspace for any group of resources that you use together.
If you’re working on two different projects, you can have the related code, tests, and logs open simultaneously in separate workspaces. For instance, say you’re writing code to update some records for your engineering team, but you also want to check the system details for your navigation team. You can create two workspaces, each of which contains only the resources relevant to the project. Workspaces reduce clutter and make it easier to navigate between different resources.
When you use the Developer Console for the first time, you see the default workspace. Setting up your own workspace is easy. Let’s try it out.
Set Up Your Own Workspace
Select Workspace | New Workspace and give your workspace a name. In your new workspace, you can create Apex classes, Aura components, Visualforce pages, and more.
You can switch between your workspaces by selecting Workspace | Switch Workspace (1). In this way, you can work with code and analyze logs for each project just by opening a different workspace.

Resources


