Prepare for Your Demo
Learning Objectives
After completing this unit, you’ll be able to:
- Explain why burndown lists are used in demos.
- List demo preparation tasks.
- Set up your devices for demo delivery.
Track Progress with Burndown Lists
By now you know that preparations make or break a presentation. Staying on top of even the tiniest detail is important for success. But how do you know if you’re preparing properly? To plan for every possibility and not waste anyone’s time—including your own—create a burndown list.
Think of a burndown list as your to-do list. Write down everything that needs to happen prior to your customer presentation, and check off these items as you complete them. Burndown lists keep you organized and prepared throughout the entire demo-building process, and help you delegate tasks and track progress.
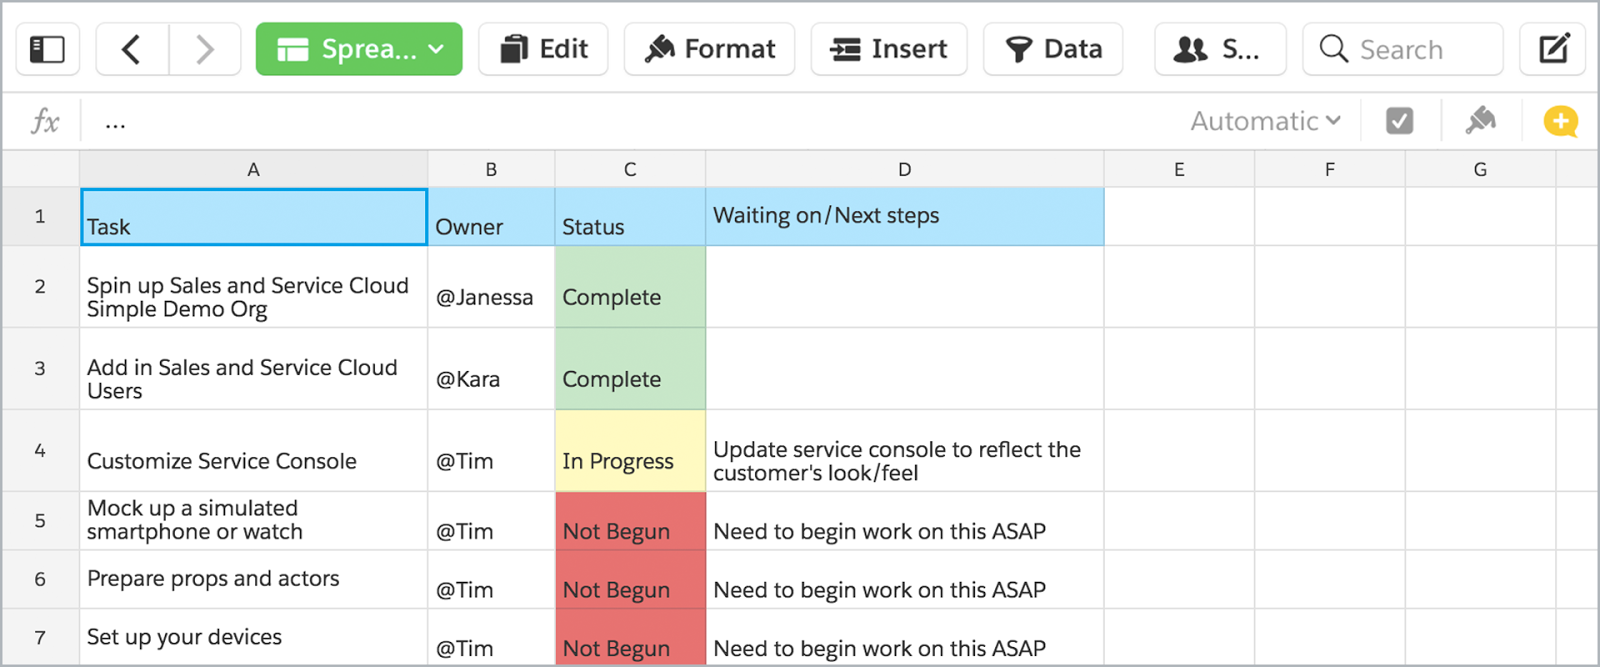
This is a sample burndown list created in Quip to see how it’s done. Task, Owner, Status, and Waiting on/Next Steps are the column headers. Seven tasks are assigned owners and given a status of “Not Begun,” “In Progress,” and “Complete.” The final column allows for helpful notes and comments.
Your burndown list includes many tasks that are specific to your demo. We’re going to use the previous burndown list to walk you through the following two tasks:
- Prepare props and actors.
- Set up your devices.
Prop Up Your Presentation
In our experience, adding a fun factor to your demo is a great way to transform average presentations into meaningful ones. This brings us to a key item on your burndown list: preparing props and actors.
Props and actors liven up demos by making them more fun and engaging. Think about it. If you’re not having fun while presenting, do you think your customer’s having fun?
Now, we know what you’re thinking: isn’t including actors and props a little childish for a professional presentation? The answer is no. Actors and props make the intangible nature of products real and physical. Here’s an example:
In a demo with a Fortune 50 Company, our demo team told an inspirational story about a factory manager who dispatched a maintenance worker using Service Cloud Lightning. Instead of just talking about Service Cloud Lightning’s features, one of the demo team members dressed up as a repair technician, knocked on the door of the conference room, and walked up to the actual CIO of the Fortune 50 Company to have him sign off on a work report. Delighted, the CIO said it was the best demo his company had ever seen—the actor made the experience real and memorable.
Bringing in props and actors doesn’t have to be hard or expensive. The hard hat cost $15, and the demo team borrowed the jumpsuit. Add creativity to your demo by taking a step back and looking at your story. Could you add extra energy by having people physically act out a portion of the demo? Is there a prop that would make the story more real? This is your chance to get creative, so embrace it!
Set It Up
You now have the first item checked off on your burndown list. What’s next? It’s time to set up your devices for the big day.
When we say “devices,” we mean laptops and smartphones. There are lots of fun ways to show off technologically, so let's start by setting them up to:
- Preload tabs.
- Transition between desktops.
- Record on QuickTime.
- Disable notifications.
Never Break the Magic
Don't break the magic of your flawless demo by making your customers wait for screens to load. Instead:
- Preload your content in multiple tabs.
- Organize your tabs from left to right.
- Maximize your browser to full screen.
- Press Command + Option + right arrow to switch between tabs in Chrome on a Mac.
To deliver a great demo, think about all the little things that make really great impressions. If you plan to return to a previously shown screen in your demo, load it again as a new tab so that you’re always moving forward. Then, before switching tabs, hover your mouse where you’re pretending to click. Seamless!
Swipe to Success
When your demos span several products or services—in Salesforce’s world, examples would be Sales Cloud, Service Cloud, and Marketing Cloud Engagement—you can transition clearly between screens by taking advantage of desktops in MacOS. (This is a Mac-specific tip—sorry, Windows folks.) When we say desktops, we’re not talking about those big bulky towers that fit beneath your desk. We’re talking about the working area of a computer screen that contains icons representing files, folders, and a wastebasket.
Set up a separate desktop for each section of your demo. Then, swipe left or right with four fingers to navigate between your desktops, or upward to sort your desktops. This process makes your demo look polished and helps you keep it on track and organized.
Here’s how you activate multitouch gestures on a Mac:
- Open System Preferences.
- Click Trackpad.
- Click the More Gestures tab.
- Select Swipe between full-screen apps.
- Select Mission Control.
Another way to transition between desktops is to use an A/V switcher. We recommend using either a Roland V-1 HD Portable 4X HDMI input switcher or a Gino PC Monitoring 4-in-1 Out VGA Ports audio switcher.
If you use a VGA output and want to export the audio as well, use an audio cable—typically a 3.5-millimeter headphone jack cable.
Lights, Screencast, Action!
Next, set up QuickTime as your primary iPhone screencasting software and AirDroid as your primary Android screencasting software. Both are far less likely to crash than AirServer, a screen-mirroring program, and are easy to use.
|
QuickTime |
AirDroid |
|
|
Note: For AirDroid, it’s best if both of your devices are on the same network. This reduces the risk of connectivity issues.
Dodge Murphy’s Law of Demos
Imagine: You’re projecting your screen, walking your customer through a key slide, when an untimely iMessage pops up. Save yourself from that embarrassment and disable all mobile notifications.
- Click Settings.
- Click Notifications.
- Select an app from the Notification Center.
- Turn off Allow Notifications for every app.
Never show up to a demo unprepared, and don’t let anything stop you from presenting an awesome demo.