Control Access to the Org
Learning Objectives
After completing this unit, you’ll be able to:
- Create, view, and manage users.
- Set password policies.
- Limit the IP addresses from which users can log in.
- Limit the times at which users can log in.
Control Access to the Organization
When you make sure that only employees who meet certain criteria can log in to Salesforce, you’re protecting your data at the broadest level. You do this by managing authorized users, setting password policies, and limiting when and where users can log in.
Manage Users
Every Salesforce user is identified by a username, a password, and a single profile. The profile defines default settings, such as login restrictions and password policies. Then, you assign additional permission sets and permission set groups that determine what tasks users can perform, what data they see, and what they can do with the data.
To view and manage the users in your org, from Setup, in the Quick Find box, search for and select Users. The user list shows all the users in your org.
Sign Up for a Developer Edition Org
To complete this module, you need a special Developer Edition org that contains sample data. Get the free Developer Edition and connect it to Trailhead now so you can complete the challenges in this module. Note that this Developer Edition is designed to work with the challenges in this badge, and may not work for other badges. Always check that you’re using the Trailhead Playground or special Developer Edition org that we recommend.
- Sign up for a free Developer Edition org with sample data.
- Fill out the form:
- For Email, enter an active email address.
- For Username, enter a username that looks like an email address and is unique, but it doesn’t need to be a valid email account (for example, yourname@example.com).
- For Email, enter an active email address.
- After you fill out the form, click Sign me up. A confirmation message appears.
- When you receive the activation email (this might take a few minutes), open it and click Verify Account.
- Complete your registration by setting your password and challenge question. Tip: Save your username, password, and login URL in a secure place—such as a password manager—for easy access later.
- You are logged in to your Developer Edition.
Now connect your new Developer Edition org to Trailhead.
- Make sure you’re logged in to your Trailhead account.
- In the Challenge section at the bottom of this page, click the org name and then click Connect Org.
- On the login screen, enter the username and password for the Developer Edition you just set up.
- On the Allow Access? screen, click Allow.
- On the Want to connect this org for hands-on challenges? screen, click Yes! Save it.
- You’re redirected back to the challenge page and ready to use your new Developer Edition to earn this badge.
Create a User
You can create users—even multiple users—in just a few clicks. It’s as simple as entering a username, alias, and email, and selecting a role, license, and profile. Many more options are available, of course, but that’s all you need to get started.
Salesforce auto-generates a password and notifies new users immediately. Users can change or add to their own personal information after they log in.
- From Setup, in the Quick Find box, search for and select Users.
- Click New User. Or you can click Add Multiple Users to add up to ten users at a time.
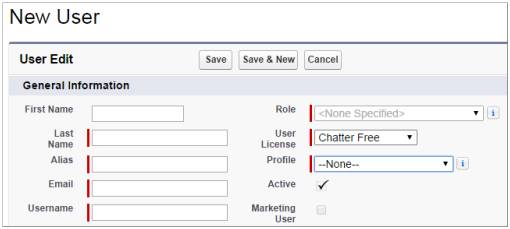
- Enter the user’s name, email address, and a unique username in the form of an email address. By default, the username is the same as the email address.
- Select the user license that this user will have. The license determines which profiles are available for each user.
- Select a profile, which specifies the user’s default settings.
- Select the option to generate a new password and notify the user, then save.
Deactivate a User
You can’t delete a user, but you can deactivate an account so a user can’t log in. Deactivated users lose access to all records. (That includes records that are shared with them individually and records shared with them as team members.) However, you can still transfer this data to other users and view the names on the Users page.
- From Setup, in the Quick Find box, search for and select Users.
- Click Edit next to the name of the user you want to deactivate.
- Clear the Active checkbox and click Save. If you can’t immediately deactivate an account (for example, when the user is selected in a custom hierarchy field), you can freeze their account. That prevents the user from logging in while you’re working on deactivating them.
- On the Users page in Setup, click the username of the user whose account you want to freeze.
- Click Freeze.
- On the Users page in Setup, click the username of the user whose account you want to freeze.
Set Password Policy
You can configure several settings to ensure that your users’ passwords are strong and secure.
Password Policies
Set password and login policies, such as specifying an amount of time before all users’ passwords expire and the level of complexity required for passwords.
User Password Expiration
Expire the passwords for all the users in your org, except for users with “Password Never Expires” permission.
User Password Resets
Reset the password for specified users.
Login Attempts and Lockout Periods
If a user is locked out due to too many failed login attempts, you can unlock the person’s access.
- From Setup, in the Quick Find box, search for and select Password Policies.
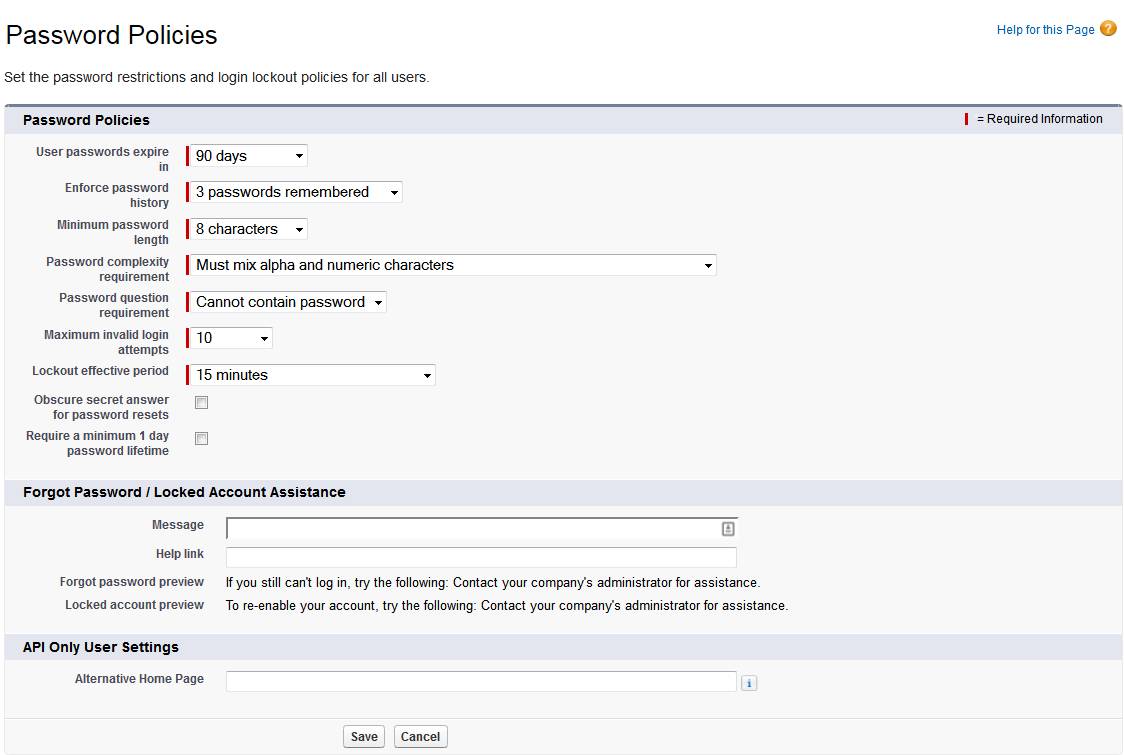
- Customize the password settings.
- How long should passwords be? Longer is usually better, within reason.
- How complex do you want your passwords to be? You can require alphabetical, numeric, uppercase, lowercase, or special characters.
- How many days is a password valid?
- How many times can someone try to log in with invalid credentials before being locked out?
- How long should passwords be? Longer is usually better, within reason.
- Choose what to do about forgotten passwords and locked accounts.
- Click Save.
You can also configure password policies at the profile-level. Profile password policies settings override the organization-wide password policies for that profile’s users.
Specify Trusted IP Ranges for the Org
The first time you log in to Salesforce, the IP address is cached in your browser. Anytime you log in from a different IP address, you’re asked to verify your identity, typically by entering a verification code. You can bypass this step for trusted IP ranges. For example, suppose that your users should be able to log in without entering a verification code whenever they are in the office.
- From Setup, in the Quick Find box, search for and select Network Access.
- Click New.
- Enter the start and end point of the range of trusted IP addresses, and click Save.
If you have an address outside this range, you aren’t excluded from logging in. You simply have to verify your identity by entering a verification code.
Restrict Login Access by IP Address Using Profiles
By default, Salesforce doesn’t restrict locations for login access. If you do nothing, users can log in from any IP address. You can restrict where users can log in from using profiles. For example, suppose that certain users shouldn’t be able to log in if they’re using an IP address outside of the office.
- From Setup, in the Quick Find box, search for and select Profiles.
- Select a profile and click its name.
- Click Login IP Ranges. If you don’t have Enhanced Profile Interface enabled, scroll down to the Login IP Range related list.
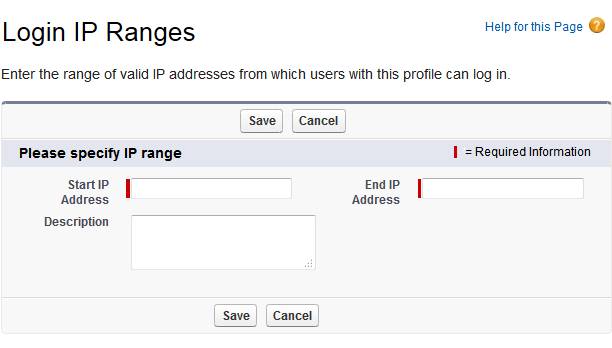
- Click New.
- Enter the start and end point of the range of trusted IP addresses, and click Save.
Now all users with this profile who are outside the trusted range can’t log in. When using profile IP ranges, there are no verification codes to worry about—a user is either in or out.
Restrict Login Access by Time
For each profile, you can specify the hours when users can log in. For example, if you decide your call center employees really only need to look at customer data while they’re taking phone calls from nine to five, you can make it so they can’t log in during evenings and weekends.
- From Setup, in the Quick Find box, search for and select Profiles.
- Click the profile you want to change.
- Under Login Hours, click Edit.
- Set the days and hours when users with this profile can log in to the organization.
- To allow users to log in at any time, click Clear all times.
- To prohibit users from using the system on a specific day, set the start and end times to the same value.
- To allow users to log in at any time, click Clear all times.

Now you know how to control access to your Salesforce org. In the rest of this module, you delve into the other three levels for controlling data access: objects, fields, and records.
Resources
- Salesforce Help: Licenses Overview
- Salesforce Help: Control Login Access Policies
- Salesforce Help: Restrict Login IP Ranges
- Salesforce Help: Configure Default Settings in Profiles