Add a Forecast Metric
Learning Objectives
After completing this unit, you’ll be able to:
- Introduce actual amount derived from sales agreements into forecast calculations.
- Add a metric by traversing the nodes of a Data Processing Engine (DPE) definition.
Add Sales Agreement Actual Amount
Cindy swiftly moves on to the next requirement: Add the Actual Amount field from sales agreements to forecast calculations. She’s already added the field on the Advanced Account Forecast Fact object and defined it as a measure in the forecast set. She gets started with the definition Generate Account Forecast_AMER Sales Forecasts.
First, she must introduce this new field in all the applicable nodes. Actual Amount is a metric derived from sales agreements and the values are specified for each product within an agreement. So, Cindy starts with the data source node Sales Agreement Product.
- Open the definition Generate Account Forecast_AMER Sales Forecasts.
- Click the data source node Sales Agreement Product and click Selected Fields.
- Select the field Total Actual Amount and click Done.
- Click Done to save.

- Click the reference node hyperlink to open the next node.
Next, she follows the trail of reference nodes and adds the field in all the corresponding nodes.
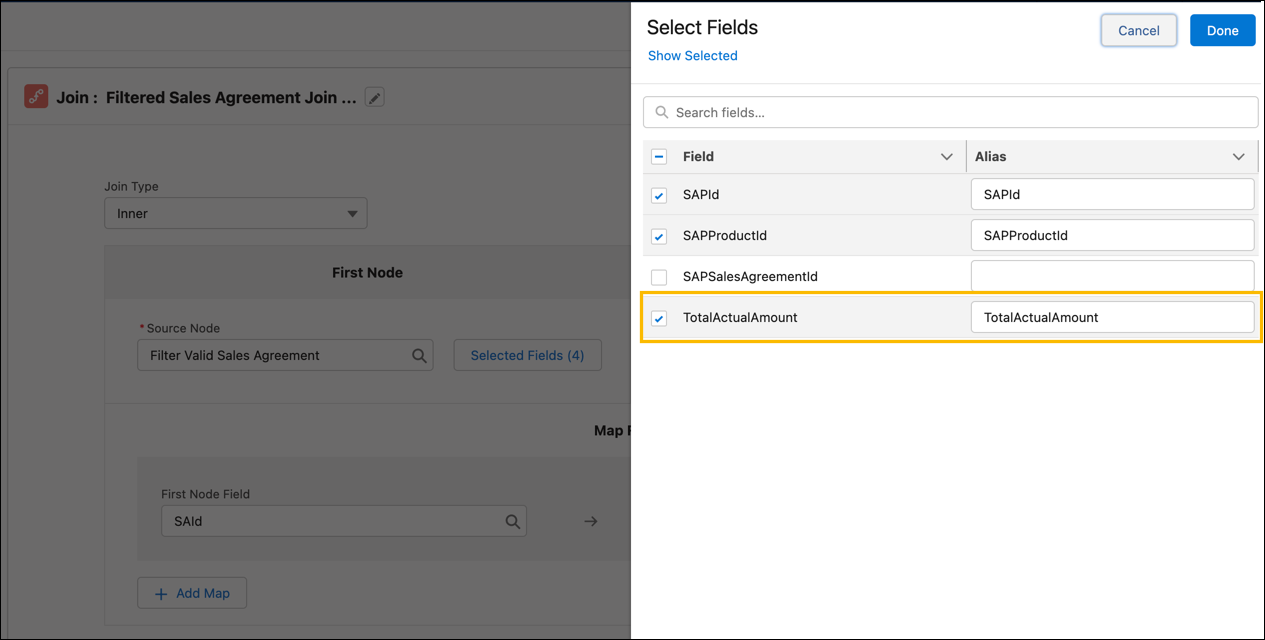
- On the node Filtered Sales Agreement Join Sales Agreement Product, in the Second Node section, click Selected Fields.
- Select TotalActualAmount and click Done.
- Click Done to save.
- Click the reference node hyperlink to open the next node, Filtered Sales Agreement Join Sales Agreement Product Schedule.
- In the First Node section, click Selected Fields.
- Select TotalActualAmount and click Done.
- Click Done to save.

- Click the reference node hyperlink to open the next node.
- Follow steps 5–8 for the node Valid Sales Agreement Join Upserted Account Forecast Set Partner.

- The next two nodes don’t require changes. Use the reference links to skip these two nodes.
- Identify Sales Agreements Within Account Forecast Set Partner Date Range
- Filter Valid Sales Agreement Within Account Forecast Set Partner Date Range
- Follow steps 5–8 for the next two nodes.
- Valid Sales Agreement Within Acct Frcst Set Partner Date Range Join Active Prod
- Valid Sales Agreement Join Account Forecast Set Partner Period Data

These nodes don’t require any changes. Click the reference node hyperlinks to skip them.
- Identify Valid Period Nodes For SAPS Start Date And End Date
- Filter Valid Period Nodes For SAPS Start Date And End Date
- Compute End Of Last Period And Sales Agreement Effective Date
- Compute Number of Applicable Days For SAPS Quantity Calculations
- Fetch Sales Price From Last Period For Calculation
- Determine Last Period Quantity And Revenue For SAPS Calculation
- Compute Quantity From Applicable Periods In SAPS Period Join Data
- Compute Applicable Quantity And Revenue In SAPS Period Join Data
12. Click Save.
Follow the Trail
Next, Cindy defines an aggregate field to store the cumulative actual amount for a single period.
- Open the definition Generate Account Forecast_AMER Sales Forecasts.
- Find and select the node Aggregate Records To Consolidate SAPS Period Join Data.
- Click Add Aggregate and specify the following:
- Alias:
ConsolidatedTotalActualAmount - Select Function: Sum
- Select Aggregate Field: TotalActualAmount
- Click Done.

- Click the reference node hyperlink to open the next node, Sales Agreement Metrics Data Join Account Forecast Set Partner Period Data.
- In the First Node section, click Selected Fields.
- Select ConsolidatedTotalActualAmount and click Done.
- Click Done to save.
Next, Cindy must ensure that the actual amount gets considered when the periods of sales agreements are matched with the periods of an account forecast.
- Find and select the node Compare Sales Agreement Metric Line Item Close Date With Period Range.
- Click Add Formula and specify the following:
- Alias:
TotalActualAmountForCurrentPeriod - Field Type: Number
- Length:
16 - Decimal Places:
2 - Formula:
IF({LeftPeriodId}=={PeriodId}, IF({SalesAgreementEffectiveDate} >= {PeriodStartDate} && {SalesAgreementEffectiveDate} <= {PeriodEndDate}, {ConsolidatedTotalActualAmount}, 0), 0)
- Click Validate Syntax to verify the formula and click Done.

- Click the reference node hyperlink to open the next node.
Next, Cindy ensures that for each forecast fact record created or updated for a product-period combination, the total actual amount for all applicable sales agreements is aggregated as a field value.
- On the node Aggregate SAPS Records To Remove Duplicate For Forecast Facts, click Add Aggregate, and specify the following:
- Alias:
ComputedTotalActualAmount - Select Function: Sum
- Select Aggregate Field: TotalActualAmountForCurrentPeriod
- Click Done.

- Click the reference node hyperlink to open the next node.
- On the node Append Consolidated Opportunity Order SA Metric Data For Forecast Facts, select Unique source nodes.
- Click the reference node hyperlink to open the next node.
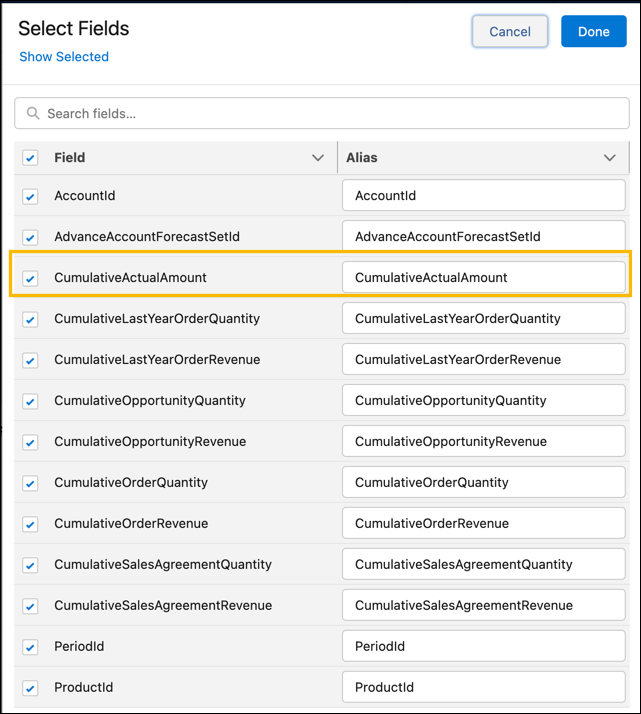
- On the node Aggregate Account Forecast Fact Records To Eliminate Duplicates, click Add Aggregate, and specify the following:
- Alias:
CumulativeActualAmount - Select Function: Sum
- Select Aggregate Field: ComputedTotalActualAmount
- Click Done.

- Click Save.
Add the Alias
Cindy is almost there! She now ensures that the new alias CumulativeActualAmount is available in the next set of referenced nodes.
- Open the node Generated Account Forecast Facts Join Active Products.
- In the First Node section, click Selected Fields and select CumulativeActualAmount.
- Click Done and Done.
- Click the reference node hyperlink to open the next node.
- Follow steps 2–4 for the next three nodes:
- Generated Account Forecast Facts Join Periods
- Generated Account Forecast Facts Join Filtered Accounts
- Generated Account Forecast Facts Join Existing Account Forecast Facts
- No changes are required to the next two nodes.
- Sort Before Writeback
- Compute IsActive Attribute On Account Forecast Fact
- Click Save.
Map It Up!
Finally, Cindy maps the alias she’s used to consolidate the actual amount (CumulativeActualAmount) with the custom field (Actual_Amount__c) on the object Advanced Account Forecast Fact. This step ensures that data is written back to the required field.
- On the node Upsert Account Forecast Fact Record, click Add Row and specify the following:
- Source Node Field: CumulativeActualAmount
- Target Field: Actual_Amount__c
- Click Done.

- Click Save.
Onward and Upward
Cindy is finally finished and feels a sense of accomplishment, and if you’re following, go ahead and reward yourself. She can now run the updated definitions to check out the new forecast grids. Cindy used two approaches to customize her DPE definitions: JSON and UI. Cindy listened to the needs of her stakeholders and successfully paved the way for more nuanced and flexible forecasting needs.
The true power of Advanced Account Forecasting lies in the power of DPE and the customizations you can make within the definitions to automate calculations. Are you ready to apply the knowledge for your own forecasting requirements?
Resources