Connect to a Data Source
Lesson Objectives
After completing this unit, you'll be able to:
- Describe the types of data you can connect to from Tableau.
- Explain how Tableau connects to a data source.
- Connect to a live data source using Tableau Desktop.
Why Connect to a Data Source?
Suppose you are a data analyst for a large retail chain. Your manager just got the quarterly sales report and she noticed that sales seem better for some products than for others, and profit in some areas are not as high as she had expected. But she needs more insight to make a decision.
As an analyst, it’s your job to look at overall sales and profitability to see if you can find out what's driving these numbers. She asks you to identify areas for improvement and present your findings to the team. The team can then explore your results and take actions to improve sales and profitability.
The first step in starting analysis is to connect to your data and then work with the data in Tableau.
As an option you can follow along using the Superstore data source found in the Tableau Desktop free trial. We won't test you on it, but it can help illustrate the experience we talk about here. Note, the free trial can take a few minutes to download and only lasts for a limited number of days.
Later in this module, you go through simulated steps to familiarize yourself more with Tableau Desktop. Let’s start with how Tableau Desktop connects to data.
What Types of Data Can You Connect to in Tableau?
Tableau supports connecting to a wide variety of data, stored in a variety of places. Your data might be stored on your computer in a spreadsheet or a text file, or in a big data, relational, or cube (multidimensional) database on a server in your enterprise. Or, you might connect to public domain data available on the web such as U.S. Census Bureau information, or to a cloud database source, such as Google Analytics, Amazon Redshift, or Salesforce. Tableau supports all of this and more.
Explore Data Connectors
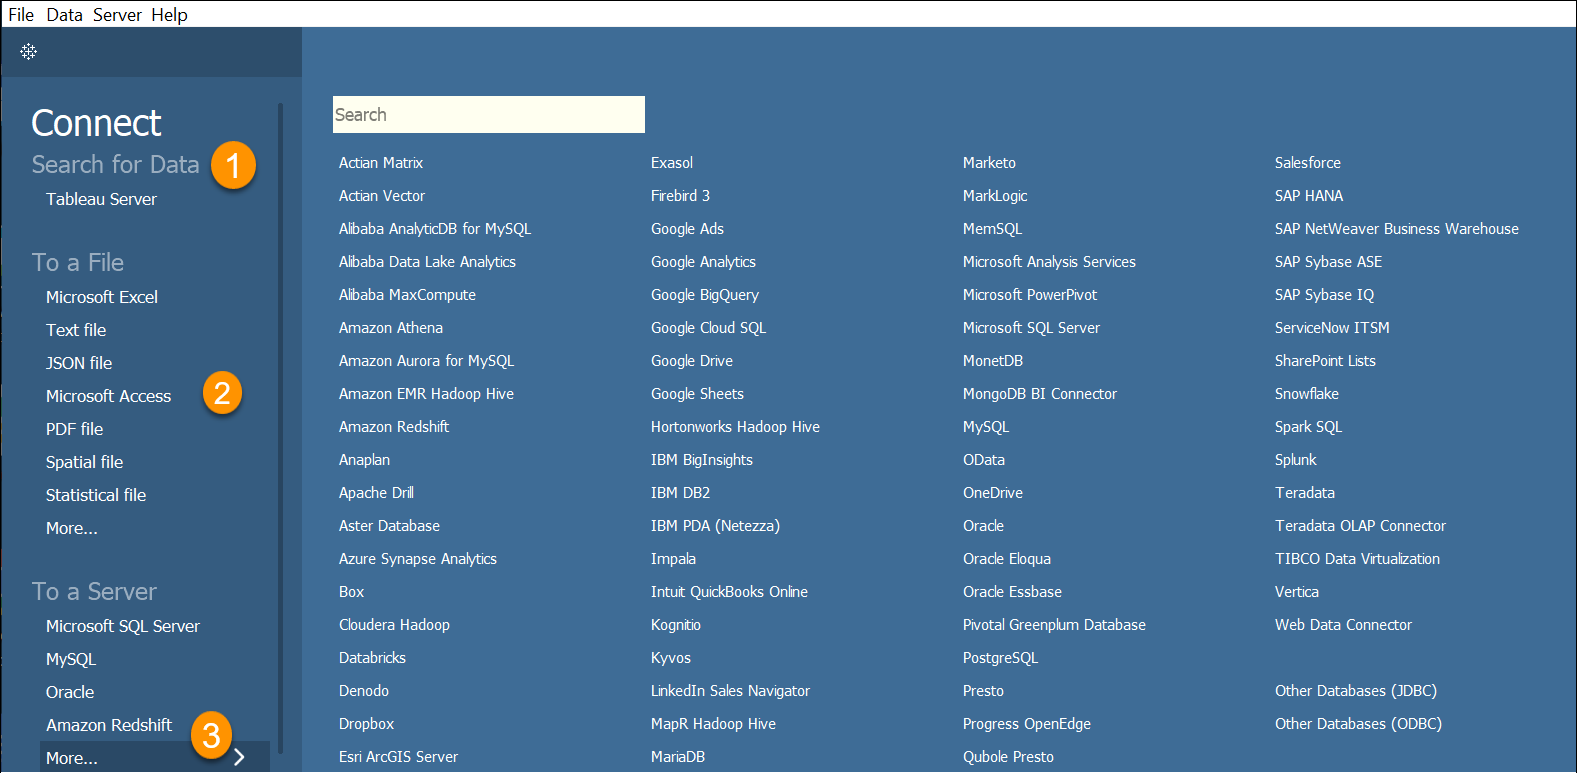
For supported files and databases, Tableau provides native connectors that are built and optimized for them. When you launch Tableau Desktop, the data connectors that are available to you are listed in the Connect pane, which is to the left of the Start page.
- (1) Under Search for Data, you can select Tableau Server to find data using Tableau Server or Tableau Cloud.
- (2) File types are listed next, then common server types, or servers that you've recently connected to.
- (3) You can click More to see the complete list of data connectors you can use.

Live Connection vs Extracts
By default, Tableau maintains a live connection to your data. A live connection is a direct connection to your data, while a Tableau data extract is a compressed snapshot of data stored locally and loaded into memory.
Connecting live leaves the data in the database or source file. This is best when you’re connecting to a high performance database and you want to use some of its capabilities, or to get up-to-the-second changes in data visualized in Tableau.
You can alternatively choose to extract the data into Tableau's high performance in-memory data engine. This option is useful when you connect to a slow database or when you want to take query load off critical systems.
Create a Live Data Connection
To create a data connection, you use the Connection page.
| If you want to |
Do this |
|---|---|
| Connect to a file |
Under To a File, choose the file type, and browse to the file on your machine you want to connect. |
| Connect to a server |
Under To a Server, choose the server type and enter the appropriate server information. |
| Connect to a saved data source |
Under Saved Data Sources, choose the saved data source. |
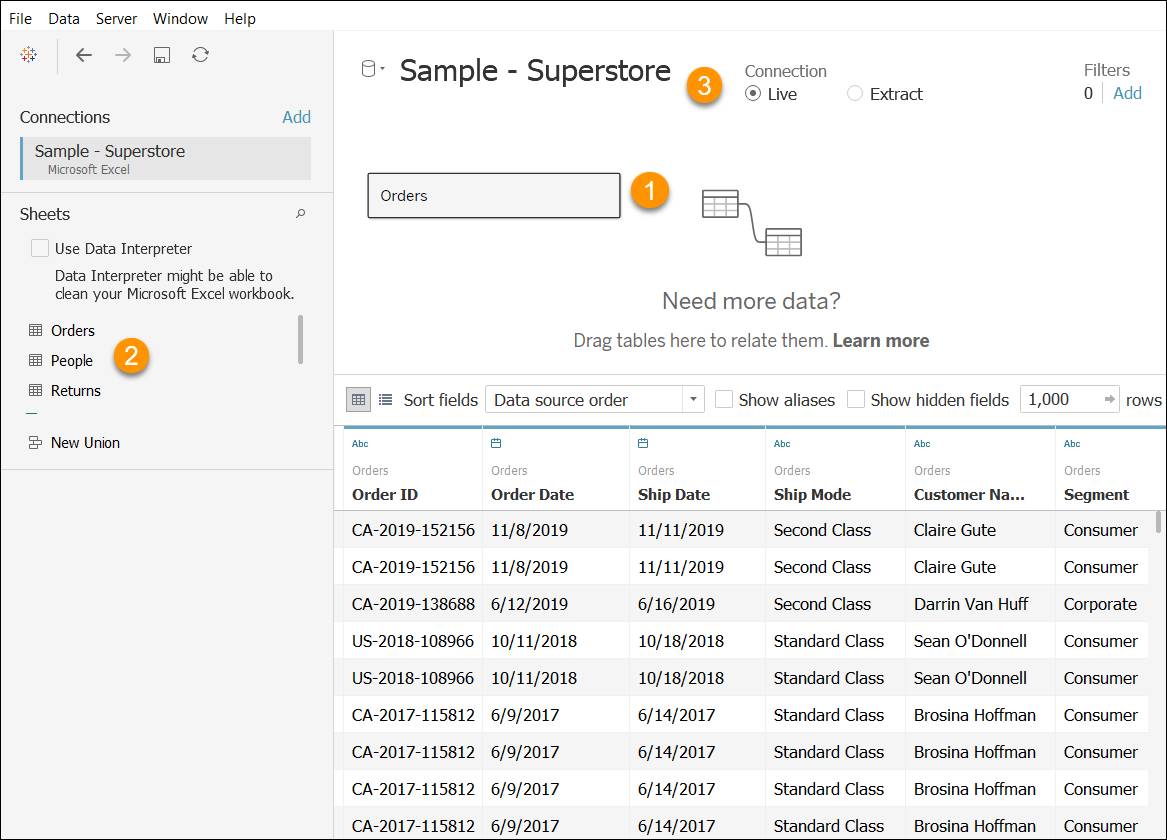
After you connect, Tableau takes you to a new workbook. To view or modify your data, you can switch to the Data Source tab.
When you connect a source that has multiple tables, you see that Tableau starts with the first table (Orders in this case) alphabetically (1). You can then double-click another sheet (2) or drag it next to the migrated data to relate them, so you can create more insightful visualizations.

Note that in the upper area of the window toward the right, under Connection (3), Live is selected by default.
To start work on a visualization, at the bottom of the screen, click Sheet 1 or ![]() to start a new Worksheet.
to start a new Worksheet.
In the next unit, you make changes to the data to customize it for your own analysis work and then save it.
