Build Automated Reports
Learning Objectives
After completing this unit, you’ll be able to:
- Create a report.
- Define report export settings.
- Set an automatic delivery schedule for sharing.
Get to Know Reports
Reports are an easy way to retrieve, view, and share a detailed analysis of the data you integrate into Marketing Cloud Intelligence. Within a report, the data uploaded into the platform is displayed in a flat-file format and includes selected dimensions and measurements within a defined time range.
Marketing Cloud Intelligence reports can be set to run as part of a workflow, in real time, or according to a defined schedule. Reports can be saved locally and shared by either email or via shared cloud platforms.
Aside from helping you better understand your data, reports can be used for many different purposes, like:
- Creating a customized performance report for a campaign in order to share with a client or other stakeholders.
- Creating exception reports where you can validate your data and make sure it is up to date—like validating your data classifications, for example.
There are two types of reports you can create:
- Data Reports, which display your data in either an Excel, CSV, TSV, or TXT file.
- Visual Reports are a screenshot image of a selected dashboard page and can be exported as either a PNG, PDF, or PPT file.
In this unit, we explain how to define the data and visual report properties and set an automatic delivery schedule.
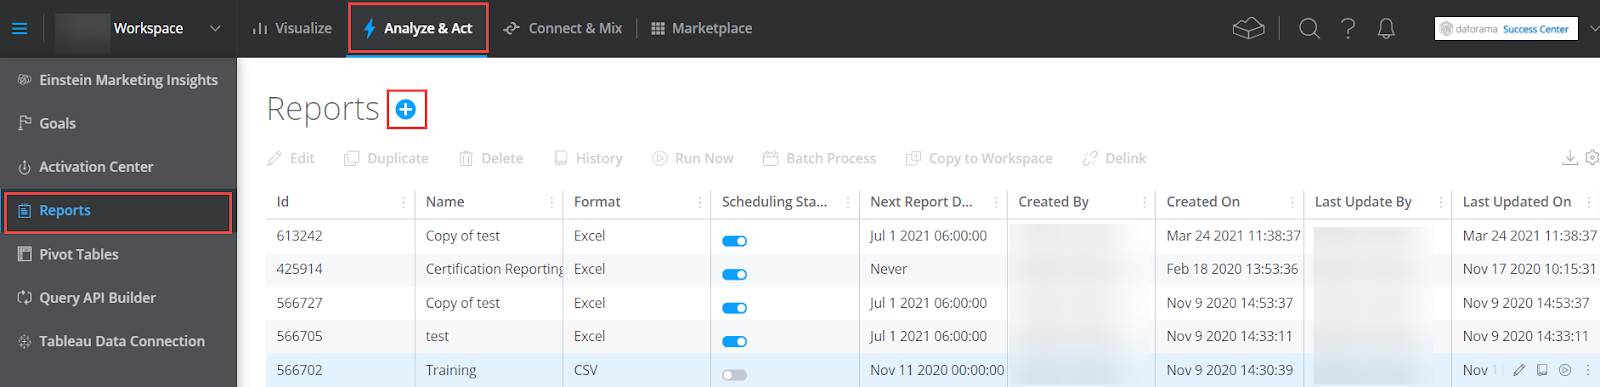
Create a Report
Once you’ve integrated your data into Marketing Cloud Intelligence, you can generate a report. Reports are based on the data that exist in your workspace. To create a report, in Marketing Cloud Intelligence navigate to Analyze & Act then Reports. Click the Add New (+) icon, next to Reports. After the Report window opens, you can define your report settings.
Define the Report Export Format and Settings
Marketing Cloud Intelligence allows you to export and customize your reports in a file format which can be shared. For example, you can choose to create a report in an Excel format. Let’s walk through an example. To use the Excel export format, you need to define the name of each Excel Sheet and choose whether you want to include column headers in the file.
In the General section, enter a Name (1) for your report and select the Export Format (2). You can add a Description (3) to help you remember what this specific report is about. In this case, we’ll name the report, My Report and select Excel in the Export format.

The options in the Configuration section change based on the type of Export Format you select. In this example, we show the configurations for the Excel export format. Define the TimePeriod (1), and select the Measurements (2) and Dimensions (3) you want to add to the report. Next, decide if you would like your report to show the Totals (4), display only the Top Results (5), and determine a sorting variable (6) and sorting order (7).
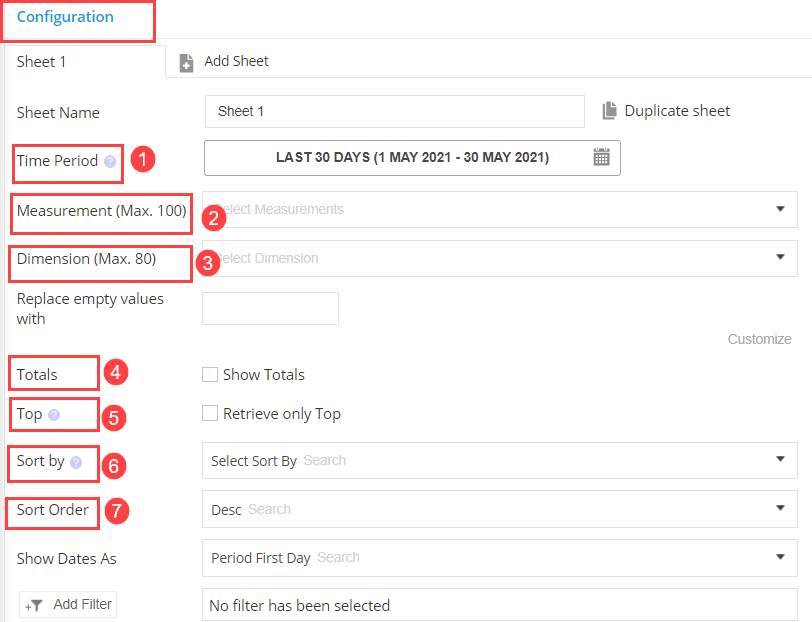
If you want to export a visual report, in the Configuration section you will need to define the Collection (1), DashboardPage (2), and the Widget (3).

Set an Automatic Delivery Schedule
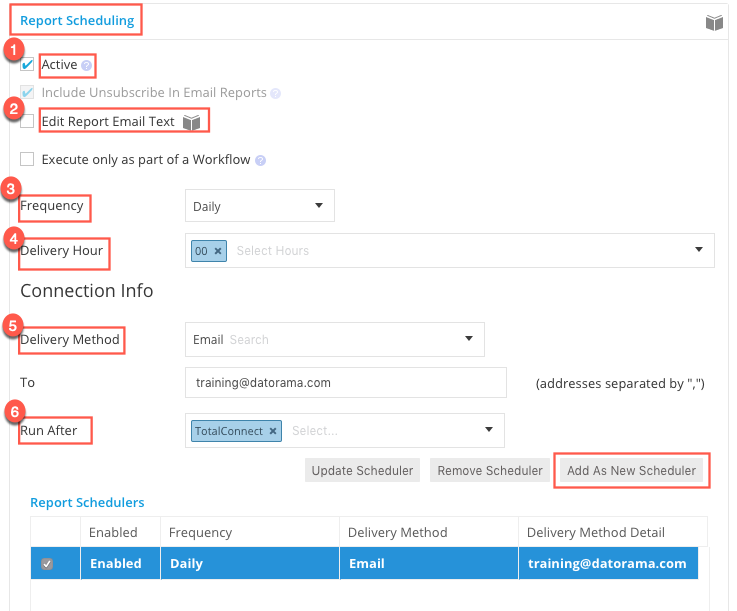
Reports are set to run as part of a workflow or according to a defined schedule. When a report is executed according to a scheduled time, it is defined as a Scheduler. You can set up multiple schedulers per report, depending on your needs. For example, you can send the same report to your leadership team on a weekly basis, and to your analytics team on a daily basis.
To enable an automatic delivery for your report, in the Report Scheduling section you must select Active (1). After you select the active checkbox, you can configure the following properties.
- Enable the Edit Report Email Text (2) to modify the email content.
- Define the Frequency (3) and Delivery Hour (4) of when to run the report.
- Enable the Execute only as part of a Workflow field to only run the report as part of the workflow.
In the Connection Info section, define the following settings:
- Define the Delivery Method (5) used to send the report and when to run it. In our example we used email as the delivery method, and set the email address we want the report to be sent to.
- If you’d like the report to run after a certain data stream, in the Run After (6) field, specify the data stream name and click Add As New Scheduler.
When you are finished defining your report, there are three available options.
-
Save: This option saves the report to the report table.
-
Save & Run: This option saves the report and runs the report immediately.
-
Run Now: This option allows you to run a report and get the result instantly, even in edit mode, without needing to save it or go to the report history log.
Now that you know your options and the steps to create a report, check out the following video, which demonstrates how to create and configure an automated report.
Marketing Cloud Intelligence’s reports and pivot tables are great tools to help you analyze and share your data. We hope this module helps you better manage your data and collaborate with your colleagues.