Use Product Options to Construct Bundles
Learning Objectives
After completing this unit, you’ll be able to:
- Construct a bundle using product options.
- Sort product options.
- Drive selection behavior.
- Control how sales reps can change quantities.
Follow Along with Trail Together
Want to follow along with an expert as you work through this step? Take a look at this video, part of the Trail Together series on Trailhead Live.
(This clip starts at the 40:06 minute mark, in case you want to rewind and watch the beginning of the step again.)
Create Bundles for Your Reps
Speed up the quoting process and make sure your sales reps sell the right products together by creating bundles they can add to quotes. As an admin, you create the bundles your sales reps choose from. As you’ll see, making bundles is about as easy as packing a lunch.
Product Options Basics
A bundle is really just a bunch of products that we know should be sold together. For example, you might want to sell a printer, toner, paper, and two paper trays together. Those are all just products, much like the ones you’d see in any org. The magic happens when CPQ knows they’re supposed to be sold as a set.
You start building a bundle by choosing a lead product, one that’s always part of the bundle no matter what. It’s usually the most important piece of the bundle. In our printer bundle example, the printer itself is the best choice for the lead product. All of the other bundle products are like followers, tagging along whenever the printer is put on a quote.
After you decide on a lead product, how do you specify which products should tag along? Use a Product Option record. Think of the Product Option as the leash between a dog and the dog-walker. Without the leash, the dog doesn’t stay part of the pack for very long. With the leash, the dog goes where the dog-walker goes.

Order and Selectability
A Product Option (for simplicity, we’ll just call this an option from now on) does more than just connect a follower product to the lead product. It also describes how the follower behaves in the bundle. Here are a few option record fields that control option behavior.
-
Number: Sorts the options on the Configure Products page. The lower the number, the higher in the list the option appears.
Tip: Number your options in increments of 10. That way, if you need to slip a new option between the first (10) and second (20), you can number it 15 without having to renumber everything.
-
Selected: Selects the option by default. Choose Selected for an option when you want to give your sales reps guidance about what’s typical for a configuration.
-
Required: Selects the option and prevents sales reps from deselecting it. The selection box is grayed out.
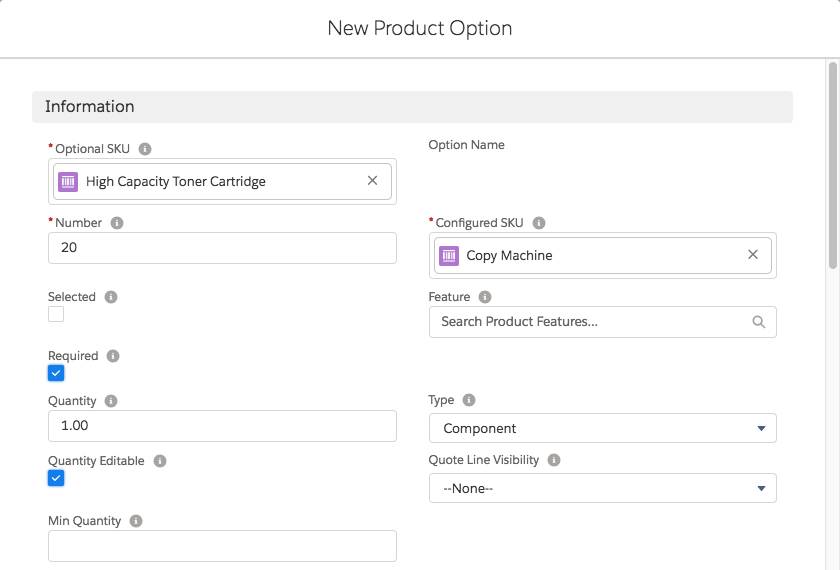
Here we see the Option record for the High Capacity Toner Cartridge. Notice that the Number is 20, and the Required Checkbox is true. In the screenshot, we see what happens in the Configure Products page. The toner option appears second in the list, and its checkbox is checked and gray, meaning it’s required.

Quantity Controls
You can use Options to control what changes your sales reps can make to the quantity of products within bundles. The table below shows how to use Quantity, Quantity Editable, and Min Quantity fields on the option to achieve different goals.
Goal |
Quantity Field |
Quantity Editable Field |
Min Quantity Field |
|---|---|---|---|
Always require a quantity of 3; no changes allowed |
3 |
False |
<blank> |
Suggest a starting quantity of 1, and let sales reps change it |
<blank> |
A blank quantity field causes CPQ to leave quantity editable, so the Quantity Editable field is ignored |
<blank> |
Suggest a starting quantity of 5, and let sales reps change it |
5 |
True |
<blank> |
Suggest a starting quantity of 8, let the sales rep change it, but require at least 6 |
8 |
True |
6 |
Suggest a starting value of 10, and let the sales rep change it to anything 10 or greater |
<blank> |
A blank quantity field causes CPQ to leave quantity editable, so the Quantity Editable field is ignored |
10 |
The Max Quantity field is similar to Min Quantity, putting an upper limit to the quantity value allowed for the option.
Creating a Bundle
Creating a bundle takes only a few clicks. Let’s step through making a copy machine bundle that includes the copy machine itself, a binding module, a high capacity toner cartridge, and a case of paper. The copy machine is the lead product, and we encourage the sales rep to sell the binding module by preselecting it. The toner cartridge is required, and we also suggest a starting value of five cases of paper.
- Click Products in the navigation bar, then choose the All Products list view.
- Click Copy Machine.
- Click the Related tab.
- In the Options related list, click New.
- In the Optional SKU field, search for and select Copy Binding Module.
- In the Number field, enter
10.
- Check Selected.
- In the Quantity field, enter
1.
- Click Save.
Great! We have the start of our Copy Machine bundle, which has the binding module tagging along for the ride.
If you want to finish the bundle, repeat the steps for the other options, with only a few variations depending on the product.
Optional SKU |
Number |
Selected |
Required |
Quantity |
Quantity Editable |
|---|---|---|---|---|---|
High Capacity Toner Cartridge |
20 |
False |
True |
1 |
True |
Copy Paper Letter |
30 |
True |
False |
5 |
True |
Once you’re done setting up your bundle, try adding it to quote Q-00002 on the Copy Machine Replacement opportunity for Edge Communications so that you can see your bundle in action!

Summary
As we’ve seen, creating a bundle is really a matter of making connections between related products and configuring the behavior you want your reps to experience. This is just the beginning of a bigger story. In the next unit, we take a look at some other things we can do with options to make bundling even better.
Resources