Learn About Configured Code and Description
Learning Objectives
After completing this unit, you’ll be able to:
- Generate a custom code to dynamically represent bundle internals.
- Generate a custom description to dynamically represent bundle internals.
Follow Along with Trail Together
Want to follow along with an expert as you work through this step? Take a look at this video, part of the Trail Together series on Trailhead Live.
(This clip starts at the 1:22:13 minute mark, in case you want to rewind and watch the beginning of the step again.)
Introduction
Sometimes bundles have special product codes that represent how they’ve been configured. For example, you can give a special code, LAP-P28-R16-H512, to a laptop with a 2.8GHz processor, 16GB RAM, and 512GB hard drive, so that other teams in your business, like order fulfillment, can get configuration information at a glance. Since CPQ knows how the laptop is configured, it can use that information to generate the special code automatically and put it into an out-of-the-box quote line field, Package Product Code.
Creating a Configured Code
How does CPQ know to use “-P28” when a rep selects the 2.8GHz processor, and how does it know to put it after “LAP” in the code? Three fields work together to construct the Package Product Code.
To illustrate how to use these fields, let’s see how we’d add codes to the 15" Laptop product.
- Click Products from the navigation bar, then choose the All Products list view.
- Click 15" Laptop.
- Click the Related tab.
- From the Options related list, open the dropdown menu for CPU 2.2GHz i7 and click Edit.
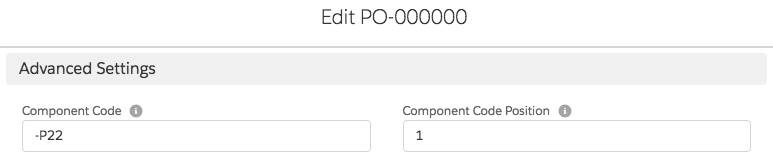
- For Component Code, enter
-P22.
This is the bit of text you see in the Package Product Code.
- For Component Code Position, enter
1.
The Component Code Position field acts as an index of sorts. In the convention we set up, all CPU options use 1, all memory options use 2, and all storage options use 3.
- Click Save.
- From the Options related list, open the dropdown menu for CPU 2.5GHz i7 and click Edit.
- For Component Code, enter
-P25.
- For Component Code Position, enter
1.
- Click Save.
- From the Options related list, open the dropdown menu for CPU 2.8GHz i7 and click Edit.
- For Component Code, enter
-P28.
- For Component Code Position, enter
1.
- Click Save.
For this example, we only update the CPU-related options, but if you want to finish the setup you can update the remaining options with these details.Option Name
Component Code
Component Code Position
RAM8GB
-R8
2
RAM16GB
-R16
2
SSD 256GB
-H256
3
SSD 512GB
-H512
3
Now we tell our lead product how to use this information
- Return to the 15” Laptop record and click Edit.
- For Configured Code Pattern, enter
LAP{1}{2}{3}.
This field tells CPQ how to construct the code string. First there’s the constant three letters LAP, followed by whatever text is used for the CPU choice, then the text for the memory choice, then the text for the storage choice.
- Click Save.
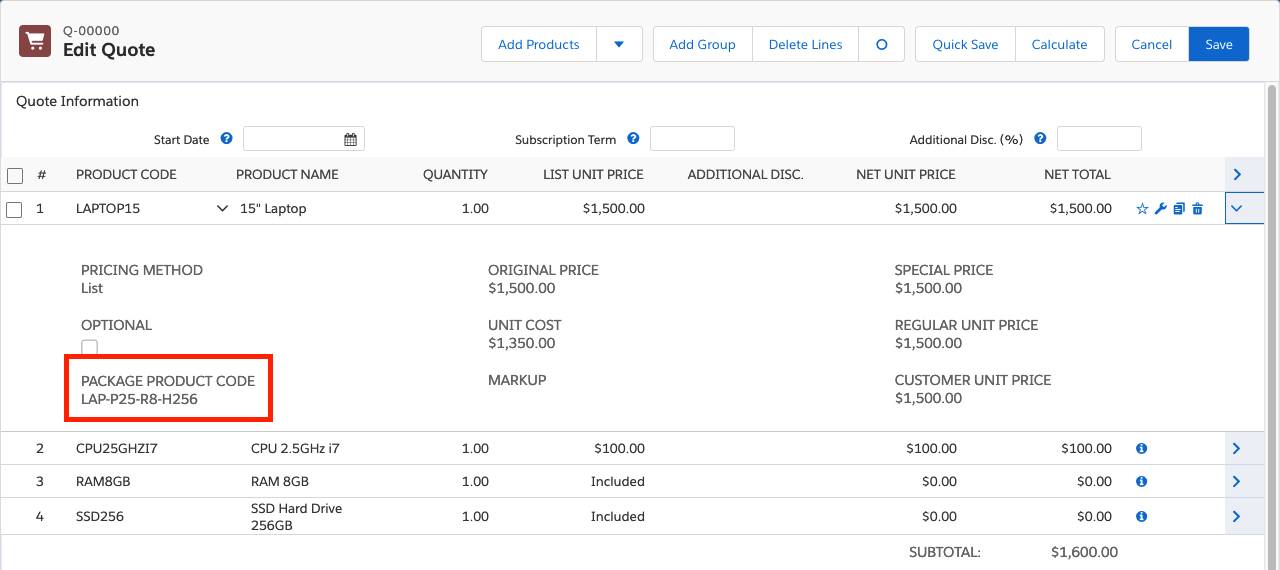
Package product codes do require a bit of extra data entry, but the result is cool. To check if your work adds up to a nice new package product code, add a 15" laptop to Q-00000 on the Laptop for Front Office opportunity for Edge Communications. (Delete (  ) the old laptop on the quote, since it was configured before we set up the package product code.) Then open the line item drawer (
  ) for the new laptop. You see that the Package Product Code field reflects your selected processor.
Package Product Description
The Package Product Description field is similar to Package Product Code, but you usually use this field to give information to the customer about the bundle in the form of friendly text. Using the Component Description and Component Description Position fields, you can concatenate whole sentences drawn from the selected options to construct a paragraph. These fields operate in the same way as the Package Product Code fields, using placeholders such as {1} in a Configured Description Pattern field. Then, put Package Product Description on proposal documents to give an accurate description of the customer's specific bundle configuration.
Summary
You can use configured code and description patterns to make it even easier for your sales reps to put together a quote. They can add all the right parts in just a few clicks, and the right product descriptions are ready to go. We now have a truly hassle-free configuration experience. Good job, admin!
Resources