Set Up Participants
Learning Objectives
After completing this unit, you’ll be able to:
- Explain participant roles.
- Add participant roles for individual users and teams.
- Explain participant groups.
- Add members to participant groups.
- Add participant groups within other participant groups.
Explore Participant Roles
At Cumulus, the Corporate Investment Banking team needs an ethical wall keeping their information private and isolated from the Capital Markets team.
How do you build this wall in Compliant Data Sharing? By setting up precision sharing based on contextual roles. You create these roles by configuring Participant Role settings in Compliant Data Sharing. When you add users to a record and assign participant roles, only those assigned users have access to the record.
So, at Cumulus, the team adds only users from the Corporate Investment Banking division so that they can access financial deals like the Northern Trail Outfitters (NTO) merger. Compliant Data Sharing then makes sure that no one from Capital Markets or any other team has access to confidential deal information.
In this unit, follow along with the steps to set up these participant roles and also participant groups.
Add Participant Roles for Individual Users
Cumulus needs three participant roles to manage their sensitive data for their deal. Here’s a summary of those roles.
-
Compliance Manager makes sure that the team complies with regulations and policies while handling financial deal data. This role needs read/write access for financial deals.
-
Corporate Investment Banking Associate manages the details of a financial deal and updates its status. This role also enables users to manage other participants, so it needs read/write access for financial deals to collaborate on the deal and update information.
-
Corporate Investment Banking Analyst needs access to the deal record to get data for research and preparation. This role doesn’t need editing privileges, so it has read-only access.
Here’s how to create these participant roles.
- From Setup, in the Quick Find box, enter
participant, and select Participant Roles.
- On the Participant Roles page, click New.
- Specify these details.
- Participant Role Name:
Compliance Manager - API Name:
Compliance_Manager, which generates automatically
- Parent Object: Financial Deal
- Default Access Level: Read/Write
- Select Active.
- Participant Role Name:
- Save your work.
Repeat the same steps to create Corporate Investment Banking Associate and Corporate Investment Banking Analyst participant roles, but change the Default Access Level as needed.
Keep these limitations in mind as you set up participant roles.
- Participant roles apply to only one object, so the roles you create for the Financial Deal object don’t apply to Account or any other objects.
- Each object can have a maximum of 10 active participant roles.
- After you create a participant role, you can’t change its parent object.
- You can only assign active participant roles when you add participants to records.
You apply participant roles to both individual participants and participant groups. Explore participant groups now.
Explore Participant Groups
In Compliant Data Sharing, participant groups help users efficiently share a record with a group of users without having to create individual participant records for each team member. Everyone in a group gets the same participant role when added to a record, so all the members inherit that access level automatically.
You can add a maximum of 100 participant groups to each parent record.
When configuring a group, Salesforce admins can add individual users or other participant groups as members. You can create up to 5 levels of participant groups.
At Cumulus, for example, there’s one group for the Retail Merger Compliance team who all get the same Compliance Manager participant role.
Create Participant Groups
Explore how to set up this group.
- From Setup, in the Quick Find box, enter
participant, and select Participant Groups.
- On the Participant Groups page, click New.
- Specify these details:
- Name:
Retail Merger Compliance - Developer Name:
Retail_Merger_Compliance, which generates automatically
- Name:
- Save your work.
The next step is to add members to the group.
Add Members to Participant Groups
Here’s how to add members to the retail coverage team.
- On the Participant Groups page in setup, select Retail Merger Compliance.
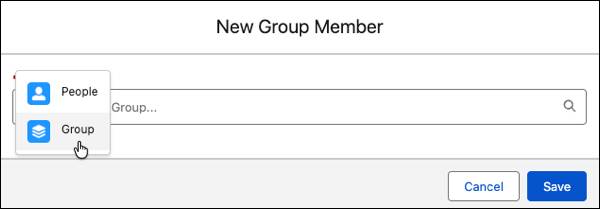
- Click Add Member.
- In the User or Group picklist, enter the name of the participant and select it.
- Save your work.
- Repeat this process for each member of the group.
At Cumulus, there are only two members of the Retail Merger Compliance team now, but as the team grows you can add more members to the team.

By default, you can’t deactivate a user who belongs to a participant group and must remove users from participant groups before you deactivate them. If your company prefers, you can enable a setting to deactivate a user and retain their inactive participant and participant group member records. Read Deactivate a User and Retain Inactive Participant Records in Salesforce Help to learn more.
Add Groups Within Groups
Earlier you learned that participant groups can include both users and groups.
At Cumulus, the Retail Merger Compliance team is part of a broader Retail Deal Coverage team that includes associates, as well. One group can contain them all because they can use the same participant role.
- On the Participant Groups page, click New.
- Specify these details:
- Name:
Retail Deal Coverage Team - Developer Name:
Retail_Deal_Coverage_Team, which generates automatically
- Name:
- Save your work.
- On the Retail Deal Coverage Team page, click Add Member.
- In the User or Group picklist, select Group.
- In the Search Group field, enter
complianceand select Retail Merger Compliance from the list. Click to view the members of the group.
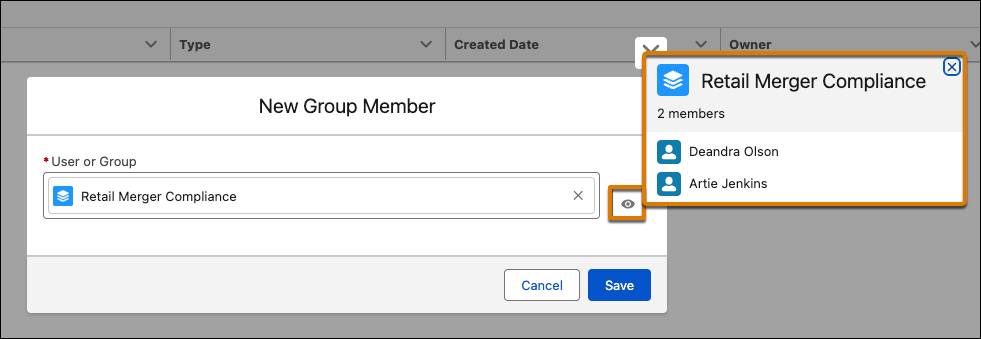
- Save your work.
- Add other individuals to the group as needed.
You can then view the group, including its group and individual members, on the page.
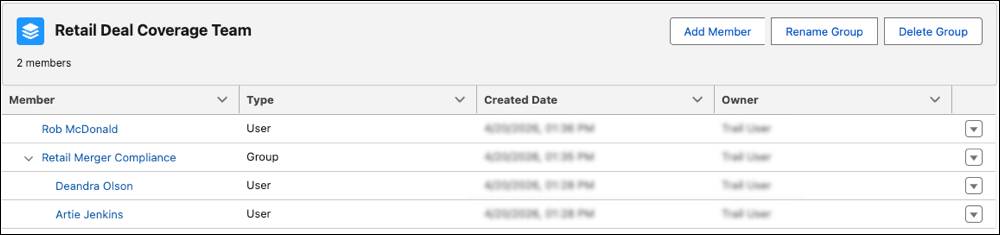
Now, Cumulus can use this single group that includes both individuals and a group in any retail merger.
Resolving Access for One User in Multiple Groups
In the previous section, you learned about groups within groups. But what if a single user is part of several different groups? What if the groups have different access levels?
If a user is part of two groups with different access levels, Compliant Data Sharing gives them the most permissive access.
As an example, a financial deal record includes two participant groups. The first group has read-only access, while the second group has read/write access. A user in both groups gets the more permissive read/write access to the record.
What’s Next?
In this unit you learned how to create participant roles and participant groups in Compliant Data Sharing, including how to define access levels for individual users, build groups for entire teams, nest groups within groups, and how Compliant Data Sharing resolves access conflicts when a user belongs to multiple groups.
In the next unit, you'll learn how to add participants to a record, track who has access by using the Sharing Detail page, and understand how Compliant Data Sharing works alongside other Salesforce sharing features.
Resources
- Salesforce Help: Manage Participant Roles in Compliant Data Sharing
- Salesforce Help: Manage Participant Groups in Compliant Data Sharing