Create Actions for Claim Coverages
Learning Objectives
After completing this unit, you’ll be able to:
- Configure an Integration Procedure to open a claim coverage.
- Create an action that calls the appropriate Integration Procedure to create a claim.
Prepare to Automate
Remember how Phil, our adjuster, easily opened claim coverages from the Claims Adjuster Workbench? He made a few clicks, entered some details, and it was done.

Claim product rules take this efficiency to the next level. They automatically open the necessary coverages based on the information gathered during the first notice of loss (FNOL). But to make this magic happen, Justus, our solution architect, needs to set up a few things behind the scenes.
For each claim coverage, he creates:
- An Integration Procedure that calls the createUpdateCoverage service to open a specific claim coverage.
- An action that triggers the Integration Procedure. He then links this action to the claim product rule.
Don't worry, you don't have to start from scratch. Instead, use the prebuilt examples to guide you. In this unit, learn how to customize these components to automate the claim coverage opening process.
Set Up the Integration Procedure
For the property claim, the Dwelling coverage already has an action and Integration Procedure configured that automatically opens the claim coverage when the action is invoked.
Earlier in this module, you created a rule on the claim product that invokes this action when certain conditions about the claim are met. Now, create a similar rule for the Personal Property coverage. This coverage doesn’t have a prebuilt action or Integration Procedure to open it.
Get ready to prepare the Integration Procedure.
First, open the Integration Procedure that opens the Dwelling coverage, ClaimProductRulesOpenBuildingCoverage.

Notice several components in the Structure panel, and take a closer look.
Investigate the Structure
The first component after the Procedure Configuration is a Set Values component that sets the CoverageName element to a value of “Dwelling.”

The next four components are all Data Mapper Extract Actions that extract important Ids needed to open the coverage, such as claimId, claimantId, and InsurancePolicyId.

The final Data Mapper Extract Action, getPolicyCoverage, uses the CoverageName element set in that first Set Values component, along with the Policy Id and Policy Asset Id, to retrieve the Insurance Policy Coverage Id.

Finally, the openCoveragePropertyItem is a Remote Action component that calls the InsClaimCoverageService:createUpdateCoverage service.

Unlike the createUpdateClaim service, which uses an input key to reference a large string of Input JSON, the createUpdateCoverage service simply references several remote options to serve as its input.

These options include the IDs extracted during the various Data Mapper Extract actions and the Reserve Amount and Reserve Processing Mode for the claim.
Configure a New Version
Using this Integration Procedure as a model, you can easily configure a new procedure that opens the Personal Property Coverage.
First, create a new version of the original Integration Procedure and change the name, type, and subtype fields to reflect the Personal Property coverage.

On the Set Values component, change the value of the CoverageName to the Personal Property coverage.

Make sure to reference the name of the Insurance Policy Coverage, not the name of the Coverage Spec on the root product. The createUpdateCoverage service references the policy record, not the root product. In this example, the Insurance Policy Coverage is named Personal Property.
Next, change the default reserve amount for this claim coverage. Assume the average reserve amount for Personal Property claims is $5,000. Find the reserveAmount key in the Remote Action component and change the value accordingly.

If you want, call a decision table or third-party service to determine more precise amounts based on the specific loss scenario.
Finally, to make this Integration Procedure available for invocation from an Action, make sure to activate it. And that’s it; with these steps, you’ve created a new Integration Procedure that opens the Personal Property coverage.
Create the Action
Now that the Integration Procedure is in place, it’s time to create an action that references the procedure.
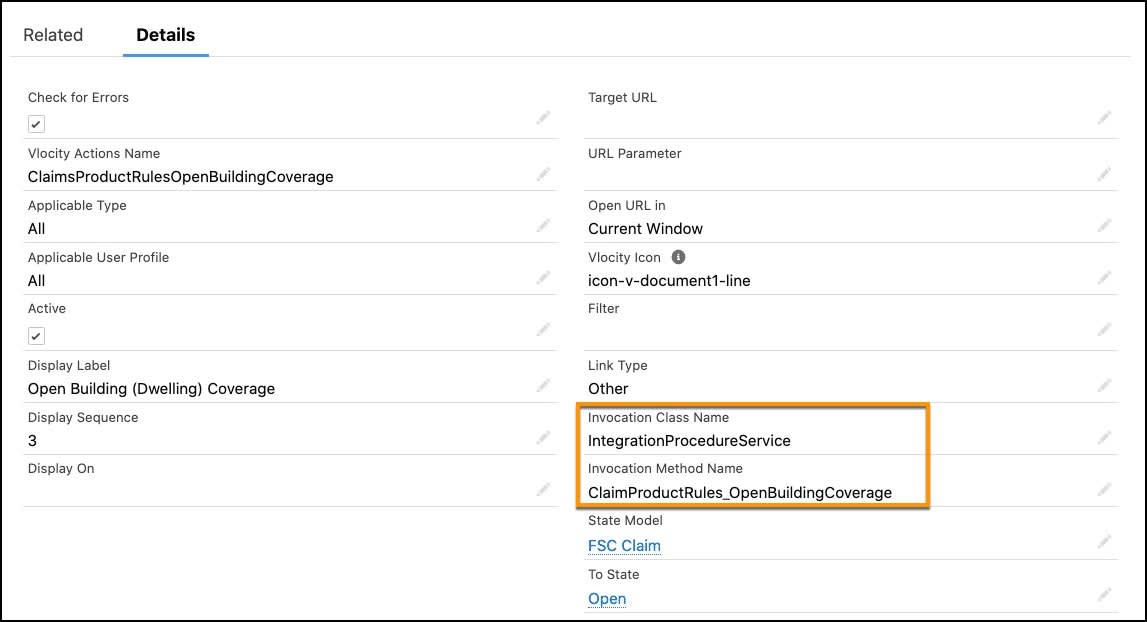
Once again, you can use an existing component as your model. Open up the action named ClaimsProductRulesOpenBuildingCoverage. This action calls the Invocation Class Name of IntegrationProcedureService. The Invocation Method Name references the Type/Subtype of the Integration Procedure.
Also, notice the action links to the FSC Claim State Model. If you don’t add an action to a specific State Model, it won’t be available in a rule.

Next, clone the original action, and change the Invocation Method Name to the appropriate Type/Subtype of the new Integration Procedure.

With these new components configured, Justus is confident that the Personal Property coverage will open automatically whenever the product rule conditions are met. This streamlined process should save time and reduce errors. Now that the automation pieces are in place, the final step is testing.
In the next unit, put it all together to see how the rule, Integration Procedure, and action work in concert.