Configure the Claim Data
Learning Objectives
After completing this unit, you’ll be able to:
- Describe the basic structure of the input JSON for claim creation.
- Trim the input JSON to support the claims model.
- Populate the input JSON with the appropriate data for claim creation.
Prepare the Data
Now that the product model, claim model, and insurance policy are in place, it’s time to create the claim itself. You call a dedicated service, createUpdateClaim, to generate the claim.
This service inputs JavaScript Object Notation (JSON) data to create a claim and its associated records.
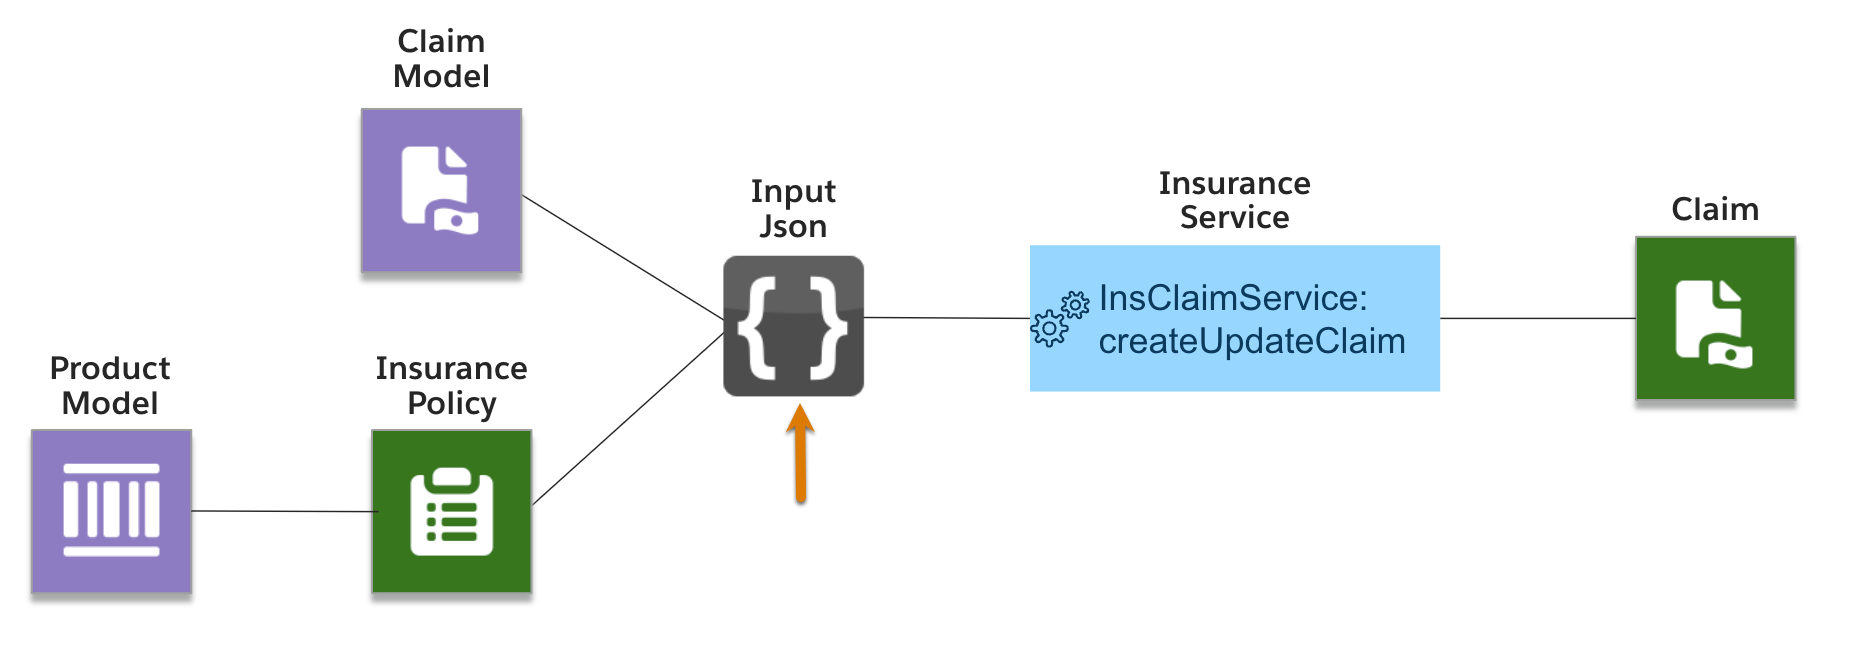
[Alt text: The diagram shows how input Json combines Claim Model and Insurance Policy information.]
In Insurance Claims Foundations, you learn how First Notice of Loss (FNOL) OmniScripts enable claimants to submit claims using guided processes. For this reason, end users of a claims solution don’t need to know anything about this JSON or how it interacts with specific services behind the scenes.
However, it’s vital for claims solution designers to understand the structure of this JSON and how to prepare it.
Remember Justus Pardo? He works as a solutions architect at Cumulus Insurance, a major insurance provider that wants to digitally transform its legacy claims system.

[Alt text: Headshot of Justus, a solution architect who works at Cumulus Insurance.]
In this unit, follow along as Justus tests his model by retrieving, trimming, and populating input JSON.
Retrieve and View the JSON
To retrieve the JSON data, navigate to the API tab of the claim product and select InsClaimService:createUpdateClaim from the dropdown menu.

[Alt text: API tab of Property Claim claim product with the appropriate service selected from the dropdown.]
After selecting the appropriate service, you see a long block of data. The content of this structured data depends on the claim specs and attributes.
The first step when working with input JSON is to understand its structure. So first, copy and paste the input data into a dedicated JSON editor, such as JSON Editor Online.
Here, Justus pastes the Property Claim input data into an editor, which converts the JSON into a tree view that makes it easy to parse the data.
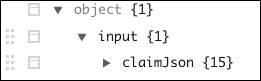
At the top level, all input data is stored in an object called claimJson.
Justus expands the claimJson object to find a claimPropertyItems object (1) and a claimPartyItems object (2).
Beneath some key-value pairs related to policy and claim details, he sees that the productCode (3) and productName (4) already contain specific values. These values come directly from the claim product. Always use the productCode, not productName or productId, as it is the most consistent property across different orgs.
Next, find out how to treat the Claim Property Items.
Trim the Claim Property Items
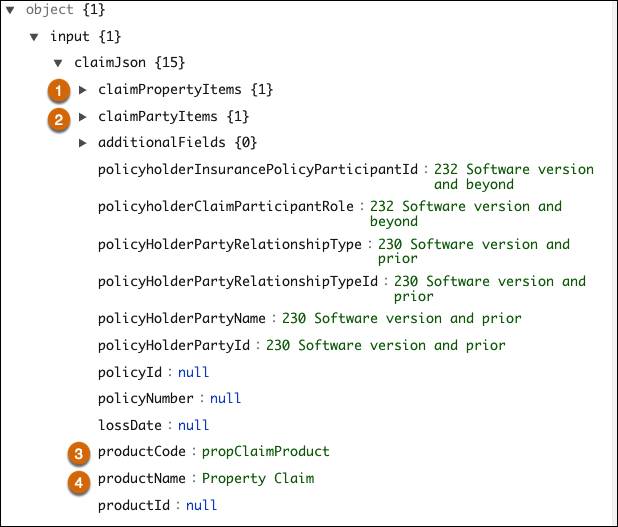
Justus expands the claimPropertyItems object, which contains a single array called claimDamagedProperty. The contents of this array correspond to the properties of the claim property spec added to the claim product.

[Alt text: Claim Damaged Property spec maps to the claimDamagedProperty JSON array.]
This array contains information about the damaged property involved in the claim.
Justus expands the claimDamagedProperty array and observes numerous key:value pairs.

[Alt text: JSON array for claimDamagedProperty containing many properties.]
The first 10 pairs contain information about the insured policy participant and roles. The productCode, productName, and productId follow.
Because Cumulus is building its claim system on the latest and greatest version of Agentforce Financial Services, Justus deletes all fields referencing an earlier software version. He also removes the productName and productId but keeps the productCode.

[Alt text: The trimmed JSON now reflects the simplified structure described in the text.]
Removing these pairs makes it easier to work with the remaining data.
For the remaining values, review the following table.
Field |
Value |
Description |
|---|---|---|
Id |
Claim Item record Id |
Only populate this field when updating a claim. In this example, the claim is new, so the field remains null. When updating a claim, populate this field to modify the existing claim. |
insurancePolicyParticipant |
Insurance Policy Participant record Id |
This claim has only one participant, Ernie Newton. Retrieve the appropriate participant id and paste it as the value. |
contactId and accountId |
Contact and Account record Ids |
Only populate these fields when there’s no Insurance Policy Participant to include. In this example, the insurance policy participant record already contains the contact and account ids of Ernie Newton. |
claimParticipant |
Claim participant role |
Add roles using the semicolon as a delimiter (Claimant; Insured). You can find and modify the list of valid values for this field in the object manager for the Claim Participant object under the Roles field. Here, Ernie Newton, the insurance policy participant, is the claimant. |
insuredItemId |
Insurance Policy Asset record Id |
In this example, the Insurance Policy Asset is Newton’s primary residence. Retrieve and paste the asset Id as the value. |
With the proper fields populated, our array looks much more manageable.
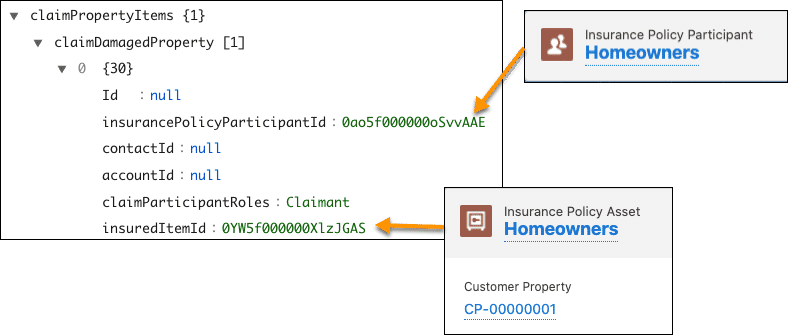
[Alt text: Arrows pointing from the Insurance Policy Participant and Insurance Policy assets to specific key:values in the array.]
The remaining pairs in the array all map directly to the attributes added to the Claim Damaged Property spec. During the FNOL, the claimant adds specific information about the claim. These inputs then become the updated values for the claim.

[Alt text: Graphic showing how product spec and attributes correspond to the JSON data as described in text.]
The Homeowners claim model only contains a single Claim Property Item. Other claims may involve more than one property. For example, auto claims often include multiple vehicles. In this case, the claimPropertyItems object contains an array with multiple items. Still, everything follows the same basic structure.
Clean Up the Claim Party Items
The claimPartyItems object is similar to the claimPropertyItems object. Rather than capturing details about the claim property, it stores information about the claim injuries.

[Alt text: Arrow pointing from Injury spec to the claimInjuredPerson array.]
The Homeowners JSON contains an array that maps to a single claim injury spec, claimInjuredPerson.
To trim and populate this array, follow the same basic steps as for the claim property item.
- Remove any pairs with a value of “232 Software version and beyond.”
- Delete the productName, productId, and heldProductRelationshipId fields.
- Populate the insurancePolicyParticipantId with the appropriate Id from the Insurance Policy Participant record. In this example, the Insurance Policy Participant is the same for the property and injury specs. However, these can differ, such as an accident where the vehicle’s owner is the insurance policy participant on the property, but a passenger is the insurance policy participant on the injury.
- If you have an insurancePolicyParticipantId, add a null value for the contactId and accountId. If the claim party doesn’t have an insurancePolicyParticipantId, create a contact or account record and use that record Id.
- Populate the claimParticipantRoles with the appropriate role. For this example, the claim party is again the “Claimant.”
- Add the appropriate values for all claim attributes.

[Alt text: Array is simplified as described in the text.]
After cleanup, the data is again much easier to work with!
Prepare Policy and Claim Product Details
Finally, Justus trims and populates the final section containing fields related to the policy and claim product.

[Alt text: Arrow pointing from complex JSON to simplified JSON.]
And with that, voila, Justus has prepared the claim JSON. Now, it can serve as the input for the createUpdateClaim service.
In the next unit, you learn how to configure an Integration Procedure to create a claim using these inputs.