Get to Know Power Attributes
Learning Objectives
After completing this unit, you’ll be able to:
- Describe the role of power attributes in the claims process to enforce policy terms and conditions.
- Describe how to create standard and power attributes.
- Explain the configuration of a power attribute.
- Explain the lifecycle of a power attribute.
Role of Power Attributes
In the previous unit, you explored the critical components of a product model and how they relate to claims. Now, it’s time to configure those attributes relevant to claims as power attributes.
What are power attributes? Compared to standard attributes, power attributes contain additional metadata that determines how power attributes are tracked as policy terms from the product model to the policy record, then on to claims against the policy.

Power attributes configure policy terms such as limits, deductibles, copays, and coinsurance. These attributes have specific definitions that allow the claims management system to enforce policy term requirements. If you want to use an attribute to enforce a policy term, you must first configure it as a power attribute and then add it to the root product or its child specs.
Create Power Attributes
Define power attributes using Attributes Designer, the same tool you use to create standard attributes. Create new attributes from scratch or add power attribute definitions to existing attributes.
When creating standard attributes, you define primary fields, such as Name, Code, and Display Sequence.

When defining power attributes, you define additional fields on the same panel, starting with the Attribute Class field.

For more information about the meaning of properties, such as attribute class and attribute scope, check out Insurance Claims Foundations.
Configure a Power Attribute
To understand how a power attribute functions across the claims process, consider the example of a limit attribute for a dwelling coverage on Cumulus’s homeowners product.
First, Justus creates a Building Limit attribute, filling out its standard and power attribute fields.

Here’s how Justus configures the Building Limit attribute.
- The attribute has a Limit—Currency attribute class (1) and Claim Coverage attribute scope (2).
- The applicable actions (3) and the applicable item and value type (4) are specified.
- The attribute doesn’t specify a benefit type (5), but we will look at such an example soon.
- The duration type (6) is not selected because any power attribute with a scope of claim or claim coverage will effectively have a duration type that lasts the entirety of a single claim. When handling policy and policy coverage scopes, specify whether the duration should span the policy term or calendar year.
After defining the standard and power attribute fields in Attributes Designer, Justus adds the attribute to a specific product or coverage spec. For the Building Limit attribute, he adds it to the dwelling coverage. Then, he adds this dwelling coverage to the root product.

The lightning icon (1) to the right of the attribute name indicates the attribute’s status as a power attribute. The name (2) field is set to Dwelling Limit. The value of this field determines what the claim adjuster will see when looking at the Policy Term Standings chart. It defaults to the attribute name, but you can specify any name. To match the coverage, Justus renames the Building Limit to Dwelling Limit.
View the attribute’s class, scope, and applicable item by hovering over the lightning icon.
Remember, where you model attributes is quite significant. Always model claim coverage and policy coverage scopes on the coverage specs. However, you can model claim and policy scopes on either the root product or the coverage spec, impacting their functionality.
- When modeling an attribute with a Claim or Policy scope on the root product, you ensure a single policy term is enforced across all claim or insurance policy coverages, regardless of which coverage spec the claim financials occur on.
- When modeling an attribute with a Claim or Policy scope on a coverage spec, you ensure a single policy term is enforced across all claim coverages or insurance policy coverages on an insurance policy, but only for that specific coverage spec on which the claim financials occur.
Follow the Lifecycle of a Power Attribute
Suppose a customer, Sophia Fournier, purchases a homeowners policy based on this product template. She selects a value of $1,500,000 for the building limit.
During the execution of the createUpdatePolicy service, an insurance policy term record is created for each power attribute. The insurance policy term record provides the structure that the Digital Insurance Platform needs to track the consumption of the policy term against its initial amount.
The policy term record contains information about the power attribute properties and associated policy records. Here’s the insurance policy term record for a Dwelling Limit power attribute.

This policy term record contains:
-
Related Records (1): Links to Insurance Policy, Insurance Policy Coverage, and Insured Policy Asset records.
-
Initial Amount (2): Stores the initial value of the Dwelling Limit, $1,500,000.00. This value is used during claim payment to help resolve the policy term standings.
-
Power Attribute Details (3): Contains all the information about its power attribute configurations. It has a Limit class, with a scope of Claim Coverage, and two applicable actions enabled.
Sophia, the policyholder, files a claim after her insured property suffers damage from a significant storm. She issues a claim on the dwelling coverage for $25,000. After conducting an investigation, the claims adjuster approves the claim. Once her claim meets the claim-level deductible of $1,000, Sophia receives a $24,000 payment on the claim coverage.
During this claim payment creation, a service creates a new record called Insurance Policy Terms Tracking Entry. This record represents the amount applied towards the limit.

This tracking entry contains:
-
Related Records (1): Links to the policy term, claim coverage, and claim coverage payment detail. This record is a child of the policy term record.
-
Initial Amount (2): Represents the amount remaining for this term before payment.
-
Posted Amount (3): Represents the amount paid for this loss item.
-
Remaining Amount (4): Represents the amount remaining for this term after payment.
The Policy Terms Standing chart on the claim automatically updates with the adjusted amount for the dwelling limit.

This chart reflects the calculations on the tracking entry record, with $24,000 used on this claim coverage attribute and $1,476,000.00 remaining. The pending amount represents the remaining loss reserve set on the coverage. In a claim scenario where the unpaid claim coverage payment details are greater than the loss reserve, the pending amount reflects the amount for the claim coverage payment details.
Next, Sophia submits a second loss payment detail for this Dwelling coverage. In addition to the roof damage, the property suffered foundation damage that requires repairs. Since this loss occurred during the same incident as the roof damage, she adds it to the same claim as a second loss payment detail on the Dwelling claim coverage. The cost for repairs is $18,000.
Once again, the claims adjuster investigates and pays this loss payment detail.

Paying the loss item creates a tracking entry containing updated calculations for the dwelling limit.

This record contains:
-
Related Records (1): Links to a newly created tracking entry containing the updated calculations for the dwelling limit.
-
Initial Amount (2): The Initial Amount is now $1,476,000.00, the total limit minus the previous loss payment for the Roof Damage.
-
Posted Amount (3): The Posted Amount of $18,000 is the payment made for this loss item.
-
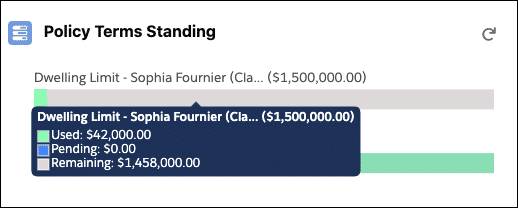
Remaining Amount (4): The Remaining Amount is now $1,458,000.00, the remaining limit amount for all payments made on this claim coverage for this specific claim.
The policy term standing chart again automatically updates to reflect the new tracking entry. $42,000 is now used on this claim coverage. The pending amount is zero because the reserves are now zero with no more unpaid claim coverage payment details. The remaining amount for the claim coverage is $1,458,000.
And that covers the basics of how power attributes are created and then processed during a claim. Remember, not all attributes are power attributes. Only create power attributes for product and coverage terms relevant to claims processing. In the next unit, explore the range of scopes in more detail.