Become a Chatter Expert
Learning Objectives
After completing this unit, you’ll be able to:
- Create a group.
- Create, edit, and delete a Chatter stream.
- Enable and configure Chatter email notifications.
Get Connected with Groups
If you’re a member of a team, collaborate on a project, or share an interest with coworkers, then groups are for you. Groups are the main collaboration space in Chatter.
A group is a collection of members united by a common project, cause, or interest. For example, you can set up a group for a team that delivers graphics to your Marketing department. You can set up a cross-collaboration group with members from both Graphics and Marketing. You can create a group for a sales team working in a common region. The point of a Chatter group is to offer a space for talking about a specific subject with others who are interested in or involved with it.
Groups can be private or public, and private groups can be listed or unlisted. Unlisted groups are not returned in searches and require invitations to join. Both listed and unlisted private groups can include or exclude your customers.
A group has its own feed where members collaborate around their central purpose. In group feeds, people share information, post updates, and ask questions.
Tip: On the Chatter page, you can see links to up to five of your most recently visited groups. Use these links to get to your most active groups quickly.

Use groups to post questions to team experts; share useful information; recognize team heroes; run polls for quick consensus; overall: to grow, maintain, and preserve group knowledge in a central spot.
Salesforce provides a few group types for different uses.
-
Public groups — Anyone in the company can join a public group, post and comment, and add files.
-
Private groups — Only the members of a private group can post, comment, and add files.
-
Unlisted groups — An unlisted group is hidden from everyone except the members of the group. Only the members of an unlisted group can post, comment, and add files. Admins can enable unlisted groups in your org’s Chatter Settings.
-
Broadcast Only groups — Group owners and managers can create posts; other members can comment.

Here’s how to create a public group.
- In your Trailhead Playground, click the Groups tab.
If Groups doesn’t appear on your navigation bar, from the App Launcher ( ), search for and select Groups.
- On the Groups tab, click New.
- Enter information about your group:
- Name:
Dream Team - Description:
Provides service and solutions to all other teams - Information: Skip this field for now. Later you can use it to link to files, list the group owner, or add other information that’s useful to your members.
- Owner: If you want someone else to be the owner of this group, click the X to delete yourself, then search for and select that person. (A group can have one owner but many managers. Group managers share the permissions of ownership.)
- Disable automatic archiving: Inactive groups are archived after 90 consecutive days. If you want to prevent a 90-day archive, select this checkbox.
- Access Type: Public.
- Click Save & Next.
- If you like, you can upload an image to represent your group. You can add an image any time, so skip it for now. Click Next.
- In the Manage Members window, you can search for and add people to your group. For now, click Done. You can add members later.
To edit the group later, open the actions menu on the group page and select Edit Group.

Select Manage Members to add people to your group or to promote members to group managers. Group managers have the same rights and privileges as the group owner, so they can share the load of managing a group.
Combine Multiple Feeds into One Stream
In Lightning Experience (and communities), you can combine multiple feeds from many kinds of objects into a single view, called a stream. Streams let you view lots of different feeds in one feed. Let’s say you want to read everything that’s posted about a project that you’re working on. With streams, you can combine feeds from the groups working on the project, the topics discussing it, and the people assigned to it. You can add any other feed type that’s related to the project. Instead of visiting many different feeds to get a complete view, you have this one stream to go to.
Depending on the way that you set up a stream, changes to the feeds that are included in a stream can trigger notifications. Streams notifications give you a way to get notified when record feeds are updated.
Look for streams in the left-side navigation panel on the Chatter home page.

Streams Rules of the Road
Your Chatter streams are your own and appear only in your view. You can create up to 100 streams, with each stream combining posts from up to 25 feeds. Create streams with feeds from people, groups, and records, such as accounts, opportunities, or cases.
You can also remove feeds from a stream. When you remove a feed from a stream, old activity continues to appear in the stream, but new activity doesn’t appear in the stream.
The Streams Home
Streams have a home page that you can get to by clicking the Streams heading on your Chatter home page. The streams home lists all your streams and shows the feeds that you added to each. Click the number of records on a row to see a full list of feeds that are in the stream.
Each stream row has its own set of row actions, including Edit and Delete.

Click a stream name to open that stream. Once there, you can see that the stream detail page has some actions of its own: Edit, Notifications, and Delete.

Use these actions to edit the stream, set up stream notifications, and delete the stream.
Each stream has a couple filters. Choose All Updates to see everything in the stream, including Feed Tracked Changes (FTCs). Choose Fewer Updates to omit FTCs from the stream.

Create Streams
Here’s how to create a stream.
- Open the Chatter page.
If you don’t see the Chatter page, from the App Launcher ( ), search for and select Salesforce Chatter.
- Click the New Stream icon (
 ) next to the Streams heading.
- In the Stream Name field, enter
Interesting People.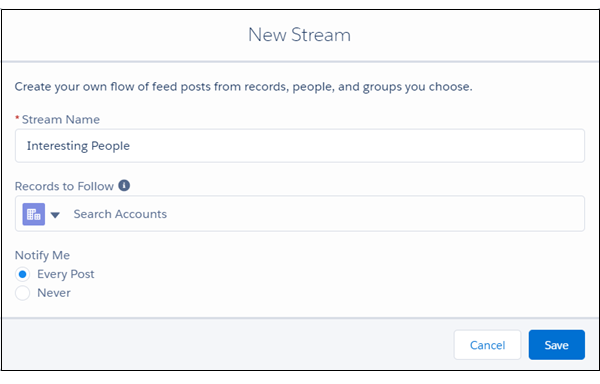
- Under Records to Follow, open the list of feed types and select People.
- Click in the field, enter
Chatter Expert, and select Chatter Expert from the search results list.
- Expand the list of feed types again to try another feed type. Select Accounts. The account name starts with “United” but we don’t know the rest. Enter
United(case sensitive) to see all the accounts that start with “United.” Select a listed account.
- Continue to add more feeds from People, Accounts, or some other feed type—up to 25.
- Under Notify Me, select Every Post or Never. Selecting Every Post triggers a notification any time someone posts to a feed that’s included in this stream. Selecting Never turns off notifications for this stream. Turning on notifications for certain important streams is a great way to get notified about activity. For streams that are less critical, turning off notifications can keep down the noise of frequent notifications.
- Click Save.
Open your stream and enjoy all the posts from all the feeds that you added, now available in one place.
Add to Stream from Follow Action
After you create a stream, the Follow action on profiles and record detail pages gets richer. A plus sign is added to the Follow button to indicate that there are more options to choose from.

Click the Follow button to see options for following the feed or adding it to a new or existing stream.

When you add a stream, groups get a new Follow in Stream action. Click it and select the streams to add the group feed to.

Stay Up-to-Date with Notifications
You’ve met the bell, the icon for in-app notifications, but that’s just one type of notification. There are also email notifications. The more active you are in Chatter, the greater the potential flood of emails that you receive telling you what’s going on. Use email notification settings to bring some order and a more controlled flow to the number of notifications that you receive.
Here’s how to adjust the frequency and type of email notifications that you receive for Chatter activity.
- On the Chatter tab, at the top of the page, click your profile picture, and select Settings.
- In the Quick Find box, enter
Email, and select Email Notifications.
To get started, select the Receive emails checkbox. That’s the basic on-off switch for your email notifications.
The rest of the email notifications page is divided into two more sections—Personal and Groups.
-
Use personal email notifications to get notified when people take a notifiable action that is related to you. For example, you can get notifications when people follow you, react to things that you’ve posted or commented on, or mention you.
-
Use group email notifications to get notified about Chatter activities in the groups where you’re a member.
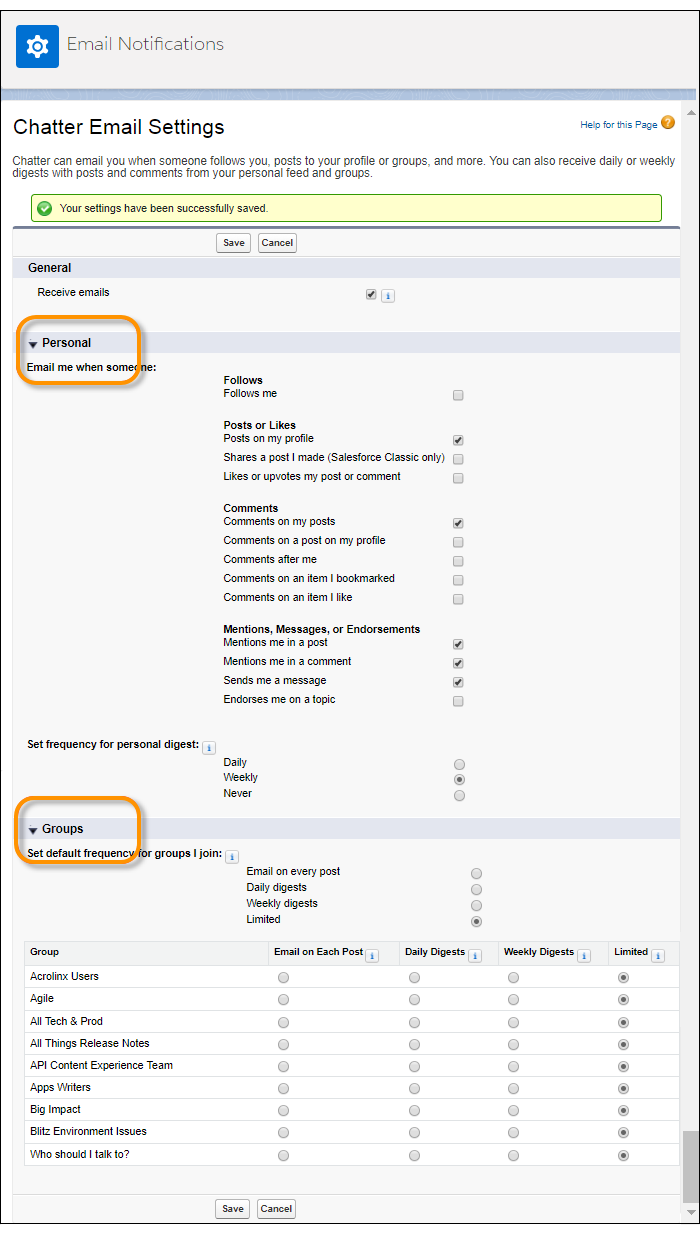
Both sections give you options for receiving digests and setting the delivery frequency of notifications. Digests summarize recent Chatter activity so that you don’t miss important discussions.
-
Personal digests include the updates that you see in your own Chatter feed, such as updates about the people, records, and files that you follow.
-
Group digests include the updates that you see in a particular group’s Chatter feed. You can choose to receive digests on a daily, weekly, or limited basis. Limited means less frequently than weekly.
We hope you feel proud! You’ve mastered the basics of Chatter and the special features that make you an expert Chatter user: streams, groups, and notifications.
Resources
- Salesforce Help: Collaborate in Chatter Groups
- Salesforce Help: Chatter Streams
- Salesforce Help: Navigate to Chatter Email Settings
- Salesforce Help: Chatter Email Digests
- Salesforce Help: Reply to Chatter Email Notifications