Configure Salesforce Payments
Learning Objectives
After completing this unit, you’ll be able to:
- Describe how payment zones work.
- Explain how to configure a checkout mode.
- Describe how to select and deselect payment methods.
- Explain how to configure checkout experiences.
- List the available payment services.
- Describe the settings that help secure and clarify customer data.
What’s to Configure?
Linda Rosenberg, Cloud Kicks admin, is ready for the next few steps. She uses Business Manager to configure storefront payments features like these.
- Payment zones
- Checkout modes and experiences
- Payment services
- Payment card capture timing
- Storing payment card credentials
- Statement descriptors
Configure Payment Zones
Linda wants to make it as easy as possible for shoppers to buy her company’s products—no matter where they live. With Salesforce Payments, she can configure how shoppers complete purchases by customizing payment methods based on country or currency. She does this by creating a payment zone, assigning it to a merchant account, and selecting the payment methods for the zone. With payment zones, a single site can map to different merchant accounts based on country or currency.
Once she assigns a checkout method to a Payments account, the system automatically creates a default payment zone, set to all currencies and countries. She can assign additional payment zones to her Payments account to further customize which payment methods are used for which zones.
Before adding payment methods to a zone, she makes sure that her Payments account has at least one checkout type enabled.
Create a Payment Zone
Here’s how she creates a payment zone and assigns one or more countries or currencies to it.
- Select Administration > Global Preferences > Payment Zone.
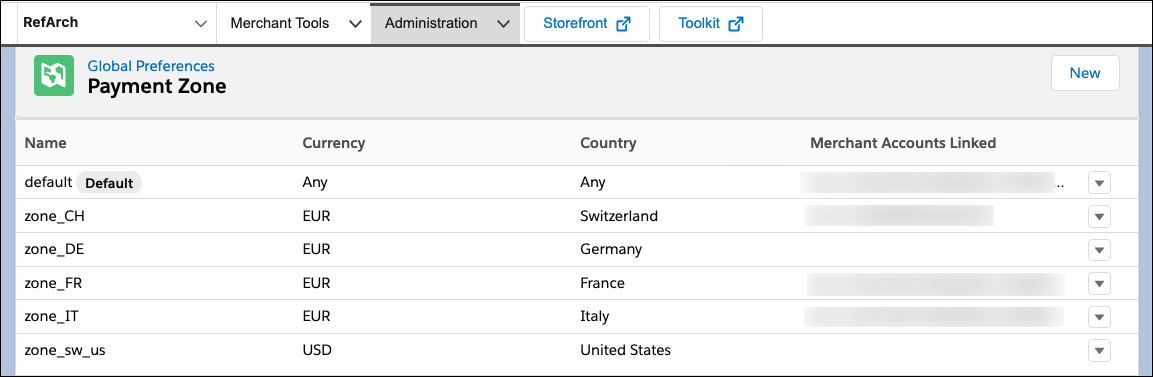
- Click New.
- Enter a name for your payment zone.
- Select at least one currency and country.
- Click Create.
Assign a Payment Zone
Here’s how she assigns payment zones to an account.
- Assign an account from the payment zone page.
- Select Administration > Global Preferences > Payment Zone.
- Select the down arrow for your payment zone.
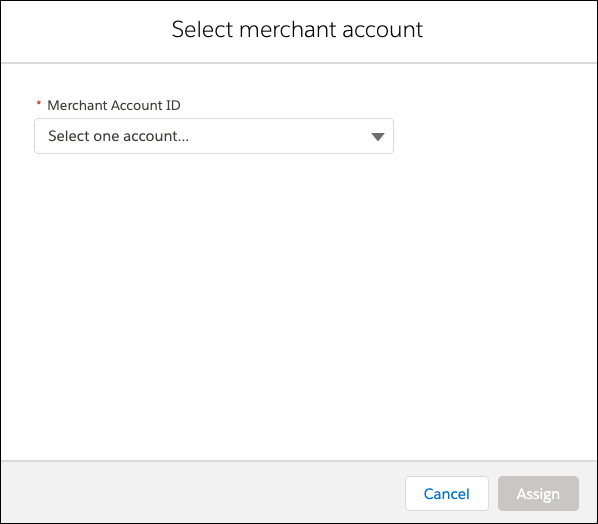
- Select Assign Merchant Account.
- Select a merchant account from the menu and click Assign.
- Assign a merchant account from the merchant account page.
- Select Administration > Global Preferences > Salesforce Payments.
- Select a merchant account.
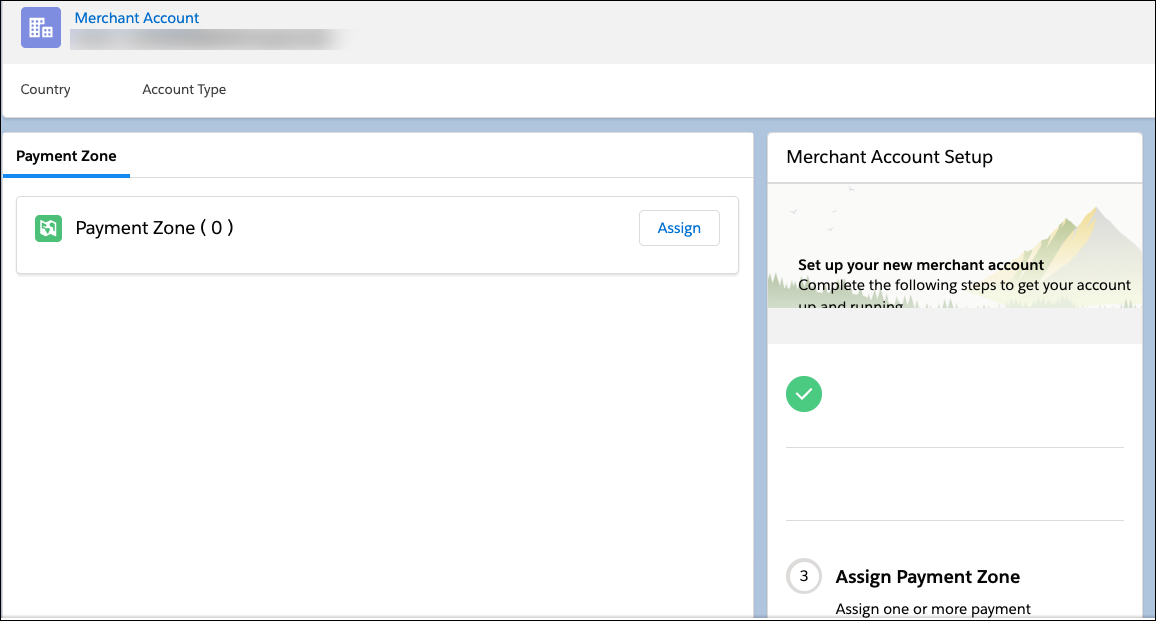
- Click Assign.

- Select at least one payment zone and click Assign.
If you don’t have any payment zones, create and add one to add one to your account.
Add a Payment Method
Here’s how she adds a payment method to a payment zone.
- Select site > Merchant Tools > Ordering > Salesforce Payments.
- Select a zone.
- Select Edit from the down arrow.
- Select one or more payment methods for this zone.
- Click Save.
Configure Checkout Modes
Linda can configure these checkout modes and payment methods with Salesforce Payments.
-
Express checkout mode: PayPal, Apple Pay or Pay Now, Venmo
-
Multi-step checkout mode: Credit cards, PayPal, Venmo, SEPA Debit, iDEAL, EPS, Klarna, Afterpay, and BanContact payment services
These payment methods are available in any country where Stripe, PayPal, or ApplePay supports them. Venmo is US only.
Shoppers prefer express checkout because it is typically faster and easier than traditional multi-step checkout methods. However, some shoppers can’t or don’t use it, so Linda will continue supporting multi-step checkout on her sites. See Express Checkout Considerations for details.
Configure Multi-Step and Express
Here’s how to configure checkout modes.
- Select site > Merchant Tools > Ordering > Salesforce Payments.
- Click the Configure tab.
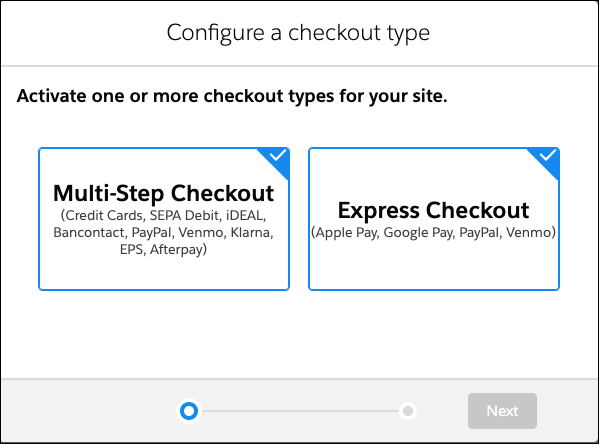
- Select a checkout method: Express, Multi-Step, or both
- Select the payment services.
- Click Nextand acknowledge your selection.
- If you activate express checkout, the credit card payment method is automatically enabled. The express checkout enablement has no impact on the methods enabled for multi-step checkout.
- Once you activate multi-step checkout, you must manage payment methods and processors in Merchant Tools > Ordering > Salesforce Payments.
- Click Activate. By default, the associated payment services are selected. For example:
-
Express checkout: Apple Pay and Pay Now are selected by default. PayPal is selected if a PayPal account is linked.
-
Multi-step checkout: the credit card service is selected by default.
- You can select or deselect one or more of the associated payment services offered at your site.
- If you try to deselect all Multi-Step payment services and save, an error message appears.
- You can deselect all express services. For shoppers to complete their payment transactions, you must activate Express Checkout or Multi-Step Checkout, select one or more payment services and click Save.
- If you select the Apple Pay payment method and want to register your Apple Pay domain, click Manage Apple Pay Domains. See Register an Apple Pay Domain.
If you activate Apple Pay without adding a domain, you can add the domain later. Save the Apple Pay selection before you add an Apple Pay domain. The domain host must have a valid, trusted, and active SSL certificate.
- Select the payment services you want offered on your site.
During checkout, activated payment services are based on the currency of the shopper’s basket.
- Click Save.
- Edit a Payment Zone assignment.
- Select Merchant Tools > Ordering > Salesforce Payments.
- Locate the payment zone assignment you want to edit, click the dropdown, and select Edit.
- Modify the payment options.
- Click Save.
Venmo with PayPal
Salesforce Payments supports Venmo as an express and multi-step checkout method. With Venmo, you can offer your shoppers a digital wallet payment option that they link to a credit card, debit card, bank transfer, or Venmo funds bank. Using Venmo on your SFRA storefront requires a PayPal integration with Salesforce Payments.
Salesforce Payments supports Venmo for US-based merchants only and shoppers using US currency. You can use Venmo with any payment zone that accepts US-based shoppers and US currency. If the payment zone accepts non-US-based shoppers and non-US currency, Venmo isn't offered as a payment service option to those shoppers.
Configure Checkout Experiences
Linda can configure these checkout experiences with Salesforce Payments.
Experience |
Basket interaction |
Shopper Interaction |
|---|---|---|
Buy Now |
Ignores the current basket |
The shopper clicks a button to buy a specific product. As a result, the basket contains only that product. It completes checkout using the browser payment app appropriate for the shopper’s device and browser, such as Apple Pay or Google Pay. |
Pay Now |
Requires a current shopper basket |
The shopper clicks a button that completes checkout using a browser payment app for whatever is in their basket. |
Both experiences are included in Linda’s site when she uses plugin_commercepayments with a compatible SFRA version (credentials required). She can add either or both because they’re independent of one another. If she (and Vijay Lahiri, then developer) customize the checkout methods for their site, each experience has its own requirements.
Configure Payment Services
The buy now, pay later payment option makes it easy for shoppers to purchase items in a variety of price ranges. Salesforce Payments offers Buy Now, Pay Later payment services through these payment methods.
Payment Method |
Details |
|---|---|
Afterpay |
Afterpay is available in Salesforce Payments through your Stripe account as a multi-step checkout method. With Afterpay, shoppers make payment in interest-free installments. Shoppers can choose to make three monthly payments or four bi-weekly payments. Afterpay is interest-free for shoppers and doesn’t require a credit check during the sign-up process. Afterpay sets initial spending limits for new customers. Spending limits for shoppers can increase as they use Afterpay. |
Klarna |
Klarna is also available as a multistep checkout method. With Klarna, your shoppers can spread the cost of their order over three or four interest-free payments. To review the countries where Klara payment is available, see the Stripe documentation. When shoppers select Klarna for payment, they’re redirected to Klarna to complete their cart checkout. In the Klarna window, the shopper reviews and agrees to the payment terms. |
Payment Settings
The payment card industry is all about securing and clarifying customer data. Linda pays close attention to these Salesforce Payments settings.
- Payment Card Capture Timing
- How credit card credentials are stored
- How transactions are documented
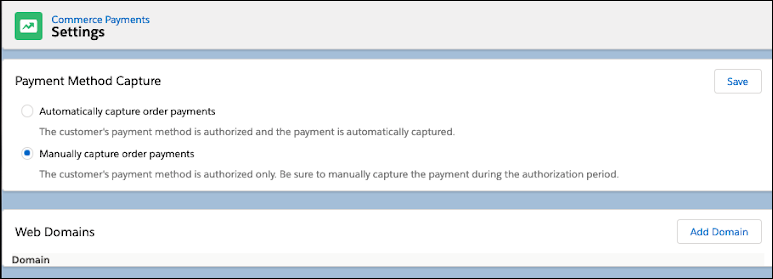
Payment Card Capture Timing
Capture timing is when a payment is captured and dispersed from the payment issuer to the merchant acquirer. Salesforce Payments supports these capture settings.
-
Capture against payment cards immediately: Payment is captured immediately after payment is authorized. Funds for the captured payment are disbursed immediately.
-
Capture against payment cards later: Payment is just authorized. Capture and disbursement still needs to happen. Capture is triggered on fulfillment from Salesforce Order Management (automatically) or via a third-party system.
To configure this, Linda selects Merchant Tools > Ordering > Salesforce Payments and clicks Settings.
Store Payment Card Credentials
Linda can configure how stored credit card credentials can be used when a shopper authorizes the use of saved credentials.
-
Save for future off-session use: When active, during checkout, the shopper’s credit card credentials are saved and can be reauthorized for off-session use.
-
Save for future on-session use: When active, the shopper’s credit card is saved for their future use when they are on the storefront, even for checkouts in later sessions.
To configure this, she selects Merchant Tools > Ordering > Salesforce Payments and clicks Settings.
Statement Descriptor Settings
The statement descriptor provides banks and credit card networks with a description of the credit card transaction charge. This description is added to the shopper’s bank or card statement to identify the source of the charge. When shoppers know the origin of a charge, it reduces payment disputes and chargeback requests. Salesforce Payments supports these statement descriptor settings.
Descriptor |
Description |
|---|---|
Merchant Account Statement Descriptor |
A Salesforce Payments account supports this descriptor. Enter a value for the shortened descriptor on your Stripe dashboard. Salesforce Payments uses this descriptor as the When a shopper completes a credit card transaction, this value is passed to the shopper’s bank or card network. With this method, you can’t have site-specific descriptors for sites in your realm that use the same Stripe merchant account ID. |
Site-Specific |
Use this descriptor to identify the site where a charge originated. In Business Manager, you can set a different descriptor for each site across your realm. This descriptor overrides the Stripe |
Per Transaction |
Use the Script API to set the statement descriptor for per payment applications, to add more detail to the description, for example. This statement descriptor value overrides the descriptor value set in the Stripe dashboard and Business Manager. |
Linda can use Business Manager to customize the description that appears on a customer’s statement to identify the source of the charge (site > Merchant Tools > site > Ordering > Salesforce Payments > Settings).
Let’s Wrap It Up
In this module, you learned how to configure Salesforce Payments checkout modes, payment methods, and experiences. You also explored the settings that help secure and clarify customer data. Now you can take the last quiz and earn an awesome badge.
Resources
- Salesforce Help: Create a Payments Zone
- Salesforce Help: Express Checkout Considerations
- Salesforce Help: Register an Apple Pay Domain
- Salesforce Help: Using Venmo with PayPal
- Salesforce Help: Buy Now and Pay Now Checkout Methods
- Salesforce Help: Buy Now and Pay Later Payment Services
- Salesforce Help: Set the Customer Statement Descriptor