Get to Know BYOL Data Sharing in Data Cloud
Learning Objectives
After completing this unit, you’ll be able to:
- Explain what zero-copy data sharing is in Data Cloud.
- Describe when to use a data share.
- List the requirements to get started with a data share.
- Describe how to access data from a third-party partner.
What Is BYOL Data Sharing?
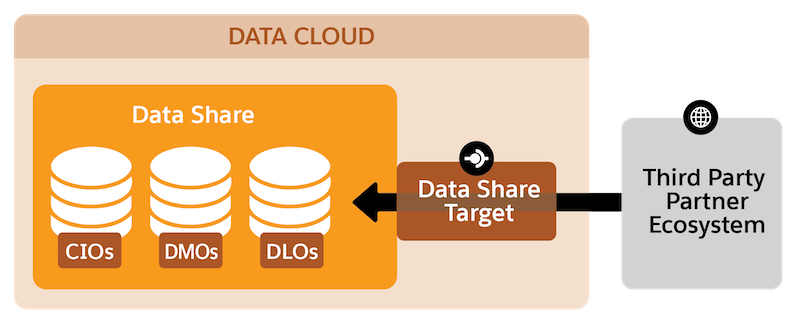
Bring Your Own Lake (BYOL) Data Sharing lets you share selected data objects in Data Cloud with third-party data ecosystems such as external data warehouses and data lakes. This means that with a simple point-and-click you can assemble the data objects into a data share. A data share is a collection of data objects that lets you share and query data without moving any data.
BYOL data sharing allows access to live and accurate data at scale. How? By using a zero copy approach.
How Does Zero-Copy Data Sharing Work?
Zero-copy integration allows data to be directly shared and queried without loading the data into a partner ecosystem. With Zero copy data sharing you can directly access data in Data Cloud. The zero copy approach ensures near real-time access to the current data while maintaining standards of security and governance.
A third-party partner can be a cloud-based data warehouse or data lake such as Snowflake, Google BigQuery, or Amazon Redshift.
The connectivity to a third-party partner is configured using a data share target. The objects assembled in a data share are made available to the third-party partner by linking a data share to a data share target.
Here are some of the Data Cloud objects you can share via data shares.
-
Data lake object (DLO): Data ingested into the Data Cloud gets stored in a DLO. The data stored in a DLO is cleansed, transformed, and prepped for computation and analysis.
-
Data model object (DMO): A DMO is a grouping of data (made up of attributes) created from data streams, insights, and DLOs. Data is harmonized from different sources into a uniform data model. Data Cloud supports standard and custom DMOs.
-
Calculated insight object (CIO): Calculated insights help build cube-style metrics with measures and dimensions on Data Cloud data. A CIO is a DMO created after a calculated insight is processed.

Use Cases for Data Sharing
Data shares let businesses break down data silos across clouds. Businesses can view data, perform cross-cloud analytics, and build machine learning (ML) models. Data cloud ingests data from diverse data sources. Low-latency access to this cross-functional data provides a deep understanding of the customer backed by data-driven awareness.
Analytical Use Cases
Some common analytics use cases for data sharing are sales projection reports, cross-sell up-sell analytics, marketing campaign analysis reports, customer retention analysis reports, and customer segmentation analysis.
AI and ML Use Cases
As with analytics use cases, accessibility to customer-rich data from the Data Cloud opens up possibilities for building powerful machine learning models like predictive models, recommendation systems, and forecasting models.
Access Data Cloud Data from a Third-Party Partner
To leverage Data Cloud’s data-sharing capability, follow these simple steps to unlock the value of secure and compliant data sharing.
Step 1: Plan Your Data Strategy
The first step is to identify the Data Cloud objects you want to access. For example, if you are a data scientist interested in building propensity and dynamic pricing models, you can access DMOs with profile information and engagement data like Contact and Individual DMOs. You can further choose to include DLOs like OrderDetails and MobileAppBehavioralEvents to analyze purchasing patterns. With such data objects assembled in a data share, you will have access to the live and latest Salesforce data.
Step 2: Set Up Your Credentials
Next, work with your Data Cloud admin and admins of your third-party partner to create the necessary users, and obtain the credentials needed to set up access to your Data Cloud data.
Step 3: Build Your Data Shares
Once the groundwork is done, create a data share and assemble the Data Cloud objects. Give the data share a unique name, and select the applicable data space. A data space is a logical categorization of your data in Data Cloud and lets you see and work on only the data that is relevant to you. Once you save your data share it gets successfully created and moves into an active status.
Step 4: Create Data Share Targets and Set Connectivity with the Third-Party Partner
To make this data share accessible in a third-party partner ecosystem you need to create a data share target. A data share target establishes a connection between Data Cloud and the third-party partner.
Step 5: Link Your Data Share with Your Data Share Target
Next link your data share target with the data share you created. Make sure that the data share is active before linking it to the data share target.
Step 6: View Your Data Cloud Objects from the Third-Party Partner
Once you link the data share to a data share target, the selected data objects are available in your third-party partner’s account. You can now leverage Salesforce data directly in the third-party partner’s data ecosystem.
Permission Management for Data Shares
To create and manage data shares in Data Cloud, you need to be a Data Cloud administrator or Data Cloud data aware specialist. The capability is available when you have the license for standard Salesforce editions of Enterprise, Performance, and Unlimited.
Resources
- Salesforce Help: Act on Data in Data Cloud
- Salesforce Help: Bring Your Own Data Lake Shares
- Trailhead: Explore Data Cloud
- Salesforce Help: Data Cloud Glossary of Terms
- Salesforce Help: Data Model Concepts