Build an Approval Process
Learning Objectives
After completing this unit, you’ll be able to:
- Set up an approval process that emails the initial approvers.
- Set up an approval process that allows users to approve or reject opportunity records.
Ready to Get Hands-on with Flow Builder?
Launch your Trailhead Playground now to follow along and try out the steps in this module. To open your Trailhead Playground, scroll down to the hands-on challenge and click Launch. You also use the playground when it's time to complete the hands-on challenges.
Create an Email Template
First create your email template to notify the record owner’s manager that an opportunity has been discounted more than 40%.
- From Setup, enter Templates in the Quick Find box, and then select Classic Email Templates.
- Click New Template.
- Select Text as the template type, and click Next.
- Configure the email template.
- Folder: Unfiled Public Classic Email Templates
- Available for Use: selected
- Email Template Name:
Approve Opportunity Discount
- Encoding: General US & Western Europe
- Subject:
Please approve this discounted opportunity
- Email Body:
{!User.Manager}, the {!Opportunity.Name} has been discounted. Please approve this discount. Thank you.
- Folder: Unfiled Public Classic Email Templates
Including the merge field {!Opportunity.Name} helps the approver by providing a link to the opportunity record. This allows them to review the record before responding to the request.
- Click Save.
Add Custom Fields
Now let’s create custom fields so that we can track the discount percentage and approval status for each opportunity.
- From Setup, enter Object Manager in the Quick Find box, and then select Object Manager.
- Click Opportunity.
- Select Fields & Relationships and click New.
- In the Data Type column, select Percent and then click Next.
- Configure the Percent field with these values.
- Field Label:
Discount Percent
- Length: leave as default
- Decimal Places: leave as default
- Required: selected
- Field Label:
- Click Next.
- Click Next.
- Click Save & New.
- In the Data Type column, select Picklist and then click Next.
- Configure the Picklist field with these values.
- Field Label:
Discount Percent Status
- Values: Enter values, with each value separated by a new line
- Picklist Values:
Approved-
Not Approved
- Field Label:
- Click Next.
- Click Next.
- Click Save.
Great! You’ve created an email template to notify approvers and you’ve set up an object with the required fields to support your approval process.
Create an Approval Process
Now that our org is ready, let’s create the approval process.
- From Setup, enter Approval in the Quick Find box, and then select Approval Processes.
- In Manage Approval Processes For, select Opportunity.
- Click Create New Approval Process | Use Jump Start Wizard. The Jump Start Wizard helps you create a simple approval process by making some decisions for you.
- Configure the approval process.
- Name:
Approve Opportunity Discount
- Approval Assignment Email Template: Approve Opportunity Discount
- Specify Entry Criteria:
- Field: Opportunity: Discount Percent
- Operator: greater than
- Value:
40
- Field: Opportunity: Discount Percent
- Select Approver: Let the submitter choose the approver manually
- Name:
- Save the approval process.
- Click View Approval Process Detail Page.
- Under Final Approval Actions, click Add New | Field Update, and configure it with these values.
- Name:
Approved
- Field to Update: Discount Percent Status
- A specific value: Approved
- Name:
- Click Save.
- Under Final Rejection Actions, click Add New | Field Update, and configure it with these values.
- Name:
Not Approved
- Field to Update: Discount Percent Status
- A specific value: Not Approved
- Name:
- Click Save.
Great job! To start evaluating discounted opportunities, simply activate the approval process.
Make Sure That Records Are Submitted
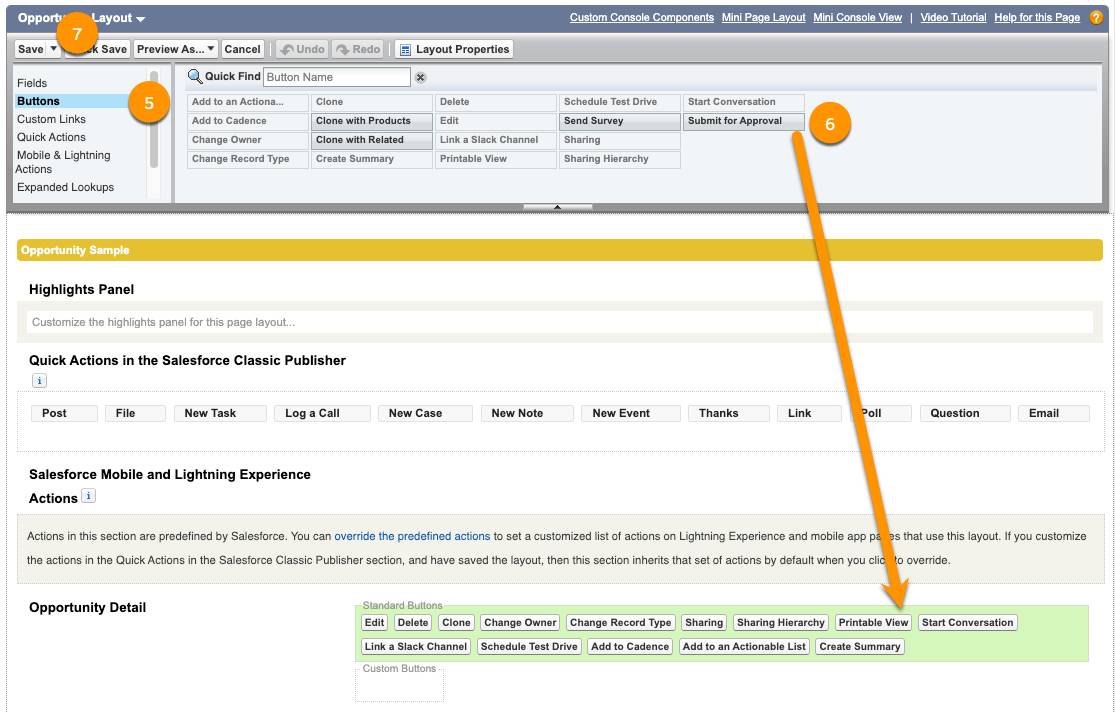
You've done a bunch of work to automate what happens when a record gets submitted for approval. Now let's add a button to the page layout that allows users to kick off the approval process.
- From Setup, click the Object Manager tab.
- Click Opportunity.
- Click Page Layouts.
- Select Opportunity Layout.
- In the layout editor's header bar, select Buttons.
- Drag the Submit for Approval button to the Standard Buttons section in the page layout.
- Click Save.

Now, when users click Submit for Approval on an opportunity, it goes through your approval process. But what if—the horror—users forget to click the button? Enter Flow Builder. One of the available actions in the Action element is Submit for Approval, which means you can build a record-triggered flow that automatically submits a record for approval. And that means your users don’t have to remember to submit opportunities for approval. For example, you can create a record-triggered flow that's triggered when an opportunity is edited, checks whether Discount Percent is greater than 40%, and if so, runs an Action element that submits the opportunity for approval.
To learn more about submitting records for approval with flows, check out the Data and Actions in Flows badge. And while you're there, you should complete the rest of the Build Flows with Flow Builder trail to learn how to create record-triggered flows and more!
Tell Me More...
Help your users view open approval requests by adding the Items to Approve component to their Home page. Also, let users respond to approval requests directly from email or Chatter. For more details, see Prepare Your Org for Classic Approval Processes.
Resources
- Salesforce Help: Create a Classic Approval Process with the Standard Wizard
- Salesforce Help: Flow Core Action: Submit for Approval
- Trailhead: Build a Discount Approval Process
