Build Decisions with Lookup Tables
Learning Objectives
After completing this unit, you’ll be able to:
- Summarize the main functions of decision matrices and decision tables.
- Identify when to use decision matrices or decision tables.
- Explain how to read decision matrices and decision tables.
Lookup Tables
Recall that Business Rules Engine includes three core tools: expression sets, decision matrices, and decision tables.
Decision tables and decision matrices are both types of lookup tables.
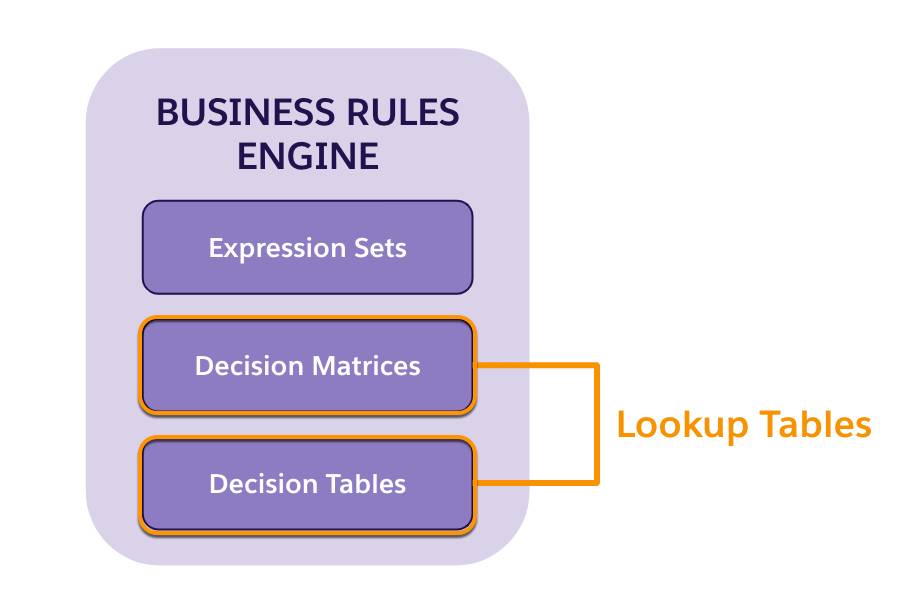
Both tools map input values to output values, but their functionality and use cases differ.
In this unit, let’s learn more about the main features of decision matrices and decision tables.
Decision Matrices at a Glance
Decision matrices are powerful lookup tables that contain user-defined input and output columns. The system takes in inputs and then “looks up” the appropriate outputs. When an expression set or other tool calls a decision matrix, the engine locates the table row that matches the input values and returns the output value for that row.
Here’s an example of a simple decision matrix with one input column–SLA–and two output columns, Retention Cost and Retention Rate.
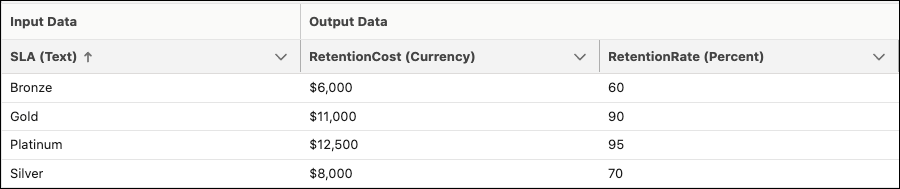
This matrix outputs the retention cost and rate of retention based on service level agreement (SLA) input.
- If the SLA is Gold, the retention cost is $11,000, and the retention rate is 90%.
- If the SLA is Platinum, the retention cost is $12,500, and the retention rate is 95%.
Business users can easily add a matrix to an expression set, or another process as a single element in a more complex calculation.
Decision matrices are helpful whenever a business process needs to determine a particular value based on one or more inputs.
Here are just a few use cases for decision matrices.
- An insurance premium matrix matches the characteristics of the insured person to policy premiums.
- A weather alert matrix sets an alert flag when weather conditions rise or fall below a designated temperature.
- A demographic matrix outputs demographic data based on a location.
- A pricing matrix matches a set of product characteristics to a price.
- An eligibility matrix evaluates a candidate’s eligibility based on their characteristics.
Decision matrices are one of two broad types.
- Standard decision matrices have common characteristics, including input columns, output columns, and versions.
- Grouped decision matrices allow you to group matrix rows by keys such as geographic region or product code.
Decision matrices are flexible in how you can deploy them. You can use them inside of expression sets as part of a larger rule, or you can use them directly in a business process.
With decision matrices, businesses can plan for the future without disrupting current operations. Business users can create multiple versions of a single matrix and then specify their active dates and priority to plan changes well in advance.
Decision matrices are fairly easy to set up, with no code required. After quickly getting up to speed, any business user can create, modify, and maintain decision matrices. Oh, and decision matrices are versatile because business users can do these tasks.
- Create a version of a decision matrix from an existing version, and copy over all the matrix data from the previous version. Nifty, right? To learn more, see Create a Decision Matrix Version from an Existing Version.
- Upload data to a decision matrix using a .csv file, and control the uploaded data. To learn more, see Create or Modify Decision Matrices by Using CSV Files.
There’s beauty in the simplicity of decision matrices.
Sometimes, you may want a more advanced lookup table that works directly with custom objects and operators, such as less-than and greater-than functions to look up input columns. In this case, decision tables meet your business needs.
Decision Tables at a Glance
Like decision matrices, decision tables are lookup tables that read business rules with multiple inputs and return multiple outputs. A single lookup on a decision table can match multiple rows and return multiple output sets.
Create decision tables in Business Rules Engine, and use them in workflows or expression sets. If you use custom or third-party tools to create workflows, use Connect APIs to integrate decision tables with your workflows.
Decision tables read business rules and return the outcome from Salesforce records or values that you specify. You can also set advanced conditions so that the decision table evaluates records or inputs against the specified logic.
Here’s an example of a decision table with two input columns and one output column.
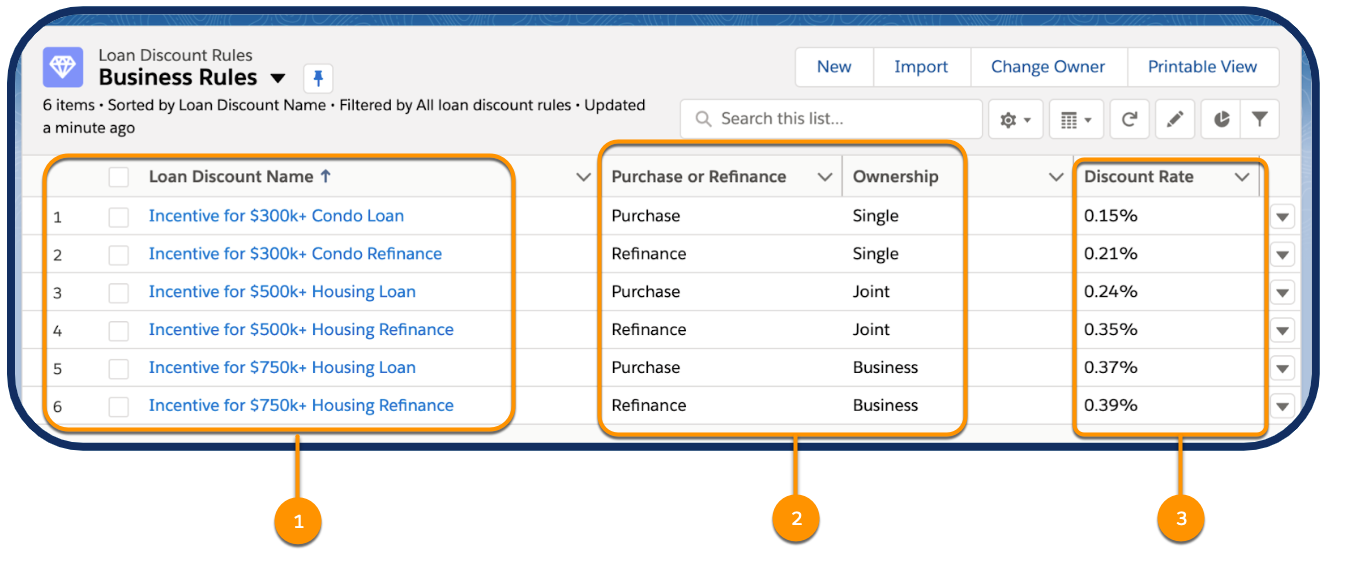
Purchase or Refinance and Ownership are the input columns, and Discount Rate is the output column. Notice the table shows multiple Salesforce records in the first column (1). Unlike decision matrices, where you edit data directly in the table, all of the table data here comes directly from the object records. In turn, table data updates when the record data changes. Based on input characteristics stored in the second and third columns (2), the decision table looks up and outputs the Discount Rate in the final column (3).
In this table, a purchase loan for single ownership yields a 0.15% discount, while a refinancing loan for business ownership yields a 0.39% discount.
After composing this table, a business user adds it to a broader business rule to automatically calculate the terms of a loan. Decision tables can reduce the number of conditional steps to create flows that are easy to orchestrate and maintain.
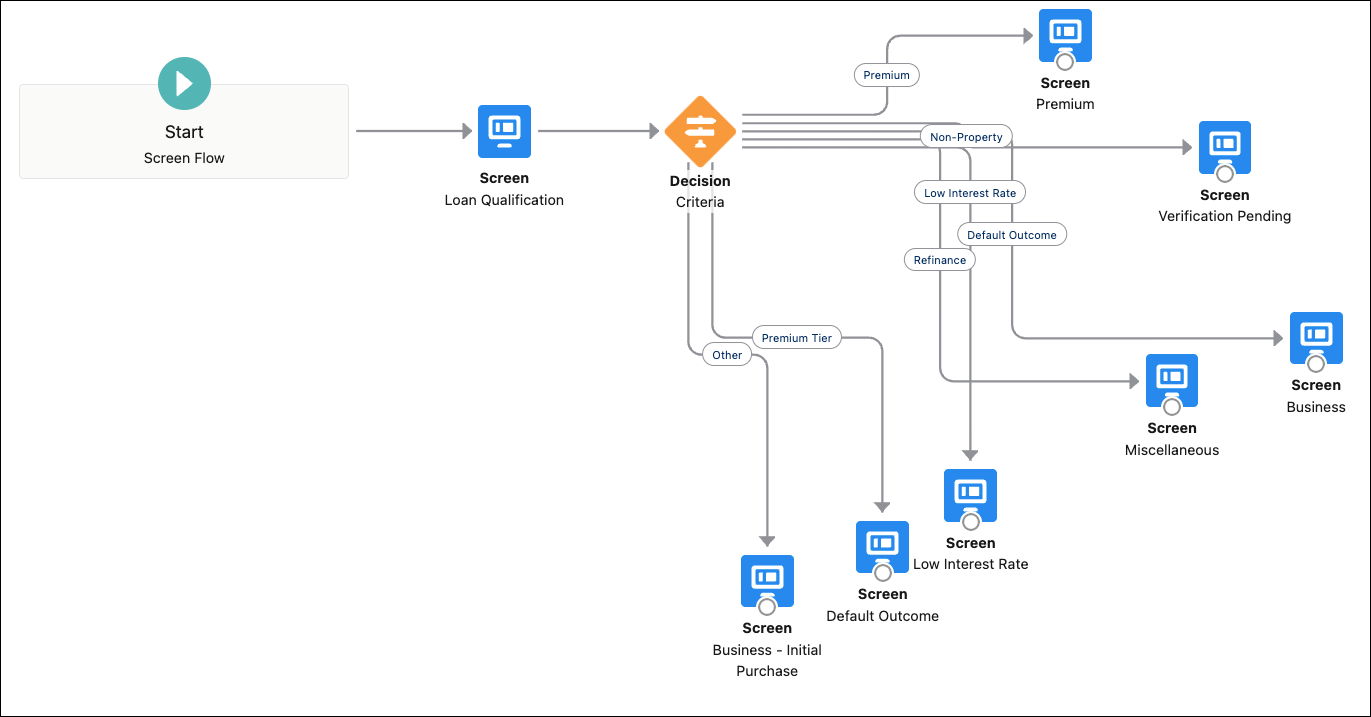
Let’s look at two flow examples that calculate the loan discount rate.
Here, the flow uses a series of complex conditional elements to calculate the premium, resulting in a messy and overly complex flow. And who wants that?
In contrast, the next flow calls on the decision table action to handle all the discount evaluations in one compact step, meaning a much cleaner, streamlined flow. Nice, isn’t it?
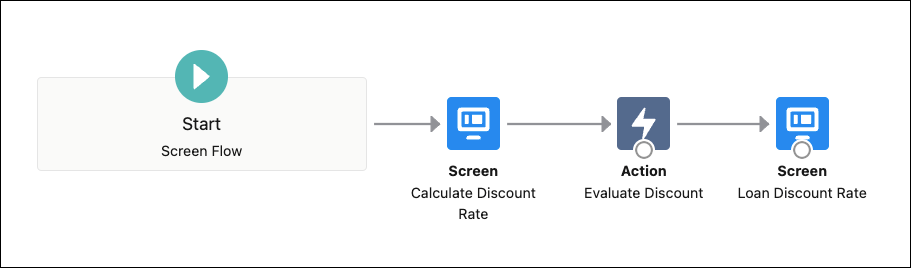
With decision tables, you can orchestrate complex rule evaluations of Salesforce records in a few, simple steps.
Lookup Tables in Action
The previous unit introduced the nation of Zercovana, which wants to automate and simplify its business license application process with Business Rules Engine.

As a first step, Zercovana must create a lookup table that determines the base fee amount for a license application based on some simple inputs. Then, they add this table to a new expression set that calculates the final fee. Finally, they add the expression set to a user-friendly guided interaction that citizens can use to determine the appropriate fee.
Zercovana’s table for determining the base fee amount is straightforward, with no need to call on complex operators or Salesforce objects. They also already have an existing spreadsheet that contains all the data, which is ideal for importing. For these reasons, Zercovana decides to create a decision matrix rather than a decision table.
Jessica Morales, program manager, creates the decision matrix and expression set.

The process has three main tasks.
- Prepare the table.
- Import the matrix.
- Activate the matrix.
Let’s look at how she configures the matrix.
Prepare the Table
You have two ways to add data into a decision matrix: Enter the data manually into Salesforce or import it from a .csv file. It’s typically more efficient to format a rating table from a spreadsheet, save it as a .csv file, and then import the table into the Decision Matrix Designer.
Here’s a pretty basic table with three columns. We’ll name this decision matrix as Base Application Fee.
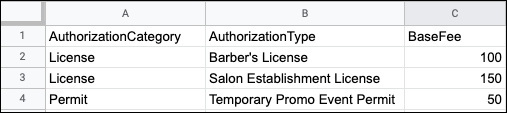
In its current form as a spreadsheet, the data lacks identifying metadata, like headers, inputs, or outputs.
Jessica can bring a simple table like this into the Decision Matrix Designer to make it come alive. Here’s how she does it.
Create a Standard Decision Matrix
After saving the table as a .csv file, open the Decision Matrix Designer and create a new standard matrix.
- Click
 , then find and select Business Rules Engine.
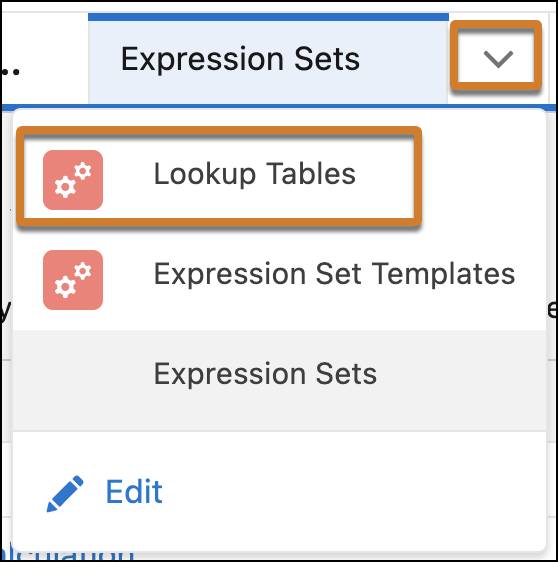
- Click the app navigation menu, and then select Lookup Tables.
- Click New.
- Select Decision Matrix, and then click Next.
- Enter these details.
- Name:
Base Application Fee - Type: Standard
- Click Save.
On the Matrix tab of the new version, click Upload CSV File.
The import process is straightforward. Choose a .csv file, and specify the appropriate header and data types for each column in the matrix.
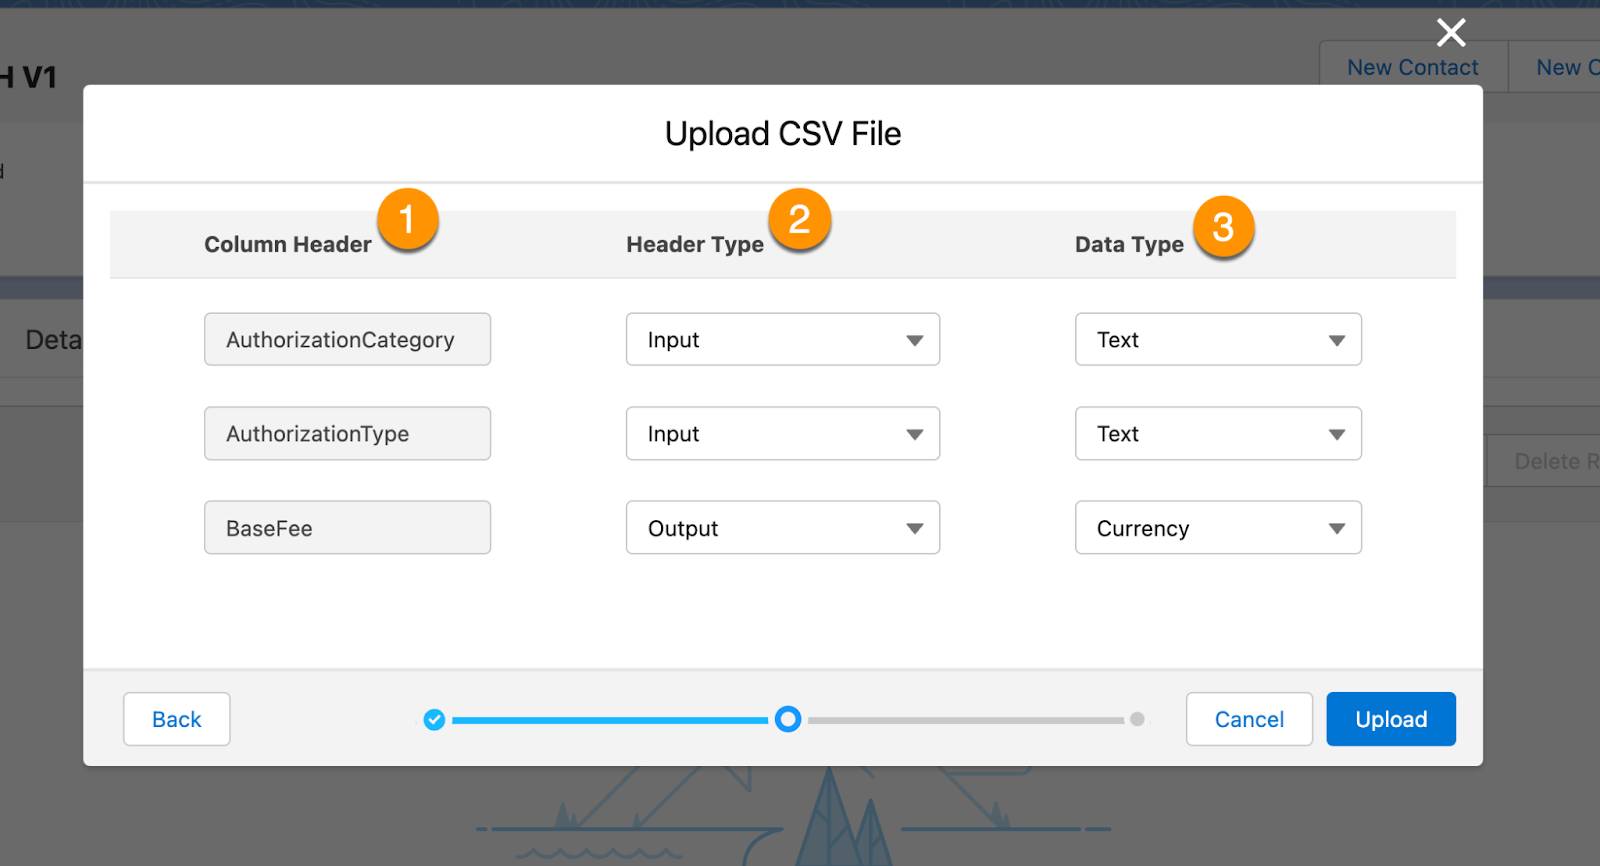
In this table:
- The Column Header (1) fields display the three values from the first row of the spreadsheet. These values function as the headers for the data in each column.
- For Header Type (2), the authorization category and authorization type headers are input columns and the base fee is an output column.
- For Data Type (3), the authorization category and authorization type are Text and the base fee is Currency.
While this table is very simple, Business Rules Engine supports much larger tables, including those with lots of data!
After specifying these fields, upload the matrix. The uploaded data now appears as a cleanly formatted table with the headers, header types, and data types designated. Save the matrix.
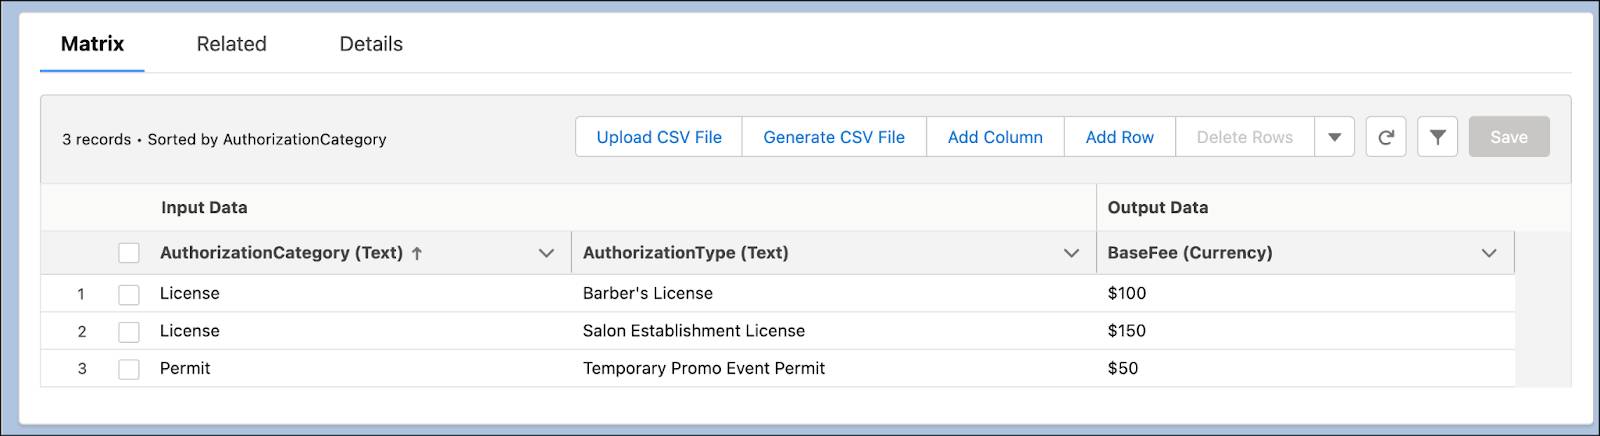
You can now manually add columns or rows to the table. After the matrix is active, you can no longer edit it.
Jessica gives her matrix a final check and likes what she sees. It's ready for activation.
Activate the Matrix
Finally, it’s time to activate the matrix. To do this, open the Base Application Fee V1 decision matrix version, set the active dates and priorities, and click Activate. In the future, you can create a version, make any needed changes to the import or export data, and then specify new active dates and priorities.
Whenever a user calls this expression set, the system automatically selects the correct matrix version based on the dates and priority.
The flexible versioning means Zercovana can plan for the long term in a way that never interferes with existing processes.
Jessica is quite impressed with the ease of setting up the decision matrix. Now that her lookup table is ready, she’s eager to orchestrate the full expression set for determining the license fee. Let’s see how she does it in the next unit.
Resources
- Salesforce Help: Decision Matrices
- Salesforce Help: Decision Tables for Business Rules Engine
- Salesforce Help: Lookup Tables: When to Use Which
- Salesforce Help: Invoke a Decision Matrix in a Flow