Identify Your Steps and Build Your Flows
Learning Objectives
After completing this unit, you’ll be able to:
- Identify how to organize your process into steps.
- Identify how to organize your process into stages.
- Identify required flows for an orchestration.
Follow Along with Trail Together
Want to follow along with an expert as you work through this step? Take a look at this video, part of the Trail Together series.
(This clip starts at the 13:25 minute mark, in case you want to rewind and watch the beginning of the step again. Also be aware the product layout and some field names have changed slightly, so the presenter’s environment may not fully match your environment. You can still follow along and complete the exercises, your click paths and field naming will be slightly different.)
What Are Our Steps?
We’ve mapped out our entire process. Now it’s time to analyze the flowchart for a logical organization of steps. Remember, steps can be run sequentially or concurrently. Think about what type of steps are required: Interactive steps require user intervention and background steps don’t. You can assign steps to groups, queues, and resources. Based on our flowcharts, we can organize our tasks into these Steps.
Step Name |
Step Type |
Flow Type |
|---|---|---|
Create the job application |
Interactive |
Screen |
Phone screen scheduled |
Background |
Autolaunched |
Conduct the phone screen |
Interactive |
Screen |
Send a rejection email to a candidate |
Background |
Autolaunched |
Schedule an interview with the hiring manager |
Background |
Autolaunched |
Conduct the interview with the hiring manager and the candidate |
Interactive |
Screen |
Make a hiring decision |
Interactive |
Screen |
What Are Our Stages?
Remember, stages always run sequentially while steps can run in parallel. A stage contains related steps that you want to group logically. They can be interactive steps or background tasks. Only one stage can be in progress at a time. With that in mind, the steps of this process can be grouped into three stages. Use a Decision element to determine which path a stage takes.
Stage Name |
Steps |
Flows |
|---|---|---|
Initial Screening |
|
|
Hiring Manager Interview |
|
|
Candidate Rejected |
|
|
Let’s look at all of the flows required for the recruitment orchestration as described. It's critical that before you start to create an orchestration in Flow Builder, you have built all of your required flows. Don’t forget to activate each flow when you’re done building it!
Try to build your flows so they can be reused. For this orchestration, we need to send different emails to a candidate. Use a generic email alert flow and pass specific details, like date and time of the interview, as input parameters. That way you limit the number of flows you need to maintain.
Ready to Get Hands On with Flow Orchestration?
To complete this module, you need a special Developer Edition org that contains Flow Orchestration and our sample data. Get the free Developer Edition and connect it to Trailhead now so you can complete the challenges in this module. Note that this Developer Edition is designed to work with the challenges in this badge, and may not work for other badges. Always check that you’re using the Trailhead Playground or special Developer Edition org that we recommend.
- Sign up for a free Developer Edition org with Flow Orchestration.
- Fill out the form:
- For Email, enter an active email address.
- For Username, enter a username that looks like an email address and is unique, but it doesn't need to be a valid email account (for example, yourname@example.com).
- After you fill out the form, click Sign me up. A confirmation message appears.
- When you receive the activation email (this might take a few minutes), open it and click Verify Account.
- Complete your registration by setting your password and challenge question.
-
Tip: Write down your username, password, and login URL for easy access later.
- You are logged in to your Developer Edition.
Now connect your new Developer Edition org to Trailhead.
- Make sure you're logged in to your Trailhead account.
- In the Challenge section at the bottom of this page, click the org name and then click Connect Org.
- On the login screen, enter the username and password for the Developer Edition you just set up.
- On the Allow Access? screen, click Allow.
- On the Want to connect this org for hands-on challenges? screen, click Yes! Save it. You are redirected back to the challenge page and ready to use your new Developer Edition to earn this badge.

Create the Job Application
For our first step, you can combine creating the job application and selecting a candidate.

Create a screen flow to enter the job application and create a work item for the recruiter. After the notification of the work item is received, the recruiter selects a candidate to be screened. This flow creates a Job Application record with the entered data.
Schedule the Phone Screen
Next you create a separate autolaunched flow to alert the candidate of the interview. This flow is launched when the Job Application record is created in the previous step’s candidate selection flow.

Create an email alert to send the scheduling notification to the selected candidate.
Conduct the Recruiter Phone Screen
You can combine the candidate screening, scoring, and decision into a single screen flow.
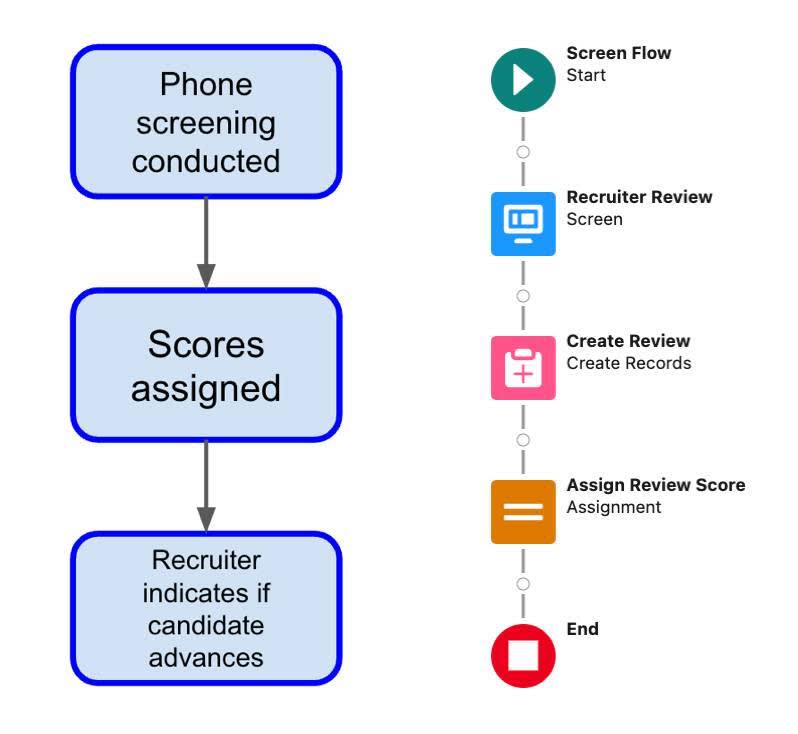
Create a screen flow for the recruiter to rate the candidate and indicate if the candidate advances in the process. Create a Review record to store the candidate’s score. This flow assigns the score to a variable available for output to be used later in the orchestration.
Schedule the Interview
Create an autolaunched flow that runs when the candidate’s score is 3 or greater.
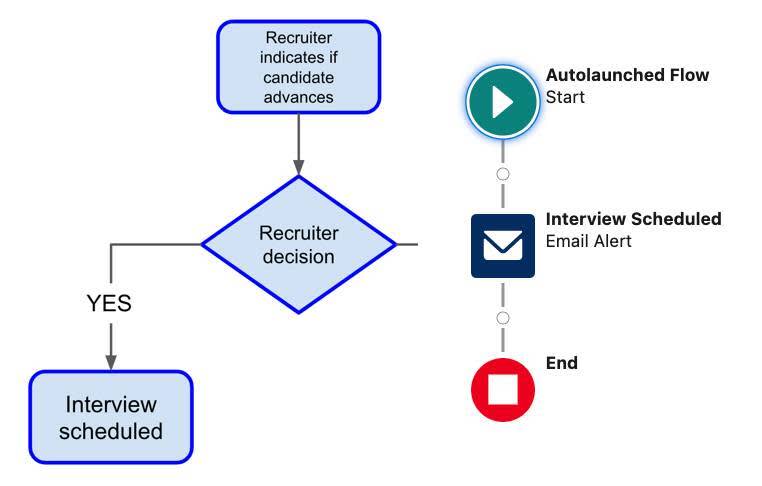
An email alert notifies the candidate that an interview has been scheduled with the hiring manager.
Reject a Candidate
Create an autolaunched flow that runs when the candidate’s score is lower than 3.

An email action is sent to the rejected candidate.
Conduct the Hiring Manager Interview
You can combine the hiring interview, scoring, and decision into a single flow.
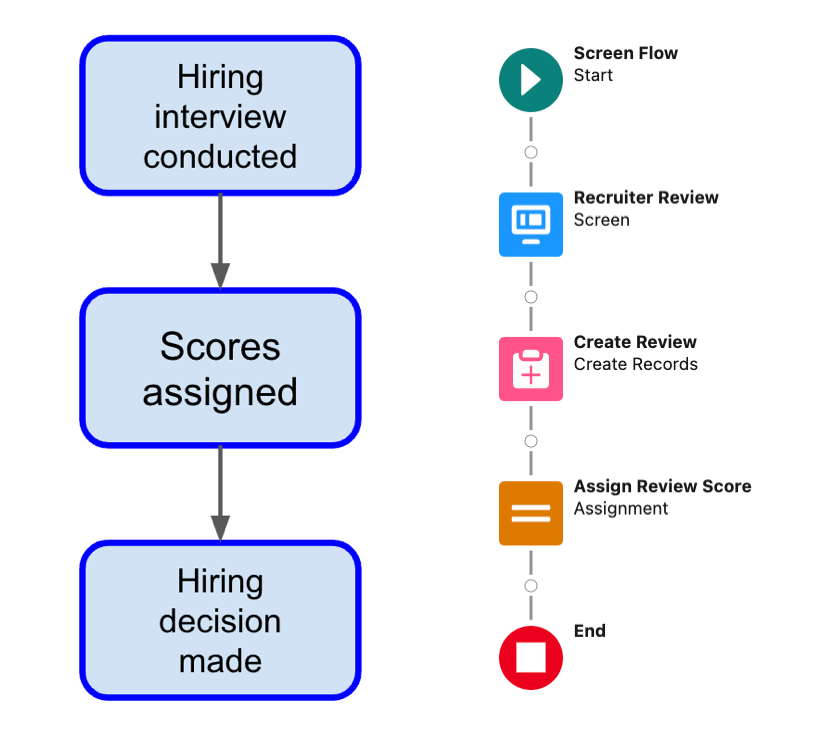
Since the evaluation criteria are the same for the recruiter and the hiring manager, we're reusing the recruiter screen flow. The hiring manager rates the candidate and indicates if they want to create an offer of employment. The flow creates a review Record to store the candidate’s score. This flow assigns the score to a variable available for output to be used later in the orchestration.
Resources
- Salesforce Help: Flow Orchestration Resource: Step
- Salesforce Help: Flow Orchestration Element: Decision
- Salesforce Help: Flow Orchestration Element: Stage
- Salesforce Help: Orchestrations