Define Custom Big Objects
Learning Objectives
After completing this unit, you’ll be able to:
- Create a custom big object.
- Build a custom index.
- Deploy a custom big object.
- Populate a big object.
Creating Custom Big Objects
So you’ve looked over the use cases for custom big objects, or come up with one of your own. Now it’s time to build one.
You can define a custom big object in Setup. You can also define a custom big object with Metadata API, but it’s much simpler in Setup. To get started, log in to your Trailhead Playground and go to Setup. At a high level, this is how you define a big object.
- Click
 and select Setup.
- Enter Big Objects in the Quick Find box, then select Big Objects.
- Create a big object and add some basic details.
- Add custom fields. They store the data on your big object.
- Add an index. The index defines the composite primary key for a big object and is used for querying and filtering the big object data.
- Save the big object and change the status to Deployed.
Now let’s go through those steps in more detail.
While custom big objects are similar to standard and custom objects, some parameters are unique to big objects, and some parameters don’t apply. Object names must be unique across all standard, custom, external, and big objects in your org.
Defining Custom Big Objects Details
When you define a big object, first fill in some basic details about it.
Field Name |
Description |
|---|---|
Label |
This name is used to refer to the object in the user interface. |
Plural Label |
The plural name of the object. |
Starts with a vowel sound |
If it’s appropriate for your organization’s default language, indicate whether “an” or “a” precedes the label. |
Object Name |
Unique API name of the big object. In managed packages, this name prevents naming conflicts with package installations. Use only alphanumeric characters and underscores. The name must begin with a letter and have no spaces. It cannot end with an underscore nor have two consecutive underscores. Once saved, a big object’s API name is identified with the suffix “__b” versus the custom object suffix “__c.” |
Description |
A meaningful description helps you remember the differences between objects when you are viewing them in a list. |
Context-Sensitive Help Setting |
Defines the URL that displays when a user clicks Help for this Page from the object record’s home (overview), edit, and detail pages, list views, and related lists. This setting doesn’t affect the Help link at the top of a page. That link always opens the Help window. |
Deployment Status |
When you create a big object, the status is set to In Development. You can't deploy a big object until it includes an index that contains at least one custom field. Only required custom fields are allowed in an index. After you create an index, you see a second status of Deployed. Once you’re ready to grant users access, change the status to Deployed. |
Big Object Custom Fields
Once you’ve defined your big object, add custom fields. Custom fields store the unique data for your big object. You can also create custom relationship fields to associate your big object with another object in Salesforce. Add custom fields to a big object the same way you would add custom fields to any object in Salesforce. Big objects support these field types:
- Lookup Relationship
- Date/Time
- Email
- Number
- Phone
- Text
- Text Area (Long)
- URL
To create an index for your big object, at least one custom field must be marked as required.
Defining a Custom Big Object’s Index
This is important! As we've mentioned before, the index defines the composite primary key for a big object. The fields defined in a big object’s index determine the big object’s identity and ability to be queried. The fields defined in your index should be the fields that will be most relevant to your queries, so you have to have foresight and do some planning here. The order in which you define the fields is also a big consideration. If you’re using SOQL to query your big object, you can query only on the fields that make up your index, in the order you defined them in. Assign the field you will use most frequently in a query filter to the first position in your index. You can also use only specific comparison operators, depending on the field’s position in your query.
Keep these considerations in mind when you define the index.
- An index must include at least one custom field and can have up to five custom fields total.
- Custom fields included in the index must be marked as required.
- Long Text Area fields can’t be included in the index.
- The total number of characters across all text fields in an index can’t exceed 100.
- Once you’ve created an index, you can’t edit or delete it. To change the index, create another big object with a new index.

Big Object Index Details
Defines the fields that make up your custom big object’s index, and determines the fields and sort order.
Field Name |
Description |
|---|---|
Label |
The label is used to refer to the index in the user interface. |
Name |
The API name for the index. |
Index Fields |
Set the Index Position and Index Direction for each custom field included in the index. The order of fields here determines their order in the index. Set the Index Position to 1 for the most frequently used filter parameter. Valid values for Index Direction are Ascending and Descending. |
Example Custom Big Object
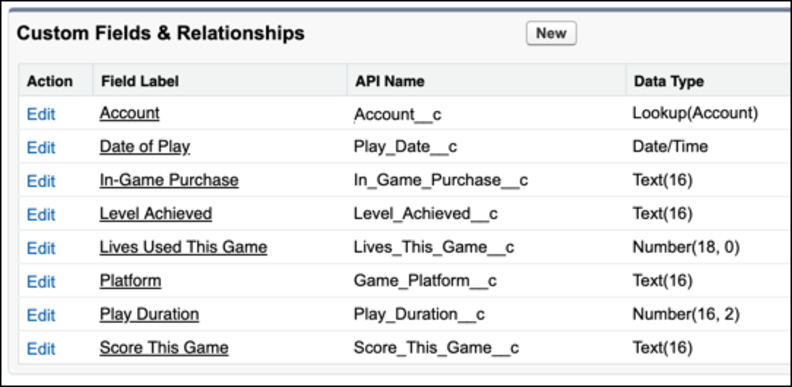
Now that you know what’s required to make a custom big object, try making one. Let’s pretend you’ve developed this awesome new game, SFORCE-COM: U.F.B.O. Defense, where players defend Earth against the Unidentified Flying Big Object menace. You want to be able to store all the interactions your players make in a single play session. In each play session you capture this information in your custom big object, Customer_Interaction__b:
- The number of things the player purchased in In_Game_Purchase__c
- The highest level they achieved in Level_Achieved__c
- How many lives they had in Lives_This_Game__c
- Their platform in Game_Platform__c
- Their score in Score_This_Game__c
- Their account name in Account__c
- Their play session date in Play_Date__c
- Their playing time in Play_Duration__c
Your game is super popular, so for each user you get several interactions each day, which, multiplied by your massive player base, is a pretty staggering number of records. Ah, the price of success!
You define all these fields on the custom big object. After defining the fields, you also define the fields that make up the index. Each player’s account name is unique, so you’ve chosen Account__c as the first field in our index. The next fields in your index are the player’s game platform, Game_Platform__c, then the session’s date, Play_Date__c. This specific order allows you to query on accounts only, accounts and game platforms, or accounts, game platforms, and play dates.
Use the exact values in these examples to create a custom big object with eight custom fields and an index. If a field and value isn’t listed in the table, ignore it or leave it as the default.
Field Name |
Value |
|---|---|
Label |
Customer Interaction |
Plural Label |
Customer Interactions |
Object Name |
Customer_Interaction |
Description |
Leave blank |
Deployment Status |
In Development |
Custom Fields
- In-Game Purchase
- Data Type: Text
- Field Label: In-Game Purchase
- Length: 16
- Field Name: In_Game_Purchase
- Required: No
- Level Achieved
- Data Type: Text
- Field Label: Level Achieved
- Length: 16
- Field Name: Level_Achieved
- Required: No
- Lives Used This Game
- Data Type: Number
- Field Label: Lives Used This Game
- Length: 18
- Decimal Places: 0
- Field Name: Lives_This_Game
- Required: No
- Platform
- Data Type: Text
- Field Label: Platform
- Length: 16
- Field Name: Game_Platform
- Required: Yes
- Score This Game
- Data Type: Text
- Field Label: Score This Game
- Length: 16
- Field Name: Score_This_Game
- Required: No
- Account
- Data Type: Lookup
- Related To: Account
- Field Label: Account
- Field Name: Account
- Required: Yes
- Date of Play
- Data Type: Date/Time
- Field Label: Date of Play
- Field Name: Play_Date
- Required: Yes
- Play Duration
- Data Type: Number
- Field Label: Play Duration
- Length: 16
- Decimal Places: 2
- Field Name: Play_Duration
- Required: No
Now you have eight fields to track all of your players’ interactions. Well done!
Index Details
|
Field Name
|
Values
|
|---|---|
Label |
Customer Interactions Index |
Name |
CustomerInteractionsIndex |
Index Fields |
Index Position 1: Account__c, Descending Index Position 2: Game_Platform__c, Ascending Index Position 3: Play_Date__c, Descending |
Deploying Big Objects
Now that you’ve defined your custom big object, you’re ready to deploy it. Click Edit on the big object, and change the deployment status to Deployed.

Now you’re all set to start using your new custom big object.

From here, you can edit the labels and names for your custom big object and its fields, but you can’t edit or delete the index. To change the index, start over with a new big object. You can also delete a custom big object from Setup. Deleted big objects are stored for 15 days. During that time, you can restore or permanently delete it, but after those 15 days are up, the big object is permanently deleted.
Populating Big Objects
There are two main ways of populating a big object. You can use a .csv file with Data Loader or the API, or do it entirely through Apex.
When using a .csv file, the first row in your file must contain the field labels used to map the .csv data to your custom big object. Upload the data into the big object in Data Loader or upload via the Bulk API or SOAP API. Here’s the .csv file we use to upload to our Customer_Interaction__b big object. A big object can support many times more data than what we’ve provided here as an example.
Date of Play,In-Game Purchase,Level Achieved,Lives Used This Game,Platform,Play Duration,Score This Game,Account
2015-01-01T23:01:01Z,A12569,57,7,PC,25,55736,001R000000302D3
2015-01-03T13:22:01Z,B78945,58,7,PC,35,61209,001R000000302D3
2015-01-04T15:16:01Z,D12156,43,5,iOS,45,36148,001R000000302D3
If you want to use Apex to populate Customer_Interaction__b, use the insertImmediate method.
// Define the record
Customer_Interaction__b bo = new Customer_Interaction__b();
bo.Account__c = '001R000000302D3';
bo.Game_Platform__c = 'PC';
bo.Play_Date__c = DateTime.newInstance(2018, 2, 5);
bo.In_Game_Purchase__c = 'A12569';
bo.Level_Achieved__c = '45';
bo.Lives_This_Game__c = 3;
bo.Score_This_Game__c = '5500';
bo.Play_Duration__c = 25;
// Insert the record, which creates a new record
database.insertImmediate(bo);
// Define the record
Customer_Interaction__b bo2 = new Customer_Interaction__b();
bo2.Account__c = '001R000000302D3';
bo2.Game_Platform__c = 'PC';
bo2.Play_Date__c = DateTime.newInstance(2018, 2, 5);
bo2.In_Game_Purchase__c = 'A12569';
bo2.Level_Achieved__c = '45';
bo2.Lives_This_Game__c = 3;
bo2.Score_This_Game__c = '5500';
bo2.Play_Duration__c = 25;
// Modify a field in the index
bo2.Game_Platform__c = 'Mac';
// Insert the record, creating a new record because the primary key has changed
database.insertImmediate(bo2);
// Define the record
Customer_Interaction__b bo3 = new Customer_Interaction__b();
bo3.Account__c = '001R000000302D3';
bo3.Game_Platform__c = 'PC';
bo3.Play_Date__c = DateTime.newInstance(2018, 2, 5);
bo3.In_Game_Purchase__c = 'A12569';
bo3.Level_Achieved__c = '45';
bo3.Lives_This_Game__c = 3;
bo3.Score_This_Game__c = '5500';
bo3.Play_Duration__c = 25;
// Modify a field not included in the index
bo3.Level_Achieved__c = '1';
// Insert the record, which updates the second record because the index is the same
database.insertImmediate(bo3);
Warning
Apex tests that use mixed DML calls are not allowed and fail. If you write only to the Big Object, the test inserts bad data into the target big object that you have to delete manually. To contain test DML calls to the targeting big object, use a mocking framework with the Apex stub API instead.
Reinserting a record with the same index but with different data results in behavior similar to an upsert operation. If a record with the index exists, the insert overwrites the index values with the new data. Insertion is idempotent, so inserting existing data doesn’t result in duplicates. Reinserting is helpful when uploading millions of records. If an error occurs, the reinsert reuploads the failed uploads without duplicate data. During the reinsertion, if no record exists for the provided index, a new record is inserted.
Resources
- Salesforce Developers: Define and Deploy Custom Big Objects with Metadata API
- Salesforce Developers: Populate a Custom Big Object
- Salesforce Help: Manage Big Objects
- Salesforce Help: Create a Custom Field
- Salesforce Help: Data Loader