Configure SEO URL Search Refinements
Learning Objectives
- Define search refinements.
- List three SEO URL Search Refinement settings.
- Describe a use case for SEO URL search refinements.
- Describe the URL archive functionality.
- Explain the benefit of snapshots.
Search Refinements
Brandon Wilson, Cloud Kicks merchandiser, likes that he can optimize (and shorten) his URLs. Not only can he define the rules on how Salesforce B2C Commerce creates URLs, but he can also map search refinements into his URL path instead of using parameters such as brand or color.
So what are search refinements?
Imagine a shopper searching for hats. When the search results display, the shopper further refines the results by selecting size, style, color, and fit, which are search refinements. When generating a new SEO URL, Salesforce B2C Commerce can add refinement text to the end of the URL.

Brandon already configured search refinements in Business Manager. Here’s where.
|
Refinement
|
Business Manager Path
|
|---|---|
Category search |
site > Merchant Tools > Products and Catalogs > Catalogs > catalog > Category |
Folder search |
site > Merchant Tools > Content > Libraries > library > Edit content > Search Refinement Definitions tab |
A basic rule of SEO is that URLs must be unique. So what happens if they aren’t? When Brandon adds search refinement text to the URL path, conflicts can occur with the refinement value text after the B2C Commerce URL character replacement step. He has to resolve those conflicts because URLs must be unique.
When it comes to SEO URL search refinements, Brandon must follow other rules. The maximum number of configurable enabled URL search refinements is 30. The maximum number of enabled URL search refinements for a category or folder is five.
Localize
Brandon starts by configuring the root category search refinement. Each locale inherits this search refinement. Remember, locale can be language (for example, en) or language_country (for example, en_US). He wants to override this configuration for specific locales that require a different search refinement order. Here’s an example.
This is the top category search refinement order: category-color-price
For the default locale (assuming it’s English), the selected refinement shows these values: <shoes-blue-price>
The German local inherits the order of the default locale: <schuhe-blaue-preis>
But the Spanish locale overrides the order of refinements to use category-price-color: <zapatos-precio-azules>
Configure SEO URL Search Refinement Rules
Brandon can define how he wants his search refinements to appear in the URL. This table shows what he can configure in Business Manager (Merchant Tools > SEO URL Rules > Settings tab).
|
Setting
|
Details
|
|---|---|
Position |
The refinement can appear before or after the category/folder mapping. After is the default. For example, with shoes as the category, and color as the refinement, before is /blue/shoes/ and after is |
Refinements segment delimiter |
This is how the refinement segment is separated from the category/folder segment: / (slash) (default), _ (underscore), - (hyphen) |
Refinements delimiter |
This is how multiple refinements are separated: / (slash), _ (underscore) (default), - (hyphen), period (.), plus (+) |
Refinements value delimiter |
This is how multiple refinement values are separated: | (pipe), _ (underscore) (default), - (minus), period (.), plus (+) The | search refinement value delimiter is encoded in the URL path. |
Conflicting refinements value delimiter |
This is the delimiter used to separate the indices from the value mapping for conflicting values: (None) (default), _ (underscore), - (hyphen) |
Here are some examples.
Search Refinement URL Settings
Brandon wants a streamlined rule that adds the color search refinement (blue|green, German: blau|grün) at the end of the URL.
This is the original URL:
www.cloudkicks.com/new-arrivals/?prefn1=brand&prefv1=abrand&prefn2=refinementColor&prefv2=blau|grün
Here’s how he does it.
- In Business Manager, select App Launcher, and then select Merchant Tools | SEO | URL Rules.
- Click the General tab | Settings tab | Search Refinement URL section.
- Configure these:
After, /, /, |.
- Click Apply.
This is the new URL:
www.cloudkicks.com/new-arrivals/abrand/blau|grün
Control Mapping Positions
Brandon wants to control the position of where B2C Commerce adds mappings to the URL and delimiters. Here’s how to do it.
- In Business Manager, select App Launcher, and then select Merchant Tools | SEO | URL Rules.
- Click the Settings tab.
- Configure:
- Enabled lowercase
- White space:
@20(URL Encoding)
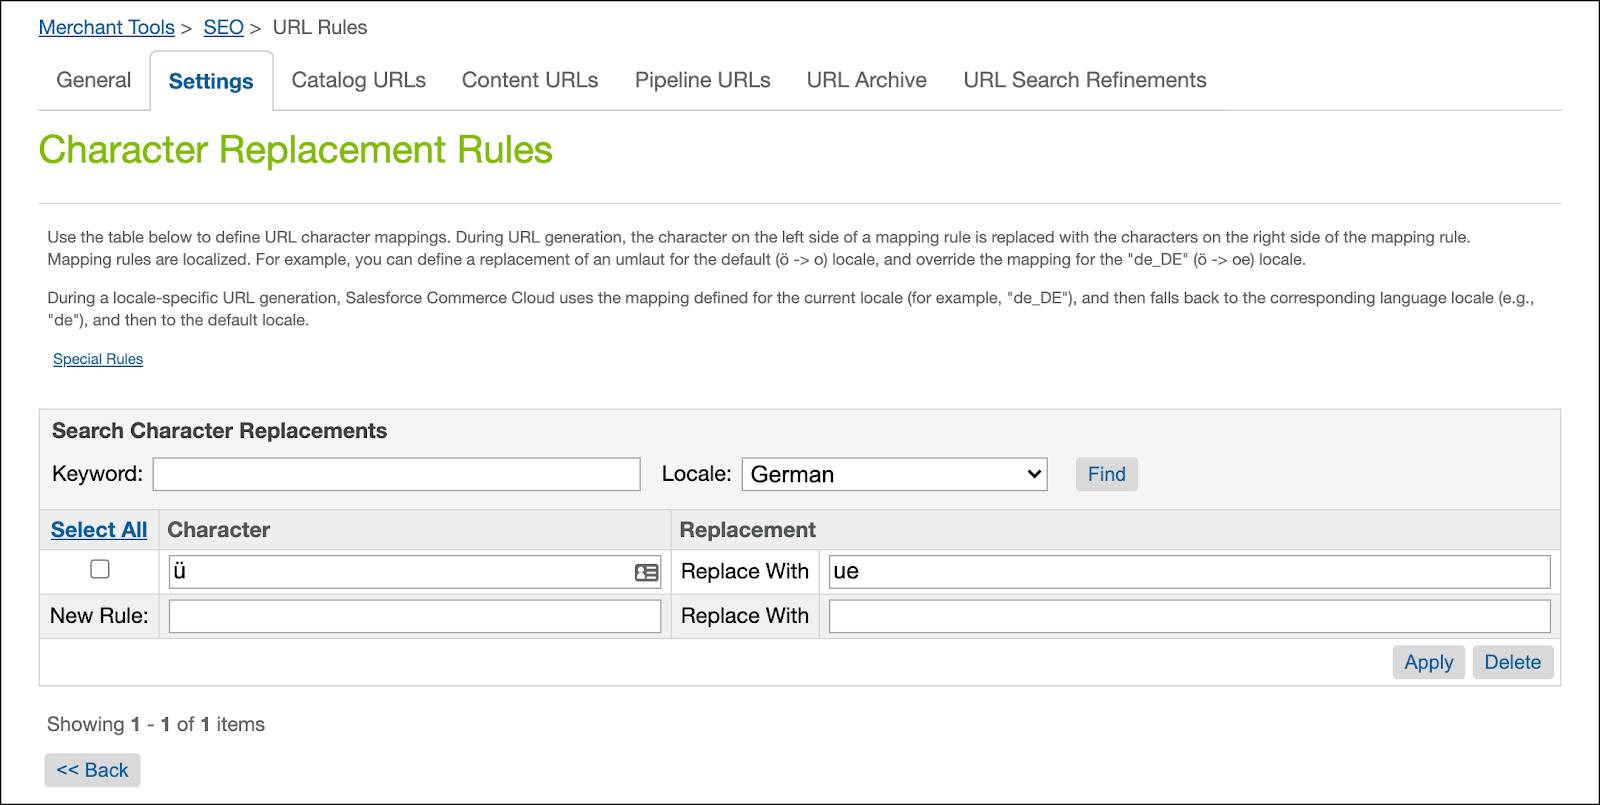
- Click Edit Rules.
- Set custom character replacement:
ü>ue - Click Apply.

- Click << Back.
- Scroll down and configure search refinement URL settings:
Before, /, _, - - Click Apply.
The configured character replacements clean the original URL, and it now looks like this:
www.cloudkicks.com/abrand_blau-gruen/new-arrivals
Prevent Further Crawling
Now Brandon wants to create a rule that prevents further crawling.
Here’s how to do it.
- In Business Manager, select App Launcher, and then select Merchant Tools | SEO | URL Rules.
- Click the Catalog (Content) URLs tab.
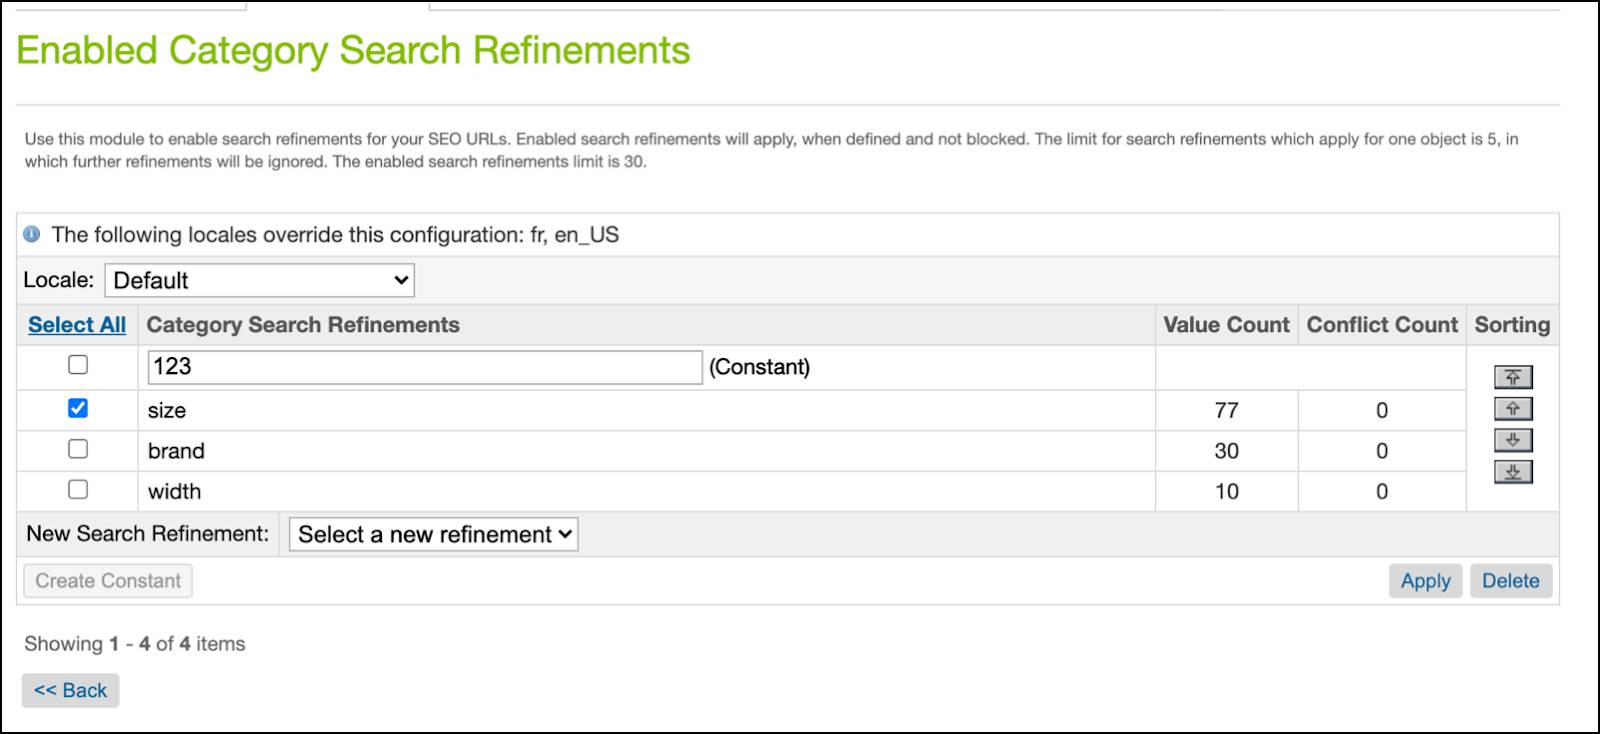
- Click Edit Refinements.
- Select a Locale: Default
- Select a search refinement from the list of enabled search refinements: size
Valid category|folder search refinements display with a value count. A defined list of enabled search refinements ensures that categories|folders use the first five valid (defined and not blocked) search refinements, to add corresponding values to the URL path given as a parameter to build a URL.
- Click Create Constant and add a constant:
123
- Give the constant a unique name for each locale.
The constant is added to the path at the position where it's defined, and only if a refinement after this constant is also in the path. For example, a URL like/aBrand/123/red, will look like/aBrand/.
- Click Apply.
- Open the robot.txt file in a text file editor.
- Add:
User-agent: *, Disallow: /123/*
Enable URL Search Refinements
To use search refinement redirects, Brandon must enable them. Here’s how he does it.
- In Business Manager, select App Launcher, and then select Merchant Tools | SEO | URL Rules.
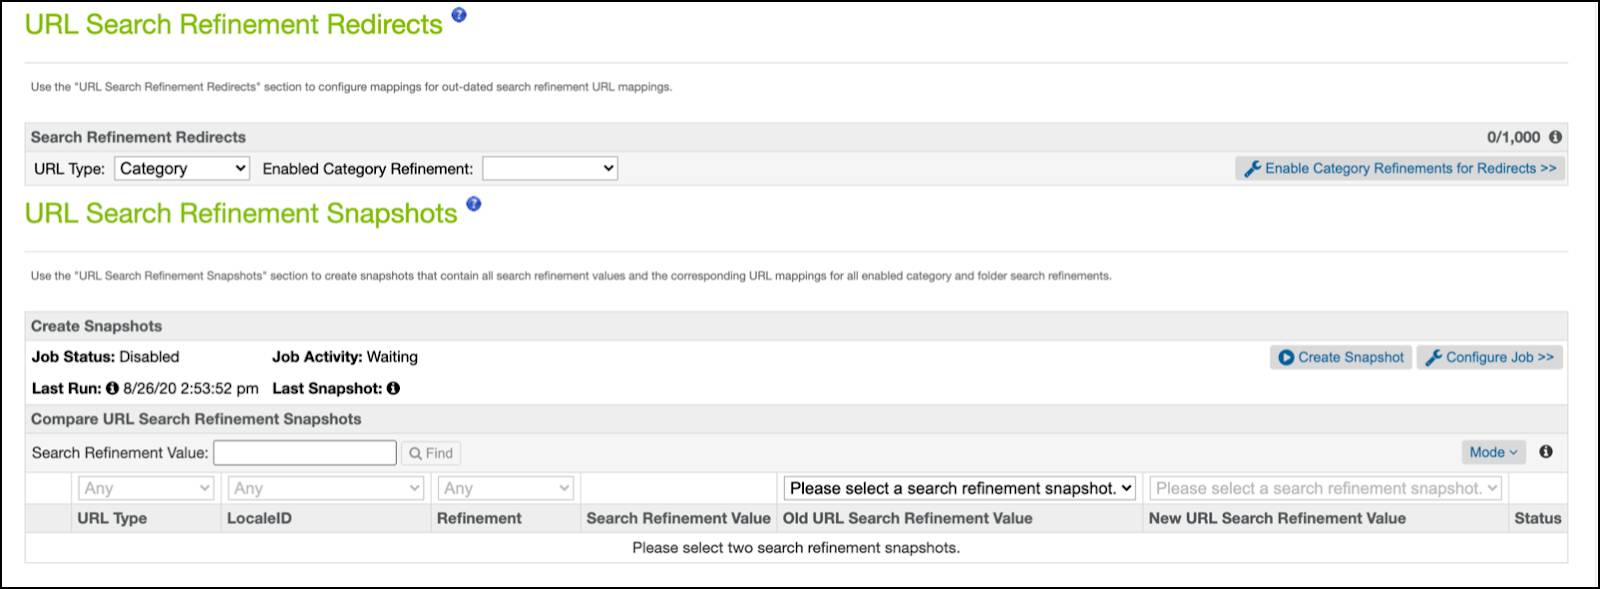
- Click the URL Search Refinements tab.
- Click Enable Category Refinements for Redirects.
This step should be infrequent.
- Configure localization.
-
Localized: Your site supports multiple languages and you want redirect mappings defined for each locale.
-
Not Localized: Your site or search refinements are not localized and you want redirect mappings defined for all locales.
- Select a search refinement:
size - Add other refinements such as brand and width.

- Click Enable CategoryRefinement.
- Click <<Back.
- To search for a refinement, on the URL Search Refinements tab, enter a value and click Find; or click Find with the Value field empty to view all mappings.
Snapshots
Brandon wants to create snapshots (manually or scheduled) that contain all the search refinement values and corresponding URL mappings for all enabled category and folder search refinements. This inventory of what he has can help him identify what’s incorrect and what’s missing. Snapshots make it easy to compare changes such as duplicate URLs caused by the introduction of new refinements, products, or categories.
B2C Commerce automatically creates a snapshot after each search index replication. You can schedule up to five snapshots. B2C Commerce creates up to two snapshots automatically after a search index replication.
Here’s how to work with snapshots.
- In Business Manager, select App Launcher, and then select Merchant Tools | SEO | URL Rules.
- Click the URL Search Refinements tab.
- Manage redirects in the top section and use the bottom section to create redirects by comparing changes over time.

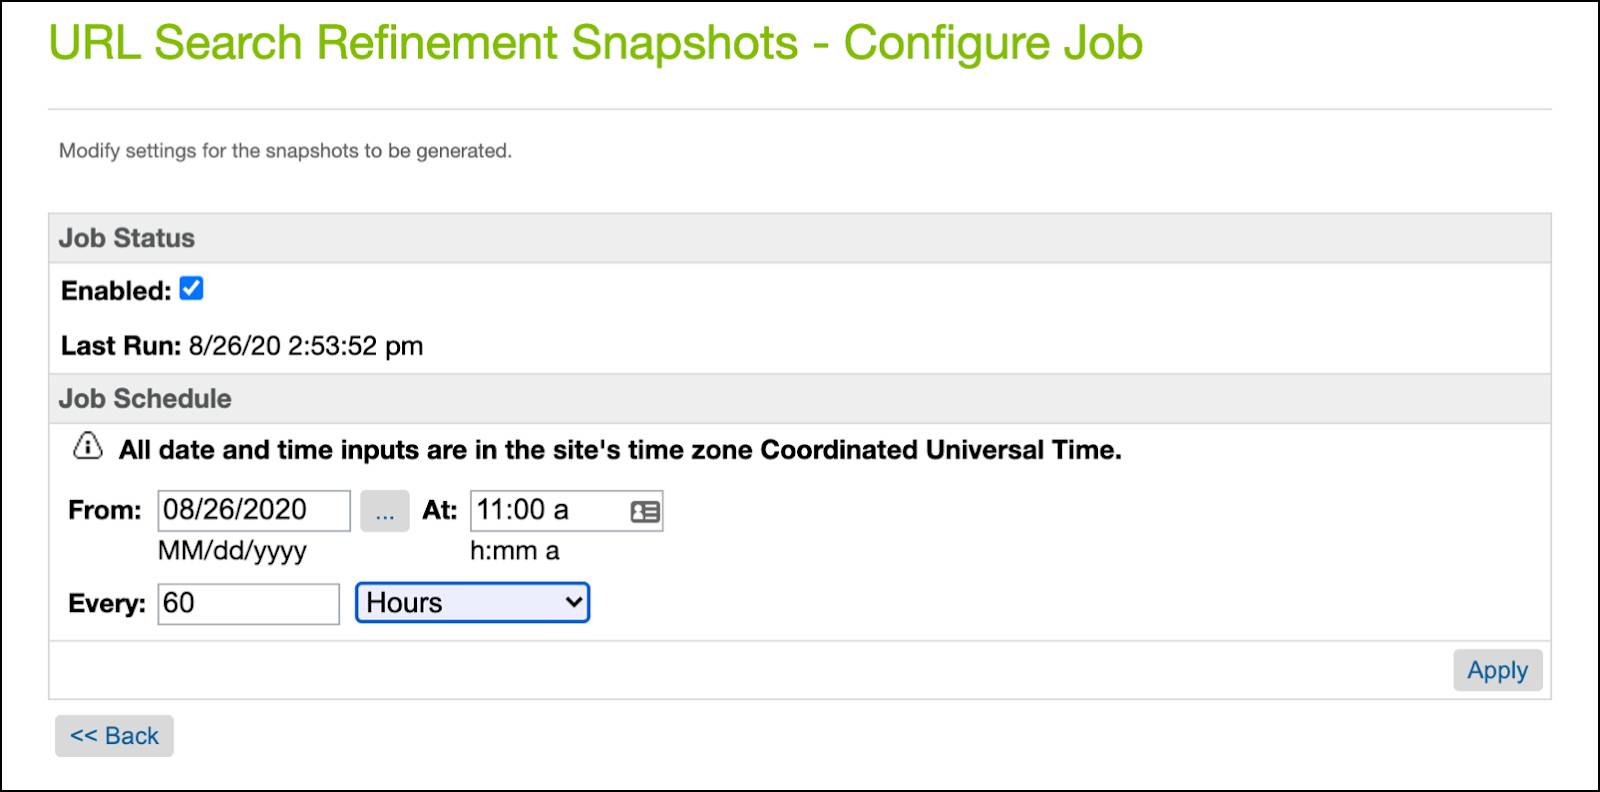
- Click Configure Job.
- Enable the job.

- Select the date and time and the interval (hours, days, weeks, or months).
- Click Apply.
- Click <<Back.
- Click Create Snapshot to create a snapshot immediately.
- Compare snapshots.
- Enter the search refinement file and click Find.
- Select the Storefront URL Type: Any
- Select the LocalID: Any
- Select the Refinement: Any
- Select the Mode: Changed
- Make sure you capture at least two snapshots.
- In the URL Search Refinement Snapshots section, select the first snapshot.
- Select the second snapshot you want to compare.
- To compare the use of a specific refinement value, enter the value into the Refinement Value field and click Find.
For example, enterblue, click Find, then click Compare. Only refinement mappings that contain blue appear in the grid.
A green check mark icon in the Existing Redirects column represents a previously created redirect that was changed or removed. Rows with existing redirects (icons) are disabled.
Here are the modes.
|
Mode
|
View only values that...
|
|---|---|
Equal |
Are equal |
Added |
Have been added |
Removed |
Have been removed |
Changed |
Have changed |
Next Steps
In this unit, you learned some basic rules for creating SEO URL search refinements, and how to configure them. You also learned how to create search refinement snapshots and make bulk changes. Next, you learn how to preview SEO URLs and resolve conflicts.
Resources
- Salesforce Help: URL Rules URL Syntax
- Salesforce Help: Search Refinement
- Salesforce Help: Create URL Search Refinement Redirects
- Salesforce Help: Configure SEO URLs