Manage Product Images
Learning Objectives
After completing this unit, you’ll be able to:
- List the Agentforce Commerce for B2C Image Management System features.
- Explain how to specify the image location with the Image Management System.
- List some view type considerations.
- Describe how the Image Management System handles main products versus variation products.
- Describe the benefits of the Dynamic Imaging Service.
Prioritize Images for Shopper Experience
You want to give your shoppers an incredible shopping experience. You know that shoppers want to see products before deciding to buy, and in multiple views. Images don’t just enhance the shopper buying experience, they are an essential ingredient. But images use a lot of memory and can slow system response times. Product details often include videos, which use even more system resources. Many merchants use third-party hosting sites for fast display.
Use the Image Management System
These are the image services that come with Agentforce Commerce for B2C.
-
Image Management System: Matrix-based image assignment for internal or external images
-
Dynamic Imaging Service (DIS): Service that transforms a single image into other images for product and catalog pages, recommendations, and more
The Image Management System supports internal images and external images.
It offers:
- Multiple images per product.
- Multidimensional access to images and image subsets for variation products and variation product attributes.
- Image annotation with alt text and image titles.
- Images located both within B2C Commerce and externally.

Specify Image Locations
Configure the catalog image setting first, and then configure images by product within a matrix structure.
Address images by their URL references, whether the images are located within the system or not. Specify an image location relative to a catalog, which dictates the location. The default location (if you don’t specify one) points to the internal catalog’s base directory. Here’s how you reference URLs by system type.
|
System
|
URL Address
|
|---|---|
Internal |
B2C Commerce knows the first part of the URL. You specify a base image path, for example, |
External |
You provide the first part of the URL, an HTTP or HTTPS URL, up to the image matrix structure. For example: http url = "http://www.imagelocation.com/images/" https url = "https://secureimagelocation.com/images/imagestructure/" |
The system stores the image location and the relative image path separately.
- The image location is stored with the catalog.
- The relative image path is stored with the product (for example,
imagestructure/shorts-abc-red_image.gif).
You configure a product image URL with a path up to 1800 characters. Together with the host path configured with a catalog's image settings, you specify image URLs with up to 2056 characters.
Define View Types
View types help you group images by things like image size and storefront usage. A new catalog automatically contains these view types.
|
View Type
|
Image Size
|
Description
|
|---|---|---|
Large |
Large |
Shown on the product detail page |
Medium |
Small |
Shown on the search results page |
Small |
Very small |
Used with a hover to show the related detail image |
Swatch |
Even smaller |
Called a thumbnail. Used to differentiate variation products by an attribute, typically by color. |
This image shows a search results page. For each product, B2C Commerce shows a medium image and one or more swatches (as circles).

Here are some details to consider.
- Catalog view types require unique names.
- Assigning images requires at least one view type.
- Products do not require all view types.
- You assign multiple view types to an image.
When you assign multiple view types to an image, it acts like a stack. The first view type in the stack is assigned the virtual index number 0; the second is assigned 1, and so on. You can't explicitly set an index number, and you can't place an unassigned index number between assigned index numbers.
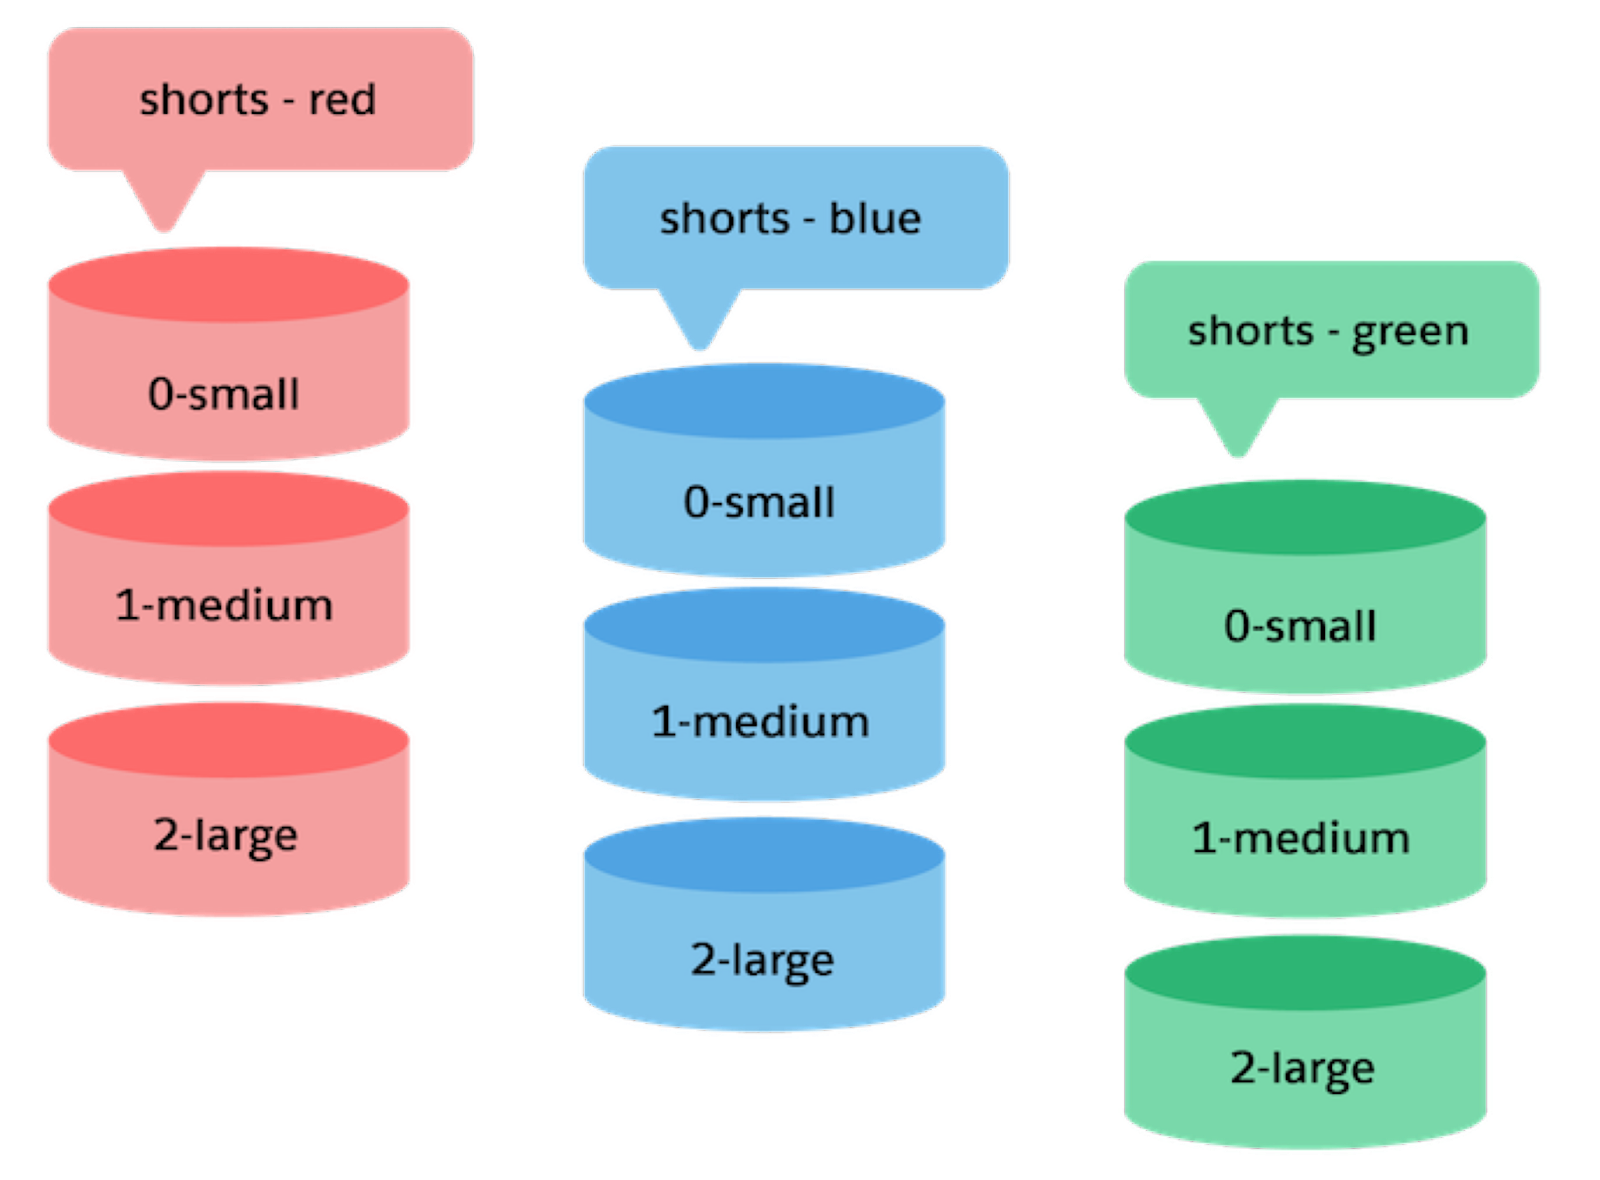
This creates a relationship between different view types by ordering their stacks. Put related images in the same position (index number) within the stack. For example, small (index 0) for hover help and large (index 1) for the product detail page, represent the same picture but sized differently.
Use Swatches
Swatch images are special. Typically, there is only one swatch per view type and variant combination. Stacked swatch images are not allowed. Swatches don’t always represent color. Merchandisers often use them for highly zoomed images of fabric, such as for leather versus linen.
Annotate Images
You can annotate each image assignment with a combination of relative image path, view type or variant, and a localizable alt description and image title.
Configure the Catalog
You configure images in the catalog settings so that a hierarchical matrix appears automatically when you configure new products. For example, once you specify image types and the color variation attribute at the catalog level, you see a base node and subnodes for colors, when you create a new product and add images.
You assign images only to the base product and not to its variations. The Image Management System retrieves images for a variation product based on its attribute value. For example, a main product uses the attribute color. The Image Management System maps the red attribute value to identify images of the red variation product.
Here’s how to configure image settings in the catalog.
- In Business Manager, click App Launcher, and select Merchant Tools | Site | Products and Catalogs | Catalogs.
- Select a product catalog:
storefront-catalog-m-en - Click Edit.
- Click the Image Settings tab.
- Select the image location: Internal
- Leave the view types as they are, though you can add one.
- Enter the variation attribute ID:
color - Enter the default image alt text:
${productname}, ${variationvalue}, ${viewtype}This pulls the alt text from storefront data.
- Enter the default image title:
${productname}, ${variationvalue}This pulls the title from storefront data.
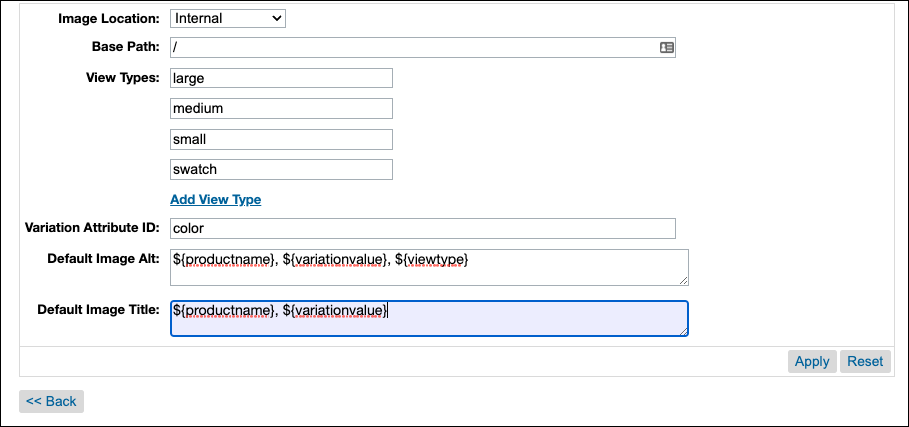
- Click Apply.
Create a Matrix
You create a matrix of images for each product using the color, size, and length variation attributes. The combination of attributes creates the structure. There’s no limit to the number of attributes, but the image json can not exceed 10 MB. Make sure your structure is consistent. For example, if you specify by color + fabric + size on one branch, you repeat the same sequence on another.
Here’s how to create a matrix.
- In Business Manager, click App Launcher, and select Merchant Tools | Site | Products and Catalogs | Products.
- Search for and open base product ID:
25148430M - Click Lock to lock the product for editing.
- Click the Edit button in the Images section.
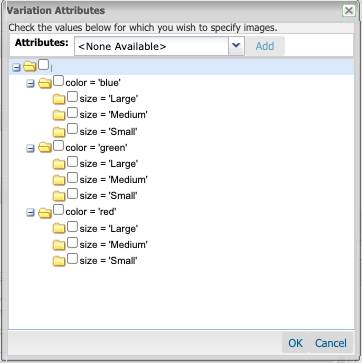
- Specify how you want your images structured: color and size.
- In the Image Manager pane, click Edit.
- Select the color attribute and Add.
- Select the size attribute and click Add.
- Click OK.
- On the File Browser pane, locate an image.
- You can also click the open icon (>>) to open the File Browser pane.
- Drag an image from this window into the appropriate view type in the Images pane.
- In the Images pane, specify the language to be used with the Alt and Title fields.
- Enter the (mandatory) path.
- Enter the localizable alternative text.
- Enter the localizable title.
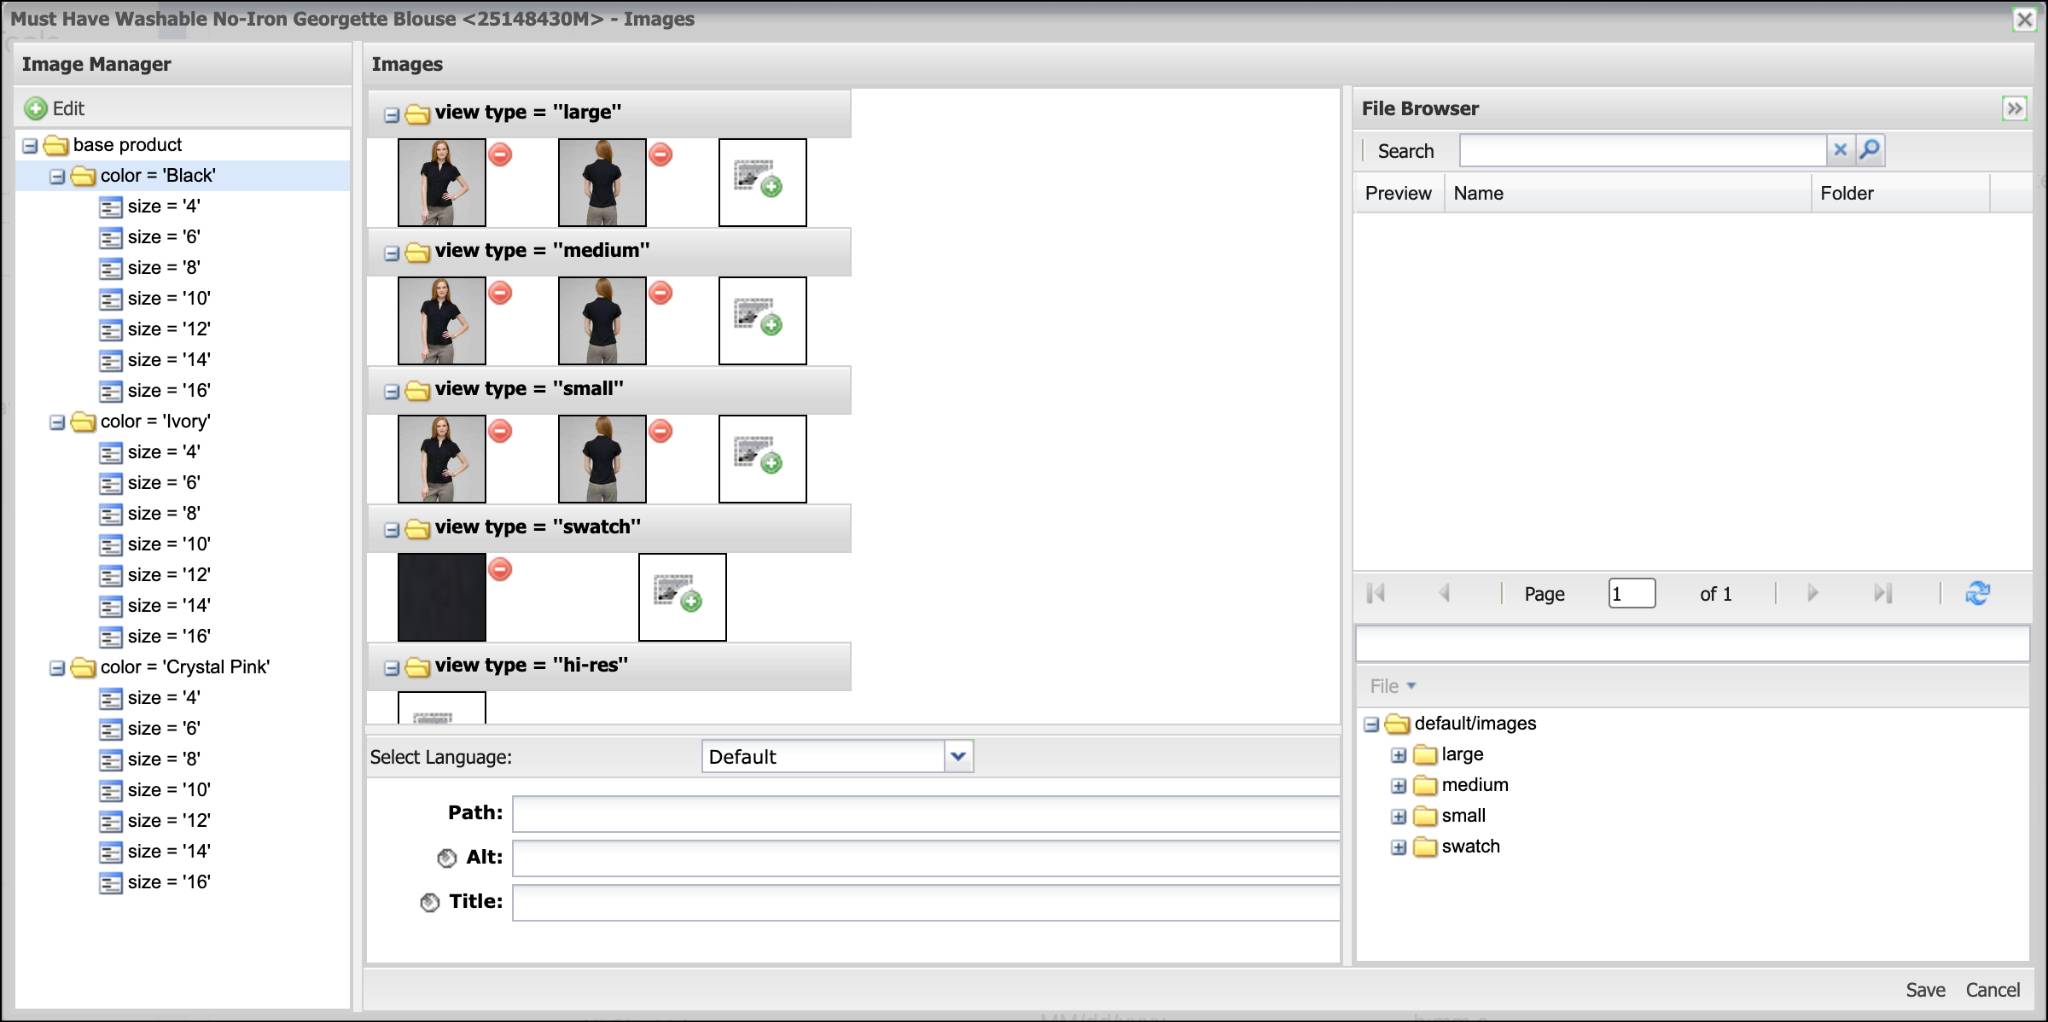
- Click Save.
Implement Dynamic Imaging Service
Dynamic Imaging Service (DIS) is an on-the-fly image transformation service that dynamically scales, resizes, crops, overlays, and changes the format of images presented on the storefront. It eliminates a big part of the image creation process, saving time and cost. You don’t have to wait for the graphics person to create multiple images ahead of time. Instead, DIS transforms a single, high-resolution source image as a source image per your specifications and serves them to your storefront.

You configure settings such as image size, crop, overlay, format, background color, and quality. Then DIS serves the correct sizes for each image application, such as the product detail page, catalog page, recommended products, search results, and more.
Say you have a catalog of 100,000 items and your search results display as four images of up to 150x150 pixels per row. There's a change of plans. Your web designer creates a new layout that shows three images, sized 250x250 pixels per row. Instead of uploading a catalog with these different-sized images, DIS uses the high-resolution images already stored in B2C Commerce to serve up the new images.
The platform serves any image regardless of dimensions or file size, but images exceeding 6 MB or 3,000 x 3,000 pixels are served in their original configuration and bypass transformations. Furthermore, image transformations time out if they take longer than 29 seconds.
Perform Image Transformations
Access to DIS is programmatic, so you ask your developer to assist with this capability.
The developer configures and generates an image URL using the URLUtils and MediaFile classes within the storefront application. The API validates the transformation parameters, and protects the code from future changes. If the basic URL pattern changes, the API calls still work, regardless of the changes.
DIS performs multiple operations when creating images from high-resolution sources. Here’s the order of processing.
|
Step
|
|
Generates
|
|---|---|---|
1 |
Format |
A gif, jp2, jpg, jpeg, jxr, or png, from a gif, jp2, jpg, jpeg, png, tiff, and tif. |
2 |
Crop |
An image that contains a cropped area taken from a larger image. |
3 |
Scale |
A scaled image with a locked aspect ratio. |
4 |
Overlay |
An image that overlays another image at a given position. |
5 |
Quality |
A JPG or PNG image that you can modify using the quality attribute. For image quality parameter settings. |
Review the documentation for image guidelines.
Next
In this unit, you learned how to manage storefront images via the Image Management System and the Dynamic Imaging Service. Next, explore how to manage storefront content in Business Manager.
Resources
- Salesforce Help: Image Management
- Salesforce Help: Image Variants
- Salesforce Help: Dynamic Imaging Service