Use Einstein Generative AI with Salesforce B2B Commerce
Learning Objectives
After completing this unit, you’ll be able to:
- Explain how Salesforce Einstein generative AI is different from other AI services.
- Explain how Einstein generative AI helps Commerce app users gain access to detailed business operation insights.
- List the Commerce app features that are enhanced with Einstein generative AI.
Unlock Intelligent Commerce with Einstein Generative AI
AI technology is increasingly prevalent in ecommerce business operations. With all the AI static in the airwaves, it’s essential to tune in to a solution that offers real value and a practical application: Salesforce Einstein generative AI. Why? Because it’s integrated into the robust Salesforce Platform and driven by the innovative power of Einstein.
Trust First and Foremost
What sets Einstein generative AI apart from other AI models is its foundation of trust. With a powerful trust layer in place, you can rely on Einstein generative AI technology to deliver accurate and reliable results. And here’s the best part–Einstein generative AI prioritizes the security and privacy of your customer’s data. So you know that both your data and your customer’s data is safe.
New Tools, New Buyers, New Revenue
The Commerce app coupled with Einstein generative AI tools offers cutting-edge technologies to revolutionize the way you engage with buyers. These powerful tools use the power of Einstein to enhance personalized buyer experiences, engage new buyers, drive sales, and increase buyer satisfaction.
With Einstein generative AI, the Commerce app takes customer engagement to a higher level by anticipating customer needs, providing personalized recommendations, and optimizing promotion strategies. Let’s take a closer look at the Einstein generative AI technology available in the Commerce app.
Improve Store Performance with Einstein Generative AI Goals and Recommendations
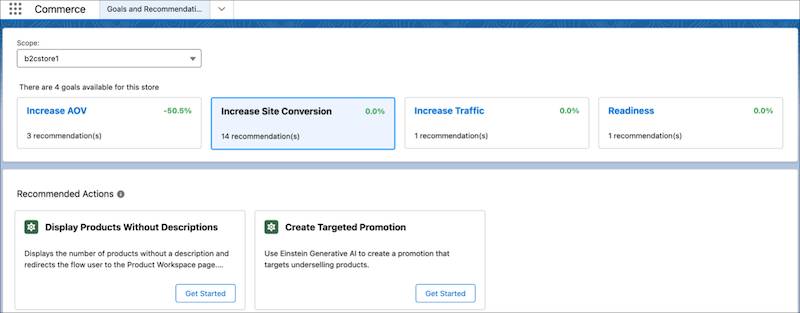
B2B Commerce Goals and Recommendations is a guided framework that offers specific business improvement recommendations from Einstein generative AI. Use goals and recommendations to improve your B2B store by taking recommended actions to achieve key performance goals. Some recommendations are tailored to your store’s data, and others are general actions based on industry best practices.
The recommendations may be specific to improving site conversion, increasing site traffic, or increasing average order value. As you act on the recommendations, you can monitor progress with data-driven insights into conversion rate, average order value, site traffic, and more.
Intelligent Product Descriptions and Fields
To help generate product descriptions and product fields, use the power of Einstein generative AI.
Enhance Product Descriptions
Create captivating product descriptions for your B2B store. This innovative tool uses Einstein generative AI and your specific instructions to generate revised descriptions for your selected products. While it currently supports input instructions in English only, Einstein's power extends to create descriptions in all languages supported by your store. After Einstein completes its work, you have the option to review and fine-tune the descriptions to ensure they align with your brand's voice.
Enhance Product Fields
A product text field is a type of custom field that allows you to capture and display text data related to a product. Text fields are useful for capturing additional product details that are not covered by standard fields. For example, you might use a text field to store a product's manufacturer, model number, or any other relevant information.
You can use Einstein generative AI to generate product text fields for multiple products in one process. This advanced feature allows you to generate and update text fields for multiple products simultaneously, streamlining your content creation process.
While product fields support instructions in English only, they can generate product text fields in the languages supported by your B2B store. By providing Einstein with clear instructions and any necessary reference fields, you can tailor the AI’s output to align with your product’s unique attributes and your brand’s voice and tone.
Hit the Search Bullseye with Einstein Product Recommendations
Enhance customer engagement and drive sales with personalized product suggestions powered by Einstein generative AI. Einstein tracks customer shopping behavior to offer tailored product recommendations, drawing insights from both individual shopping patterns and data collected from a network of participating merchants.
Promotions with a High IQ
Configure compelling promotions with only a few simple clicks. Harness the power of Einstein generative AI and trusted data from Agentforce Commerce.
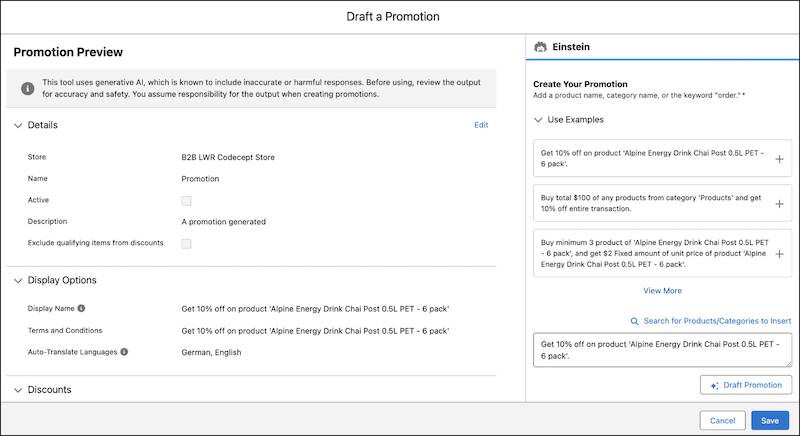
Create Smart Promotions with Einstein
Whether your goal is to construct basic offers or more complex promotional campaigns, the combination of natural language processing and Einstein generative AI technology streamlines the process and enriches the results. Simply input your instructions in everyday language, and watch as Einstein generative AI transforms your ideas into actionable, engaging promotions. Because the promotions account for customer shopping behaviors, the promotions resonate with your target audience, elevate your marketing strategy, and drive results.
Smart Promotion Management
Push the sales strategy envelope and simplify promotion management by automatically generating customized offers for distribution through email, SMS, and messaging apps. Use Einstein generative AI to create a range of promotion types, converting business insights into impactful promotions. Reach your revenue growth goals by implementing targeted promotions that connect with your audience. Moreover, easily create promotion display names and translate them into multiple languages to ensure global reach and local appeal for your offers.
Shine a Light on Your Site
Quickly generate page title tags and page meta description fields for your products to elevate your store’s online visibility with the Einstein for product and page meta tags feature, powered by Einstein generative AI. This feature generates tags and description fields that provide search engines with the critical information required to rank your pages effectively and enhance your SEO performance.
Get Detail-Oriented with Helpful and Meaningful Insights
Einstein Commerce Insights
Boost cart conversions with powerful shopping basket analysis that gives your team insight into buying behaviors. Then, understand your customers’ purchasing patterns via an intuitive dashboard.
With Einstein Commerce Insights, make data-driven decisions like pinpointing the top-selling items and uncovering common product pairings. Delve into detailed product data, monitor sales trends over time, and investigate co-purchase dynamics to inform your merchandising and promotional strategies. By applying these insights, you can tailor your approach to meet customer needs and increase cart conversions.
Review Product Behavior with the Product Intelligence Analytics Dashboard
Get product stats on your total sales and orders in the Product Intelligence Analytics dashboard. Explore charts showcasing your top-selling items and categories. Get insights into your customers’ product search habits, and explore which products are commonly purchased together.
Shopper Intelligence Analytics Dashboard
Dive into the world of customer shopping behavior with engaging data visualizations in the Shopper Intelligence Analytics dashboard. Discover who your active, at-risk, and churned customers are with easy-to-understand graphics. Gain valuable insights into your customer base by exploring important metrics like average customer lifetime value, average order value, and average purchase frequency.
Return Insights
Lower your return rates by using Return Insights to identify and analyze customer feedback on frequently returned products. Select up to 20 products and send them to Einstein. Einstein uses multiple streams of feedback to gather and sort return data. Use this valuable data to identify patterns and address underlying issues. Then, implement strategies such as improving product descriptions or revisiting sizing metrics to reduce return rates, ultimately enhancing customer satisfaction and improving your bottom line.
As your B2B business looks to elevate the buyer experience with intelligent solutions, search no further than the Commerce app with Einstein AI.
Next Steps
In this unit, you learned how Salesforce Einstein generative AI adds intelligence to product descriptions, search recommendations, search engine optimization, promotions, and dashboard metrics. Next, complete the quiz to earn a new badge!
Resources
- Salesforce Help: Enhance Product Fields with Einstein
- Salesforce Help: Goals and Actions
- Salesforce Help: Commerce Einstein
- Salesforce Help: Intelligence Analytics Dashboards Powered by Data 360
- Salesforce Help: Create Promotions with Einstein
- Salesforce Help: Search Engine Optimization (SEO) for Commerce
- Salesforce Help: Return Insights Overview