Prepare to Create an Approval Process
Learning Objectives
After completing this unit, you’ll be able to:
- Create and assign record types to manage access to shift statuses.
- Create a shift approval queue that contains all the approvers.
- Create email templates that are used to send emails during the approval process.
Identify How to Set Up Shift Statuses
Matt has successfully completed Step 1 of his plan and starts preparing for Step 2. To make it easy to select and use shift statuses, Matt must make sure that users can only see the statuses they use.
Matt meets Fola to better understand the role of retail bankers and branch managers in shift creation. Fola informs Matt that not all users need access to all shift statuses.
- Cumulus retail bankers only propose their shifts. So they only use the Published status.
- Cumulus branch managers and partner branch managers approve or reject shifts created by all retail bankers. The branch managers also create placeholder shifts for planning purposes. After discussing availability with their team members (Cumulus retail bankers), they assign them to placeholder shifts. So they only use the Tentative status (for placeholder shifts) and the Confirmed status.
- Partner retail bankers create their own shifts. So they create shifts only with the Confirmed status.
Create Record Types to Set Up Shift Statuses
Here’s how Matt ensures that Cumulus retail bankers can create shifts with only the Published status.
- Click
 , and then click Setup.
 - Click the Object Manager tab.
- In the Quick Find box, enter
shift, and click Shift. - Click Record Types, and then click New.
- For the record type label, enter
Retail Banker Statuses. The Record Type Name is auto populated. Retain the default record type name. - Select Active.
- In the Make Available column, select the checkbox for Retail Banker profile.
- Click Next.
- Click Save.
- In the Picklists Available for Editing section, next to the Status field, click Edit.
- Ensure that only Published(Published) is in the list of selected values. That is, select Confirmed and Tentative from the list of selected values, and then click Remove.

- In the Default dropdown, select Published (Published).
- Click Save.
Similarly, Matt creates record types for partner retail bankers and branch managers and makes them available to the respective profiles.
| Record Type Label | Selected Values | Profile |
|---|---|---|
|
Partner Retail Banker Statuses |
Confirmed |
Partner Retail Banker |
|
Branch Manager Statuses |
Tentative and Confirmed (Default: Confirmed) |
Branch Manager |
After setting up record types, everyone has access only to the shift statuses they need. This setup also makes it easy for retail bankers to create shifts with one less field to select.
Learn About Approval Process
An approval process automates how records are approved in Salesforce. When you configure an approval process, you can manage various aspects of the process.
- Specify the steps necessary for a record to be approved and who approves the record at each step
- Specify the actions that must be performed based on what happens during the approval process. For example, change record status and send email to stakeholders when a request is approved.
As the final step of his three-step plan, Matt wants to set up an approval process for shifts at Cumulus Bank. Before he does that, he must set up queues that contain all the stakeholders who are responsible for approving shift requests. Then, he must create email templates that are used for communication during the approval process.
Create a Shift Approval Queue
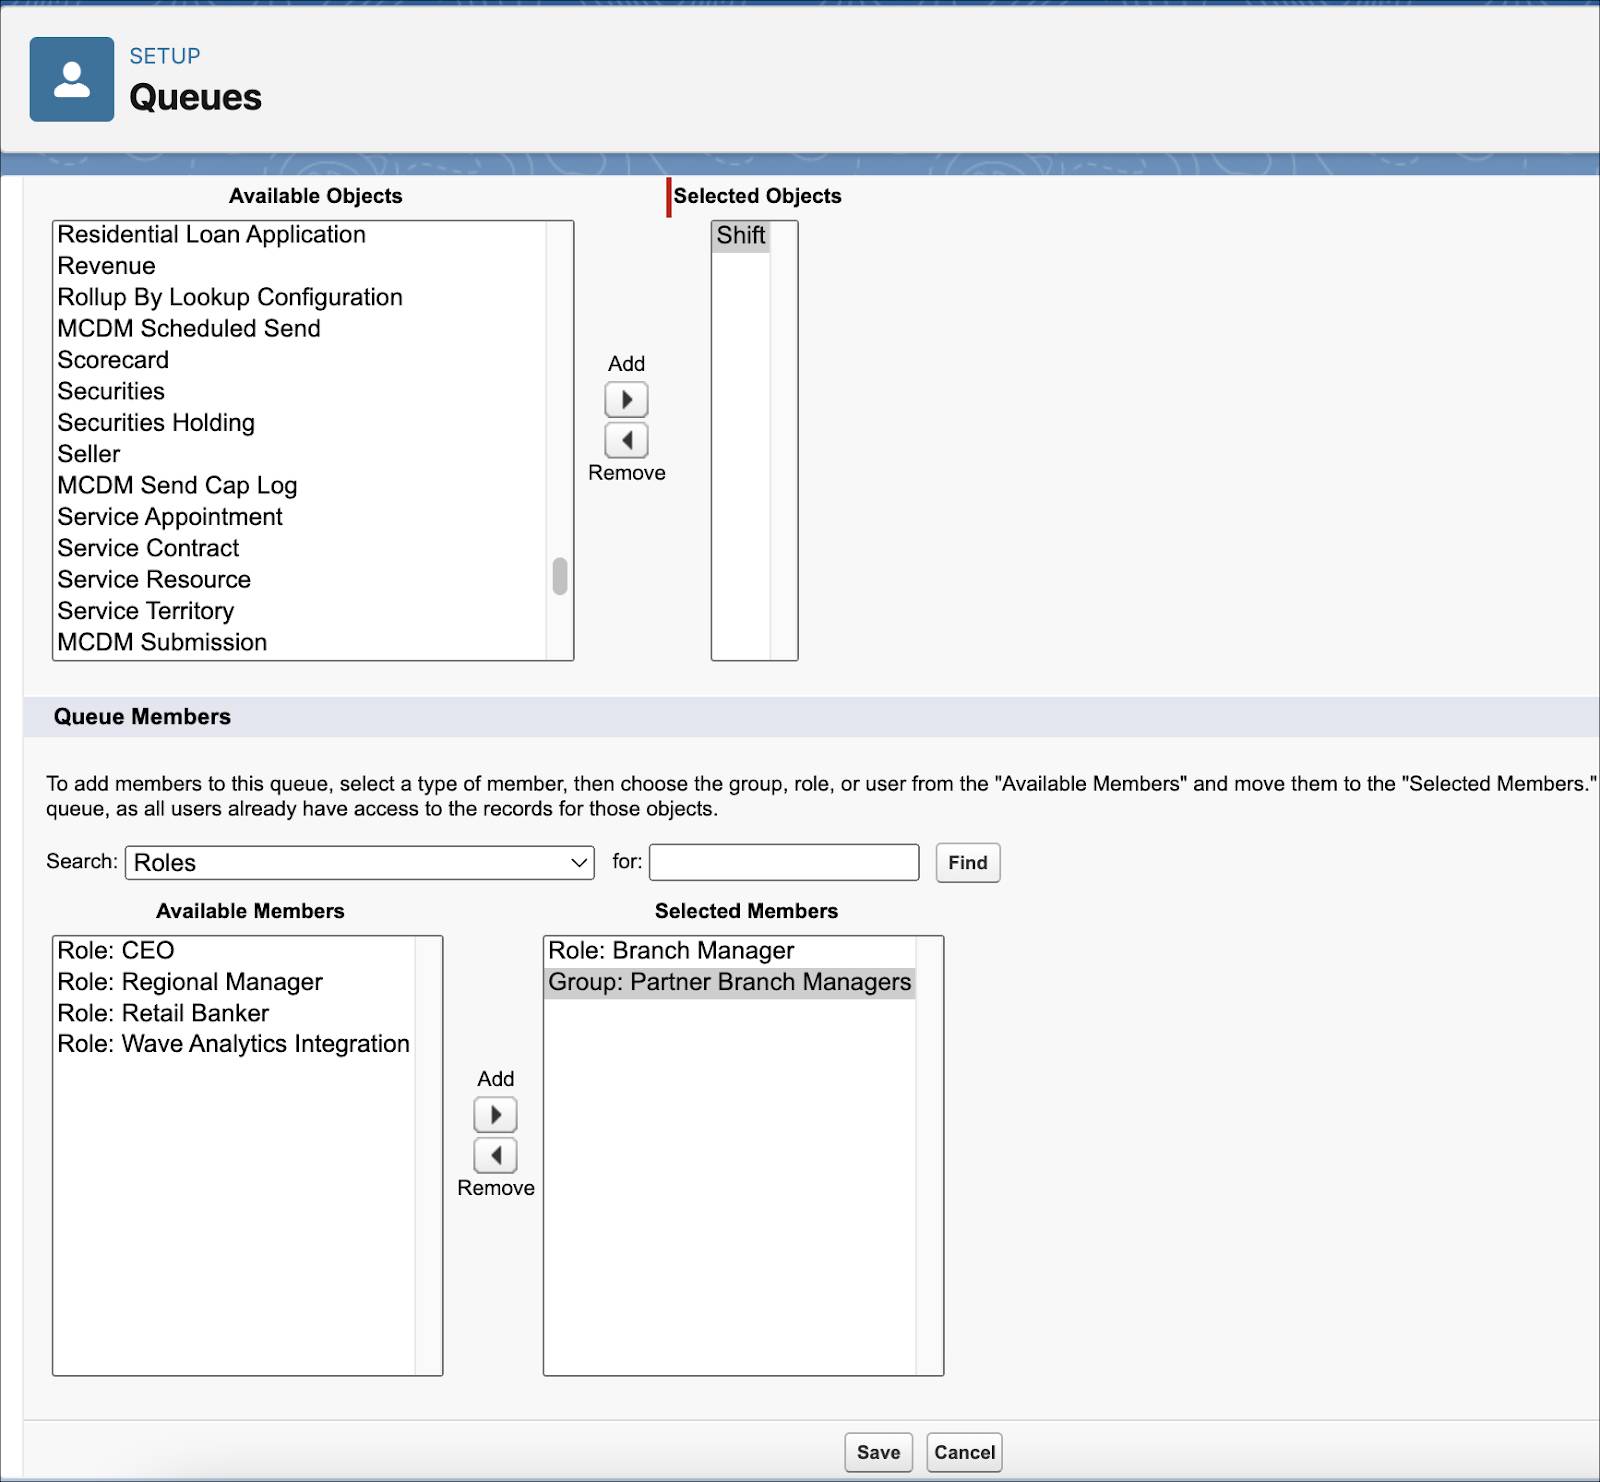
Matt creates a queue that contains all the approvers—Cumulus branch managers and partner branch managers. When a shift approval request is assigned to the queue, any approver in the queue can respond to the request.
- Click
 , and then click Setup.
 - In the Quick Find box, enter
Queues, and click Queues. - Click New.
- For the label, enter
Shift Approvers, and then press Tab to auto-populate the queue name. - In the Supported Objects section, select Shift from the Available Objects list, and then click Add.
- In the Queue Members section, select Roles from the Search dropdown list.
- Select Role: Branch Manager from the Available Members list, and then click Add.
- In the Queue Members section, select Public Groups from the Search dropdown list.
- Select Group: Partner Branch Managers from the Available Members list, and then click Add.
- Click Save.

Create Email Templates for Approval Process
Matt wants Salesforce Scheduler to automatically send emails to stakeholders when it’s their turn to act during an approval process. So, he must create email templates that are used during the approval process setup. He must create four templates.
- The first template notifies approvers (Cumulus branch managers and partner branch managers) when a shift approval request is created.
- The second template notifies retail bankers when a shift approval request is approved.
- The third template notifies retail bankers when a shift approval request is rejected.
- The fourth template notifies approvers when a shift approval request is recalled.
Matt starts by creating the first email template.
- Click
 , and then click Setup.
 - In the Quick Find box, enter
Classic Email Templates, and click Classic Email Templates. - Click New Template.
- In the Email Template: New Template step, select Text, and then click Next.
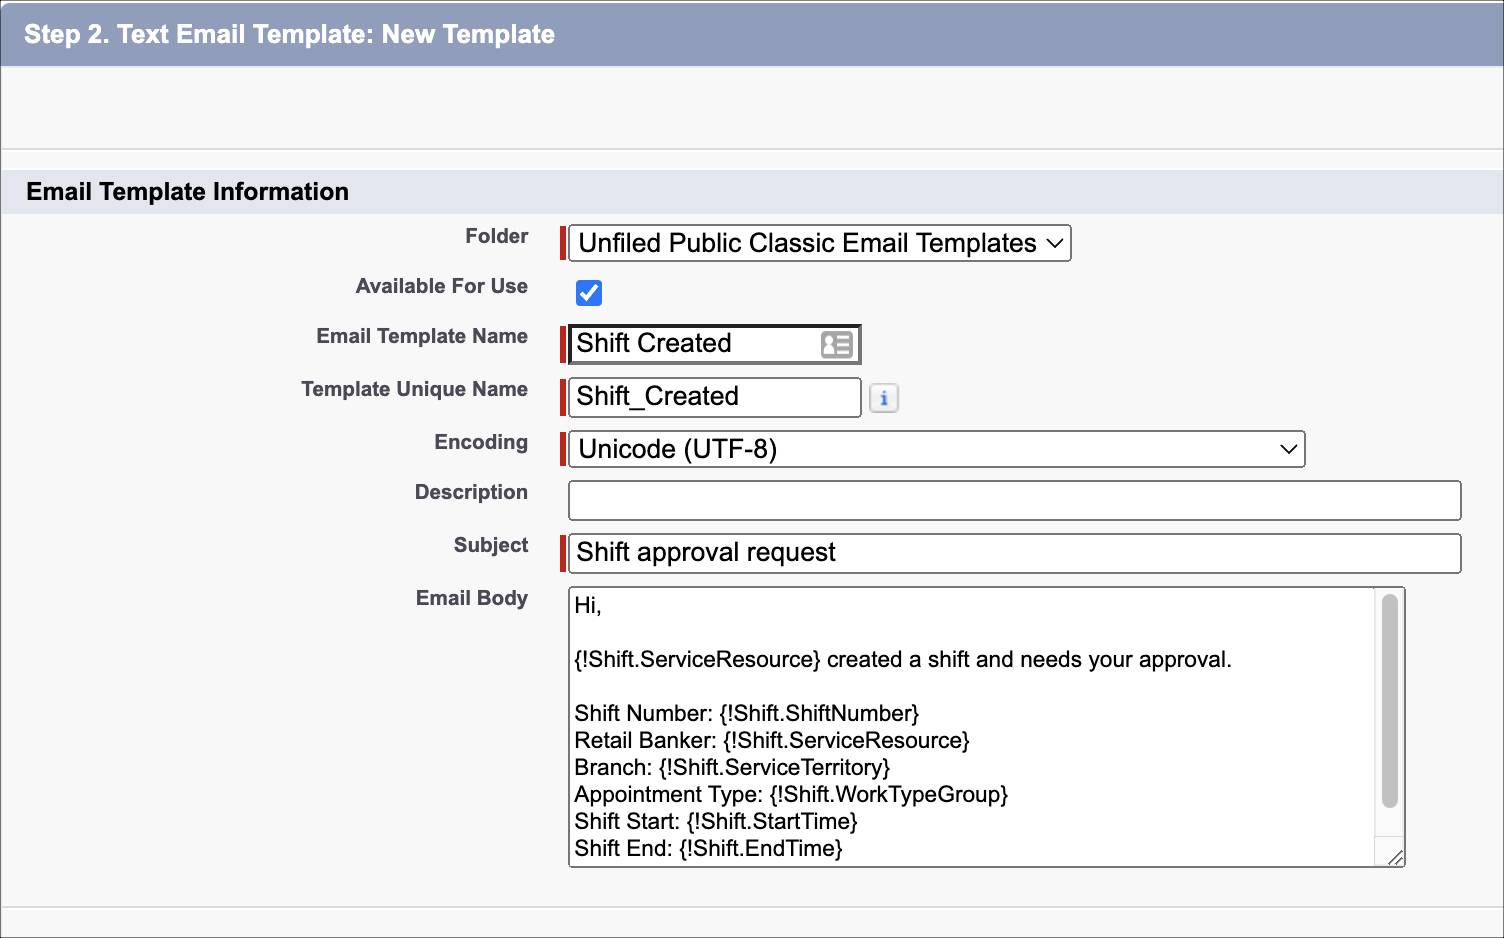
- In the Text Email Template: New Template step, provide these details:
- Select Available for Use.
- For the email template name, enter
Shift Created, and then press Tab to auto-populate the unique name. - For the subject, enter
Shift approval request. - In the Email Body, enter:
Hi,
{!Shift.ServiceResource} created a shift and needs your approval.
Shift Number: {!Shift.ShiftNumber}
Retail Banker: {!Shift.ServiceResource}
Branch: {!Shift.ServiceTerritory}
Appointment Type: {!Shift.WorkTypeGroup}
Shift Start: {!Shift.StartTime}
Shift End: {!Shift.EndTime}
- Click Save.
Matt repeats the steps to create three more templates: Shift Approved, Shift Rejected, and Shift Recalled. The Shift Approved and Shift Rejected templates are used to notify retail bankers when shift requests are approved and rejected respectively. The Shift Recalled template is used to notify branch managers when a shift approval request is recalled.
Add the Items to Approve Component
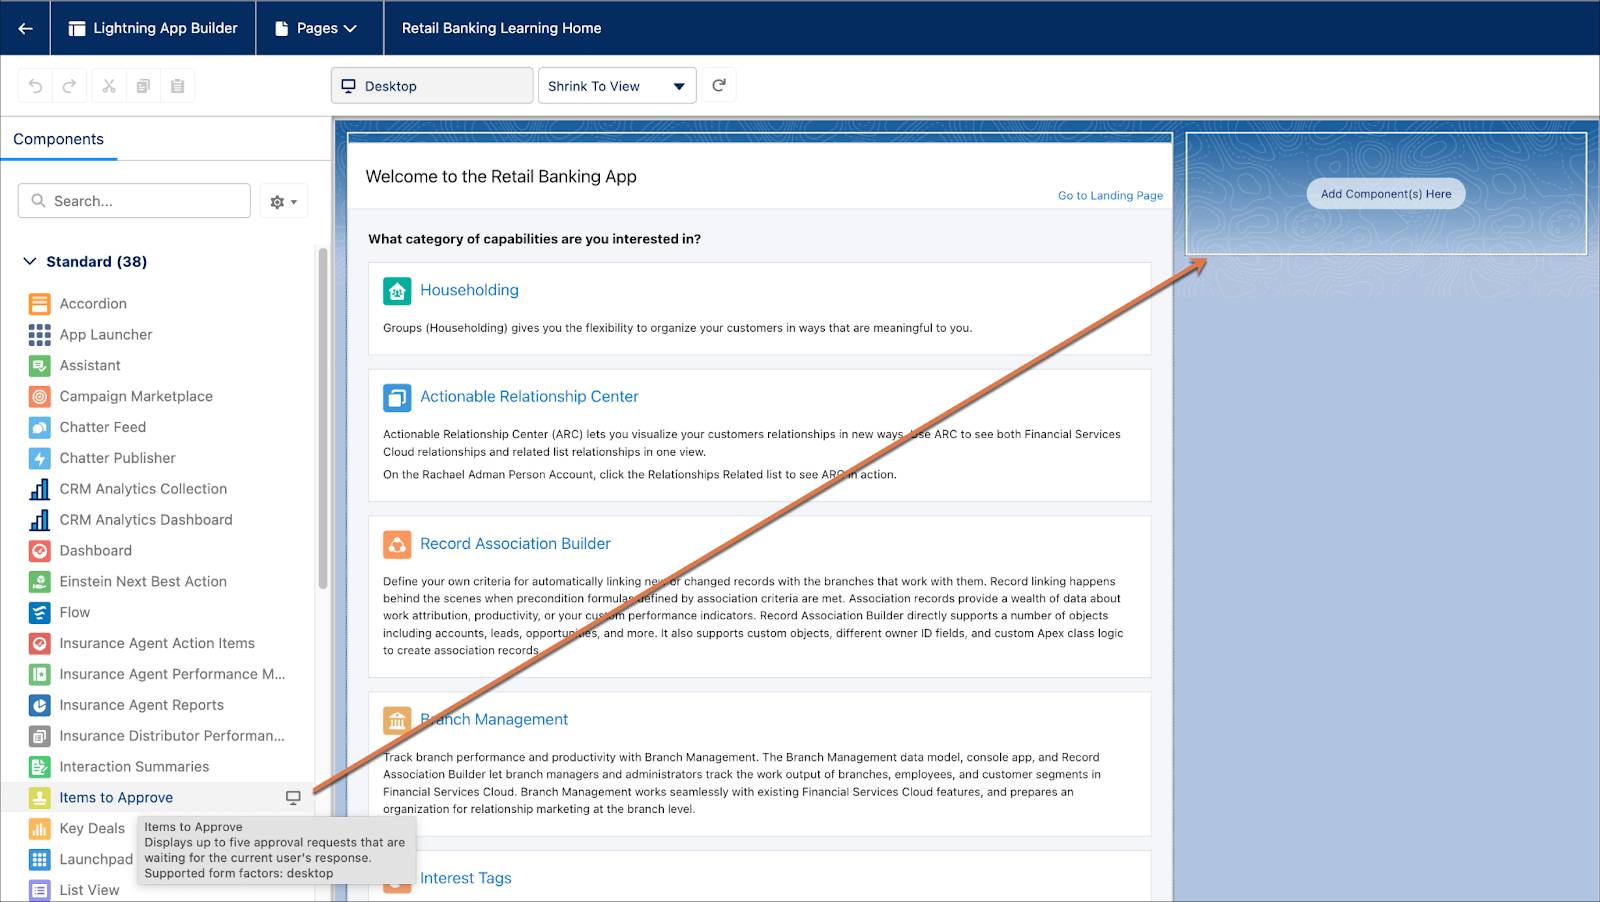
To make it easy for approvers to view and respond to approval requests, Matt adds the Items to Approve component to the Retail Banking Home page. The component allows users to see all the approval requests in one place.
- Click
 to open the App Launcher.
 - Find and open the Retail Banking app.
- On the Home page, click
 , and then select Edit Page. The Lightning App Builder page appears.
 - In the Components panel, under Standard, drag the Items to Approve component to the canvas.

- Save your changes and activate the page.
What’s Next
In this unit, Matt created and assigned record types to manage access to shift statuses. Then, he prepared for the approval process setup and added the Items to Approve component. In the next unit, you see how Matt sets up the approval process.
