Set Up Approval Paths and Queues
Learning Objectives
After completing this unit, you’ll be able to:
- Define a new application status.
- Create a path based on application statuses in the review process.
- Build a queue for reviewers to manage the application review backlog.
Create Application Statuses
A constituent can apply for various programs, such as financial assistance, COVID-19 relief, child care, unemployment insurance, driver’s licenses, business licenses, and more. When they submit an application, it goes through an application approval process. The application status tells you where an application is in the approval process. For example, once a constituent submits an application on the Cosville public portal, the status is Submitted. This means the application is received and ready for processing.
Public Sector includes some default application status values for business licenses and individual applications. On the business license application or individual application objects, you can create additional picklist values or customize the default values for the Application Status field.

To learn more about creating picklist values, see the link in the Resources section.
Next, you create a path that uses the application statuses in the review process.
Set Up Paths for Application Statuses
Tishon wants to give reviewers a visual representation of the stages of the application approval process, so she uses a path. Paths guide users through a business process. At each step in the path, users see details from up to five fields to keep them focused on the most important details at that step. Paths can also have Guidance for Success, which includes useful information like tips, links, and best practices.
Here’s how Tishon creates a path for her business license application approval process.
- From Setup, use the Quick Find box to find and select Path Settings. The Path Settings window opens.

- Select New Path.

- Name the path, and choose an object.
- For Path Name, enter
Salon Establishment License Path. Then, press Tab to automatically populate the API Reference Name.
- For Object, select Business License Application.
- For Record Type, choose Business License.
- For Picklist, select Application Status.
- Click Next.

- For Submitted, click +Add/Update Fields and add Application Status, Application Type, and Record Type.
- Save your work.
- For Guidance for Success, enter
Verify that all required information is included. A maximum of 1,000 characters are allowed.
- Click Next.
- Click Activate Your Path and then Finish.
Next, she creates a queue for reviewers to manage their application review backlog.
Create an Application Approval Queue
In Public Sector, a queue is a way for multiple approvers to manage a backlog of applications to review. Instead of a user owning an application record, the queue owns it during the approval process. This way, whoever is available to review the next pending application can pick it up from the queue.
Let’s see how Tishon creates an approval queue for business license applications.
- From Setup, use the Quick Find box to find and select Queues.
- Click New. The Queues page opens.

- For Label, enter
Initial Review Queue, and press Tab to automatically populate the Queue Name.
- (Optional) For email notifications, enter a Queue Email to use when applications enter the queue. If desired, select Send Email to Members to send email notifications to all members of the queue.
- Under Supported Objects, add Business License Application to the Selected Objects list.
- Under Queue Members, change Search to Roles and then add Role: Intake Officer to the Selected Members list.
- Save your changes.

Configure How Reviewers Respond to Approval Requests
Tishon wants to make it easy for reviewers to view and respond to approval requests. To do this, she decides to customize the Home page and give users the option to respond to approval requests right from their email.
Let’s see how she does it.
Customize the Home page:
- From App Launcher, find and open Public Sector: License and Permit Management.
- On the Home page click,
 and then select Edit Page. Lightning App Builder Opens.
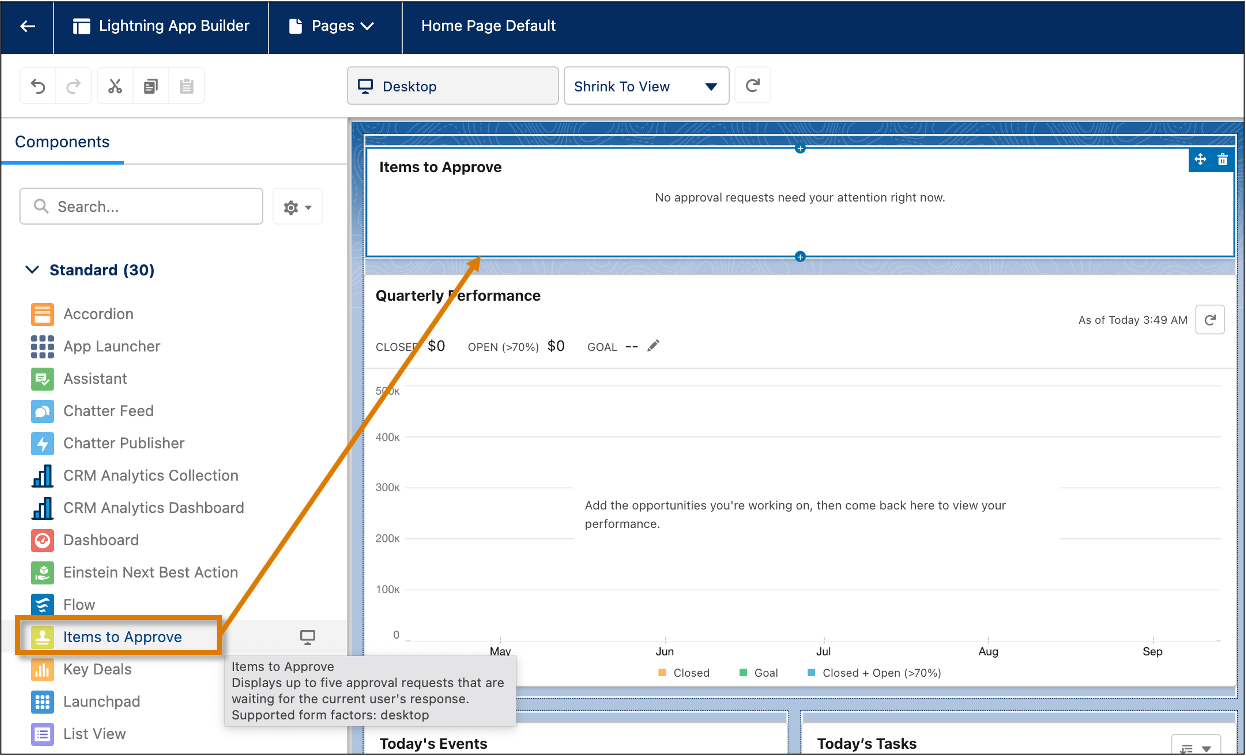
- Under Standard Components, drag the Items to Approve component to the Items to Approve section at the top of the page canvas.
- Save your changes and activate the page.
Enable Email Approval Response: To let reviewers respond to approval requests directly from their email, enable Email Approval Response.
- From Setup, use the Quick Find box to find and select Process Automation Settings.
- Select Enable email approval response.
- Save your changes.
In the next unit, you find out how to automate application reviews and approvals. So what are we waiting for? Let’s dive in!
Resources
- Salesforce Help: Create a Path for Application Approvals
- Salesforce Help: Create a Queue for Application Reviewers
- Salesforce Help: Modify or Create Wellness Check Email Templates
- Salesforce Help: Let Users Respond to Approval Requests from Classic Approval Processes by Email
- Salesforce Help: Add or Edit Picklist Values