Automate the Approval Process
Learning Objectives
After completing this unit, you’ll be able to:
- Create an approval process that automates application reviews and approvals.
- Manage rejected applications.
- List the tasks you can automate using Flow Builder.
- Create a Document Checklist Item.
Create an Approval Process
A Salesforce approval process automates the approval of applications in your organization. When a constituent submits an application through a public portal, the approval process begins. It includes steps for reviewers to follow to approve or reject an application.
Tishon needs to set up an approval process for all business license application reviews and approvals at Cosville. Let’s join her as she gets the approval process in place.
- From Setup, in the Quick Find box, search for and select Approval Processes.
- For Manage Approval Processes For, select Business License Application.

- For Create New Approval Process, select Use Jump Start Wizard.

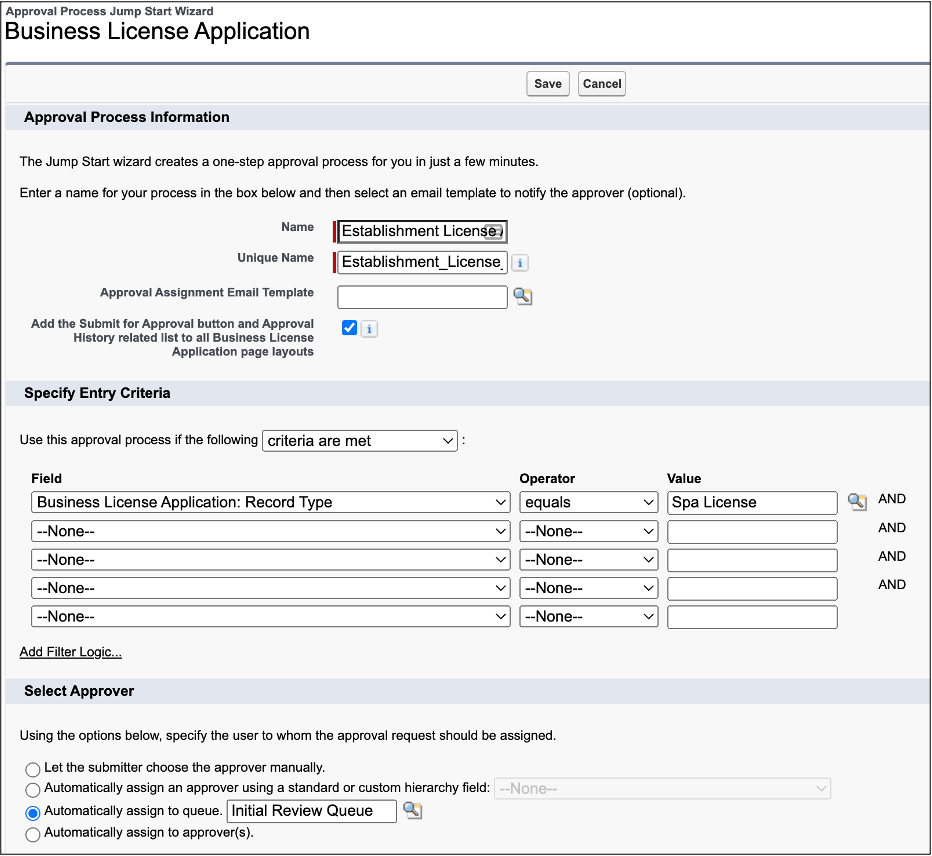
- For Name, enter
Establishment License Approval Process, and press Tab to auto-populate Unique Name.
- Under Specify Entry Criteria, add this criteria:
- For Field, select Business License Application: Record Type.
- For Operator, select equals.
- For Value, enter
Spa License.
- Under Select Approver, select Automatically assign to queue. Click the magnifying glass icon to view and select the name of the reviewer queue as Initial Review Queue.
- Save your changes.
- To view the approvals process you just created, click View Approval Process Detail Page.
Configure an Approval Process
To configure an approval process, you define what happens at each step along the way. The process typically starts with initial submission and ends with final approval or rejection of the application. You can configure four types of actions.
-
Task: The approval process assigns a task to a user with a deadline.
-
Email Alert: The approval process sends an email alert, such as a status update, to the applicant.
-
Field Update: The approval process updates a field on a selected object to a new value.
-
Outbound Message: The approval process sends an email notification to a third-party system.
Now it’s time to join Tishon as she configures her approval process to allow reviewers to approve or reject applications.
Add Approval Actions
The first step is to add the approval actions that reviewers can select during application review. Follow these steps to add approval actions.
- On the Approval Processes page for the business license application, in the Initial Submission Actions list, click Add New, and select Field Update. Here you define a variable that resets every time a constituent submits an application.
- On the New Field Update page, specify these values:
- For Name, enter
Reset Returned Flag, and press Tab to auto-populate Unique Name.
- For Field to Update, select Returned to Applicant.
- Under Specify New Field Value: Checkbox Options, select False.
- Save your action.
Now she adds actions to approve an application.
- In the Final Approval Actions list, click Add Existing.
- On the Select Existing Actions page, for Choose Action Type, select Field Update.
- Add Field update: Reset Returned Flag to the Selected Actions list.
- Save your action. Next, you add an action to update the application status to In Review.
- In the Final Approval Actions list, click Add New, and select Field Update.
- On the New Field Update page, specify these values:
- For Name, enter
Initial Review Approved, and press Tab to auto-populate Unique Name.
- For Field to Update, select Application Status.
- Under Specify New Field Value: Picklist Options, click A specific value, and then select Approved.
- Save your action.

Add Rejection Actions
Add an action to track when an application is returned to the applicant.
- Under the Final Rejection Actions list, click Add New, and then choose Field Update.
- On the New Field Update page, specify these values:
- For Name, enter
Set Returned Flag, and press Tab to auto-populate Unique Name.
- For Field to Update, select Returned to Applicant.
- Under Specify New Field Value: Checkbox Options, select True.
- Save the action.
Next, Tishon adds an action so reviewers can reject an application if it needs corrections.
- Under the Final Rejection Actions, click Add New, and then select Field Update.
- Specify these values:
- For Name, enter
Initial Review Returned, and press Tab to auto-populate the Unique Name.
- For Field to Update, select Application Status.
- Under Specify New Field: Picklist Options, click A specific value, and then select Returned.
- Save the action.

- Click Activate. Once activated, you can view the approval process in the Active Approval Processes section.
Hurray! Tishon has successfully created and configured an approval process for business license applications.
Use Flow Builder to Streamline Approval Processes
With Flow Builder, you can control the order of actions using the point-and-click tool that shows a graphical representation of your process as you build it. Use the straightforward logic of Flow Builder to easily add automation to approval processes. You can configure immediate actions or schedule actions to run at a specific time.
Tishon uses Flow Builder to route different types of applications through different approval automations. She can also automatically send email alerts to license applicants every time their application status changes. For information on how to use Flow Builder, see the Help articles in the Resources section.
Create a Document Checklist Item
Missing documents can lead to application rejection and rerouting back to the applicant. To prevent this and to help applicants manage their file uploads efficiently, create a Document Checklist Item. This will ensure that applicants upload all of the necessary supporting documents for their business license applications.
For example, here’s a document checklist item for all Salon Establishment License applications.

A reviewer uses this checklist item to make sure that the applicant provides valid proof of the business establishment address, such as a rental agreement or utility bill.
You can also relate your document checklist items to Action Plan Templates and generate similar checklist items to create Action Plans for those templates. To learn more, see the Salesforce documentation in the Resources section.
Congratulations! You now understand the approval workflow in Public Sector. Equipped with this knowledge, you can set up and configure your own approval processes to meet the needs of your organization.
In the next unit, you see how all of the pieces of the process come together as Salima Sheikh reviews and approves a business license application in Cosville.
Resources
- Salesforce Help: Set Up a Classic Approval Process
- Salesforce Help: Create Approval Processes
- Trailhead: Build a Discount Approval Process
- Salesforce Help: Automate Tasks with Flows
- Salesforce Help: Approval Process for Licensing and Permitting
- Salesforce Help: Create an Action Plan Template for a Dynamic Assessment