Set Up Flows for Appointment Invitations
Learning Objectives
After completing this unit, you’ll be able to:
- Clone the Book Appointment from Invitation standard flow template to create a flow, and then add it to an Experience Cloud site.
- Clone the Generate Appointment Invitation standard flow template to create a flow, and then customize the flow.
Clone Flow Templates and Customize Flows
Matt is ready to clone flow templates to create flows, and then configure the flows. With these flows, users can generate appointment invitations, and authenticated wealth management customers can book appointments using the invitations.
To customize the flow required to generate appointment invitations, he needs the details of the site and the flow that will be used to book appointments from invitations. So, first, he’ll set up the flow for booking appointments. Then, he’ll set up the flow for generating the invitations.
Configure the Flow for Booking Appointments Using Invitations
In this module, we assume you’re a Salesforce Scheduler administrator with the proper permissions to perform these steps. If you’re not an administrator for Salesforce Scheduler, that’s OK. Read along to learn how your administrator would take the steps in a production org. Don't try to follow these steps in your Trailhead Playground. Salesforce Scheduler isn't available in the Trailhead Playground.
Matt clones the Book Appointment from Invitation flow template to create a flow for use by authenticated customers.
- Click
 , and then click Setup.
 - In the Quick Find box, enter
Flows, and select Flows. - Click Book Appointment from Invitation.
- Click Save As.
- Enter
Book Appointment from Invitation_ForWMas the Flow Label, enterBook_Appointment_from_Invitation_ForWMas the Flow API Name, and then click Save. - Click Activate.
Add the Flow to an Experience Cloud Site
Next, Matt adds the cloned version of the Book Appointment Invitation flow template to the Experience Cloud site that authenticated customers use.
- Click
 , and then click Setup.
 - In the Quick Find box, enter
All Sites, and select All Sites. - Click Builder next to the wealth management site.
- In Experience Builder, open the Pages menu, and then click New Page.

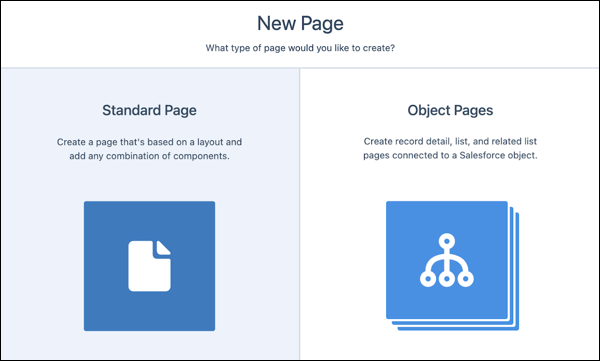
- In the New Page window, select Standard Page.

- Select Flow, and then click Next.

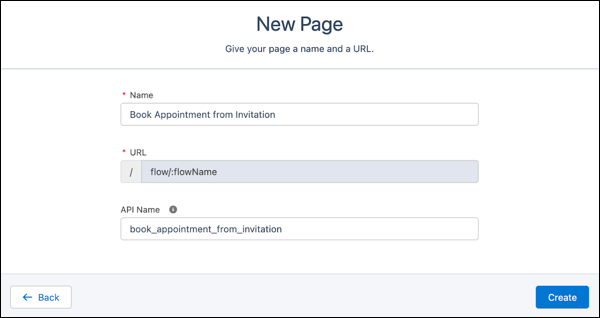
- For Name, enter
Book Appointment from Invitation, and for API Name, enterbook_appointment_from_invitation.
- Click Create.
- Select the Flow Component and provide these details:
- Flow: Book Appointment from Invitation_ForWM
- invitationKey:
{!invitationKey}
Important: Ensure that the flow is in the Content section.
- From the Pages menu at the top, select the Book Appointment from Invitation page, and then click Page Properties. Because the flow is for authenticated customers, ensure that the Page Access field is set to Requires Login.

- Click Publish.
- In the Publish your site? window, click Publish.
- Review the confirmation message, and then click Got it.
Configure the Flow for Generating Appointment Invitations
It’s time to get the flow to generate appointment invitations ready.
An appointment invitation URL has two components: the URL prefix and the invitation key. Salesforce Scheduler automatically generates the invitation key when a user creates an appointment invitation URL. When a user books an appointment using the invitation, Salesforce Scheduler passes the invitation key to the Book Appointment from Invitation flow using the variable in the invitationKey field.
Matt must create the invitation URL prefix, and use it to customize the Generate Appointment Invitation flow.
Here’s how to create the invitation URL prefix:
- Click
 , and then click Setup.
 - In the Quick Find box, enter
All Sites, and select All Sites. - Click Builder next to the wealthmanagement site.
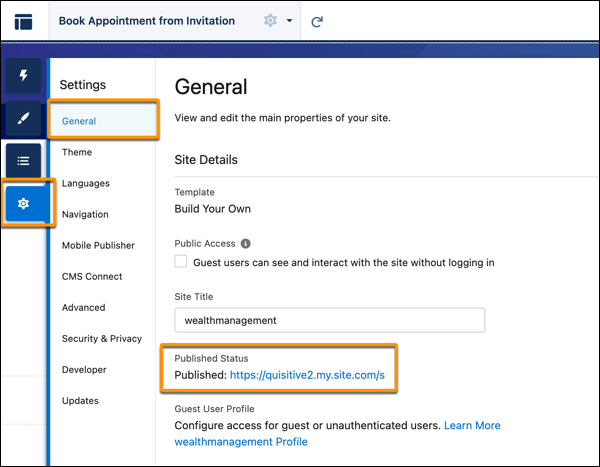
- Click Settings.
- Click General.
- Copy the site URL under Published Status, and then paste it in a text editor.

- From the Pages menu, select the Book Appointment from Invitation page, and then click Page Properties.

- Copy the base URL for the page from the URL field. In this example, the base URL is /flow/:flowName.
- Append the base URL of the page to the site URL. In this example, it’s https://quisitive2.my.site.com/s/flow/:flowName.
- To create the invitation URL prefix, replace :flowName in the URL with the Flow API Name of the ‘Book Appointment from Invitation’ instance. In this example, the URL prefix is https://quisitive2.my.site.com/s/flow/Book_Appointment_from_Invitation_forWM.
After creating the invitation URL prefix, Matt must clone the Generate Appointment Invitation flow template. Then he has to set the invitation URL prefix, which he generated earlier, as the value for the InvitationURLPrefix flow variable.
Like any other flow, Matt can also customize the Generate Appointment Invitation flow. For example, he can set default values for work type group, service territory, and appointment type. Matt knows that Tessa and Ryan want to select the required values. So he doesn’t make such changes.
Here’s how to customize and clone the Generate Appointment Invitation flow.
- Click
 , and then click Setup.
 - In the Quick Find box, enter
Flows, and select Flows. - Click Generate Appointment Invitation.
- Under Toolbox, click Manager.
- Select the InvitationURLPrefix variable.
- Enter the invitation URL prefix in the Default Value field, and then click Done.

- If you want service resources and their assistants to add multiple resources to the invitation, ensure that the Disable Multi-Resource Scheduling attribute is set to false.
- Open the Validate Appointment Time Slot screen.
- Click the Select Service Appointment Time component.
- Ensure that the value of Disable Multi-Resource Scheduling is
{!$GlobalConstant.False}. - Click Done.
- Click Save As.
- For Flow Label, enter Generate Appointment Invitation_forWM.
- For Flow API name, use Generate_Appointment_Invitation_forWM.
- Click Save.
- Click Activate.
All in a day’s work—or rather, a few minutes work for Matt. Now that his flows are ready, it’s time to set permissions and flow access. Let’s follow along in the next unit as he completes the setup.