Set Up Appointment Distribution
Learning Objectives
After completing this unit, you’ll be able to:
- Enable Appointment Distribution.
- Create an appointment assignment policy.
- Link the appointment assignment policy to a scheduling policy.
- List key technical details about Appointment Distribution.
Enable Appointment Distribution
In this module, we assume you’re a Salesforce Scheduler administrator with the proper permissions to enable Appointment Distribution. If you’re not an administrator for Salesforce Scheduler, that’s OK. Read along to learn how your administrator would take the steps in a production org. Don't try to follow these steps in your Trailhead Playground. Salesforce Scheduler isn't available in the Trailhead Playground.
To help Fola’s team get started with appointment distribution, Matt must enable both Appointment Distribution and Aggregate Resource Use. The Appointment Distribution setting provides access to the appointment distribution feature while the Aggregate Resource Use setting starts the utilization score calculation for financial advisors. As we learned earlier, a utilization score is required for appointment distribution to work as expected.
- Click
 and select Setup.
 - In Setup, search for
Scheduler Settingsin the Quick Find box, and click Salesforce Scheduler Settings. - Enable Appointment Distribution, and then enable Aggregate Resource Use.
To ensure equitable distribution of appointments, Fola lists a couple of requirements. Let’s find out how Matt modifies all the flows where appointment distribution must be enabled to meet these requirements.
| Requirement | Matt’s approach |
|---|---|
|
Show only six least utilized advisors from the team when a customer is trying to book an appointment. |
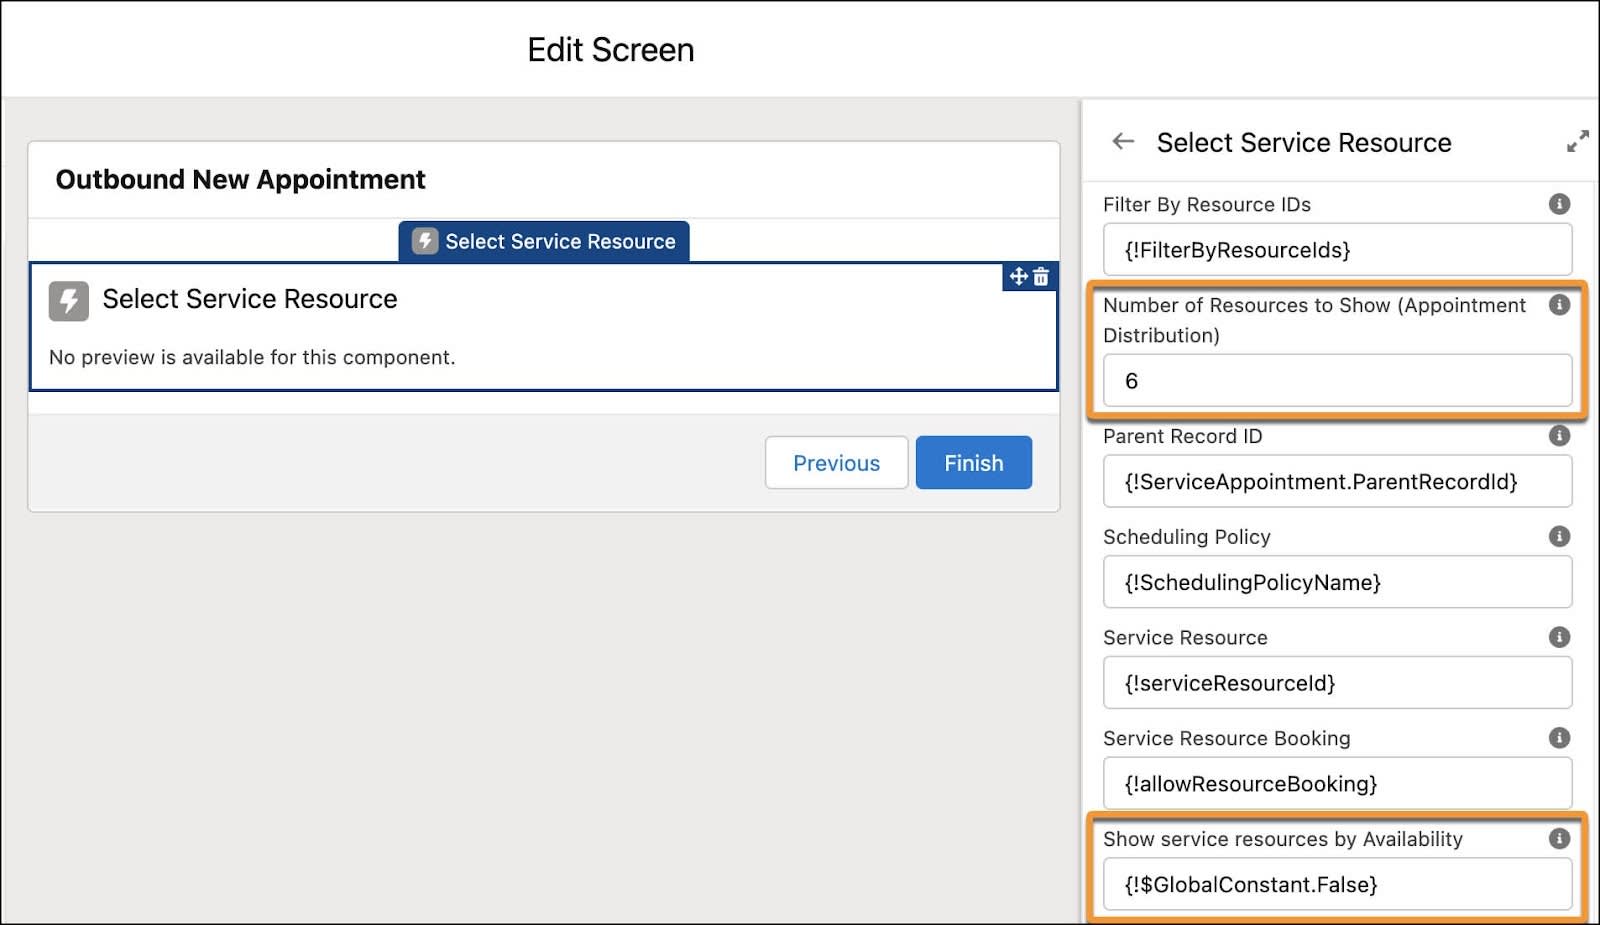
Edit all the components that contain the Number of Resources to Show (Appointment Distribution) attribute, and then set the value of the attribute to 6. |
|
Show the least occupied advisors at the top of the list. |
Edit all the components that contain the Show Service Resources by Availability attribute, and then set the value of the attribute to False. |
Here’s a table of the components and their attributes that you must modify to enable appointment distribution.
| Component | Attributes |
|---|---|
|
Select Service Resource |
|
|
Select Service Resource and Service Appointment Time |
|
|
Service Resource Availability |
|
|
Select Service Appointment Time |
|
Here’s an example of how Matt sets the value for the attributes in the Select Service Resource component.

Matt has configured Appointment Distribution for Fola’s team. The next course of action is to create an appointment assignment policy and link it to a scheduling policy.
Create an Appointment Assignment Policy
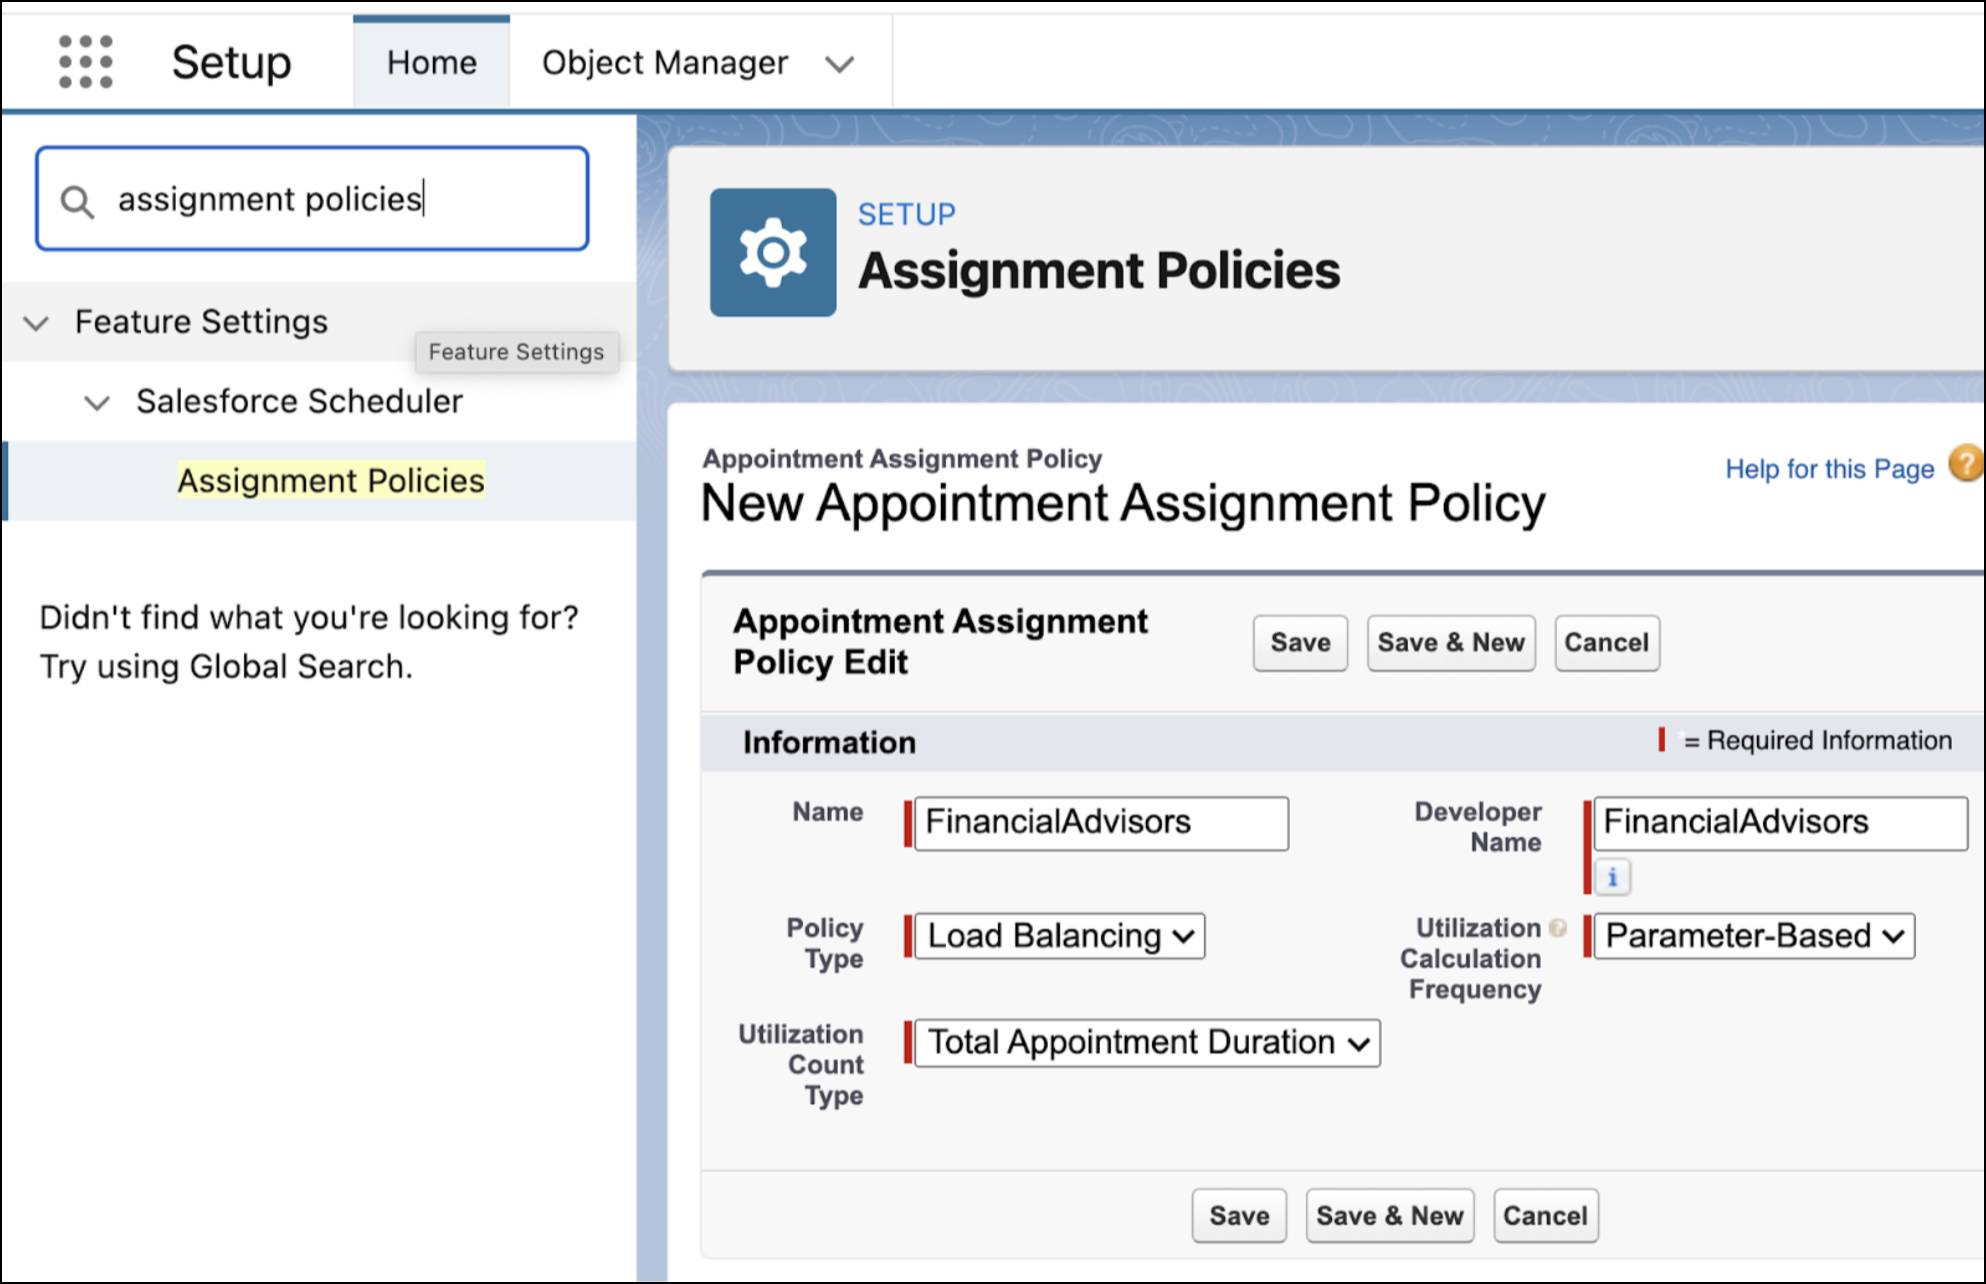
There are two ways you can calculate the utilization score: by the amount of time a financial advisor is occupied (Total Appointment Duration) and by the number of appointments the advisor is assigned (Number of Appointments). These are known as Utilization Count Types. Matt must define an appointment assignment policy that includes parameters such as Utilization Count Type and Utilization Calculation Frequency.
Here’s how he creates the appointment assignment policy.
- Click
 and select Setup.
 - In Setup, search for
Assignment Policiesin the Quick Find box, and click Assignment Policies. - Click New.
- Enter a name for the policy. Matt enters
FinancialAdvisors. - From the Policy Type List, select Load Balancing.
- From the Utilization Count Type list, select Total Appointment Duration.
- From the Utilization Calculation Frequency list, select Parameter-Based.
- Click Save.

To learn more about defining appointment assignment policies and the available choices, see Define an Appointment Assignment Policy.
Link an Appointment Assignment Policy to a Scheduling Policy
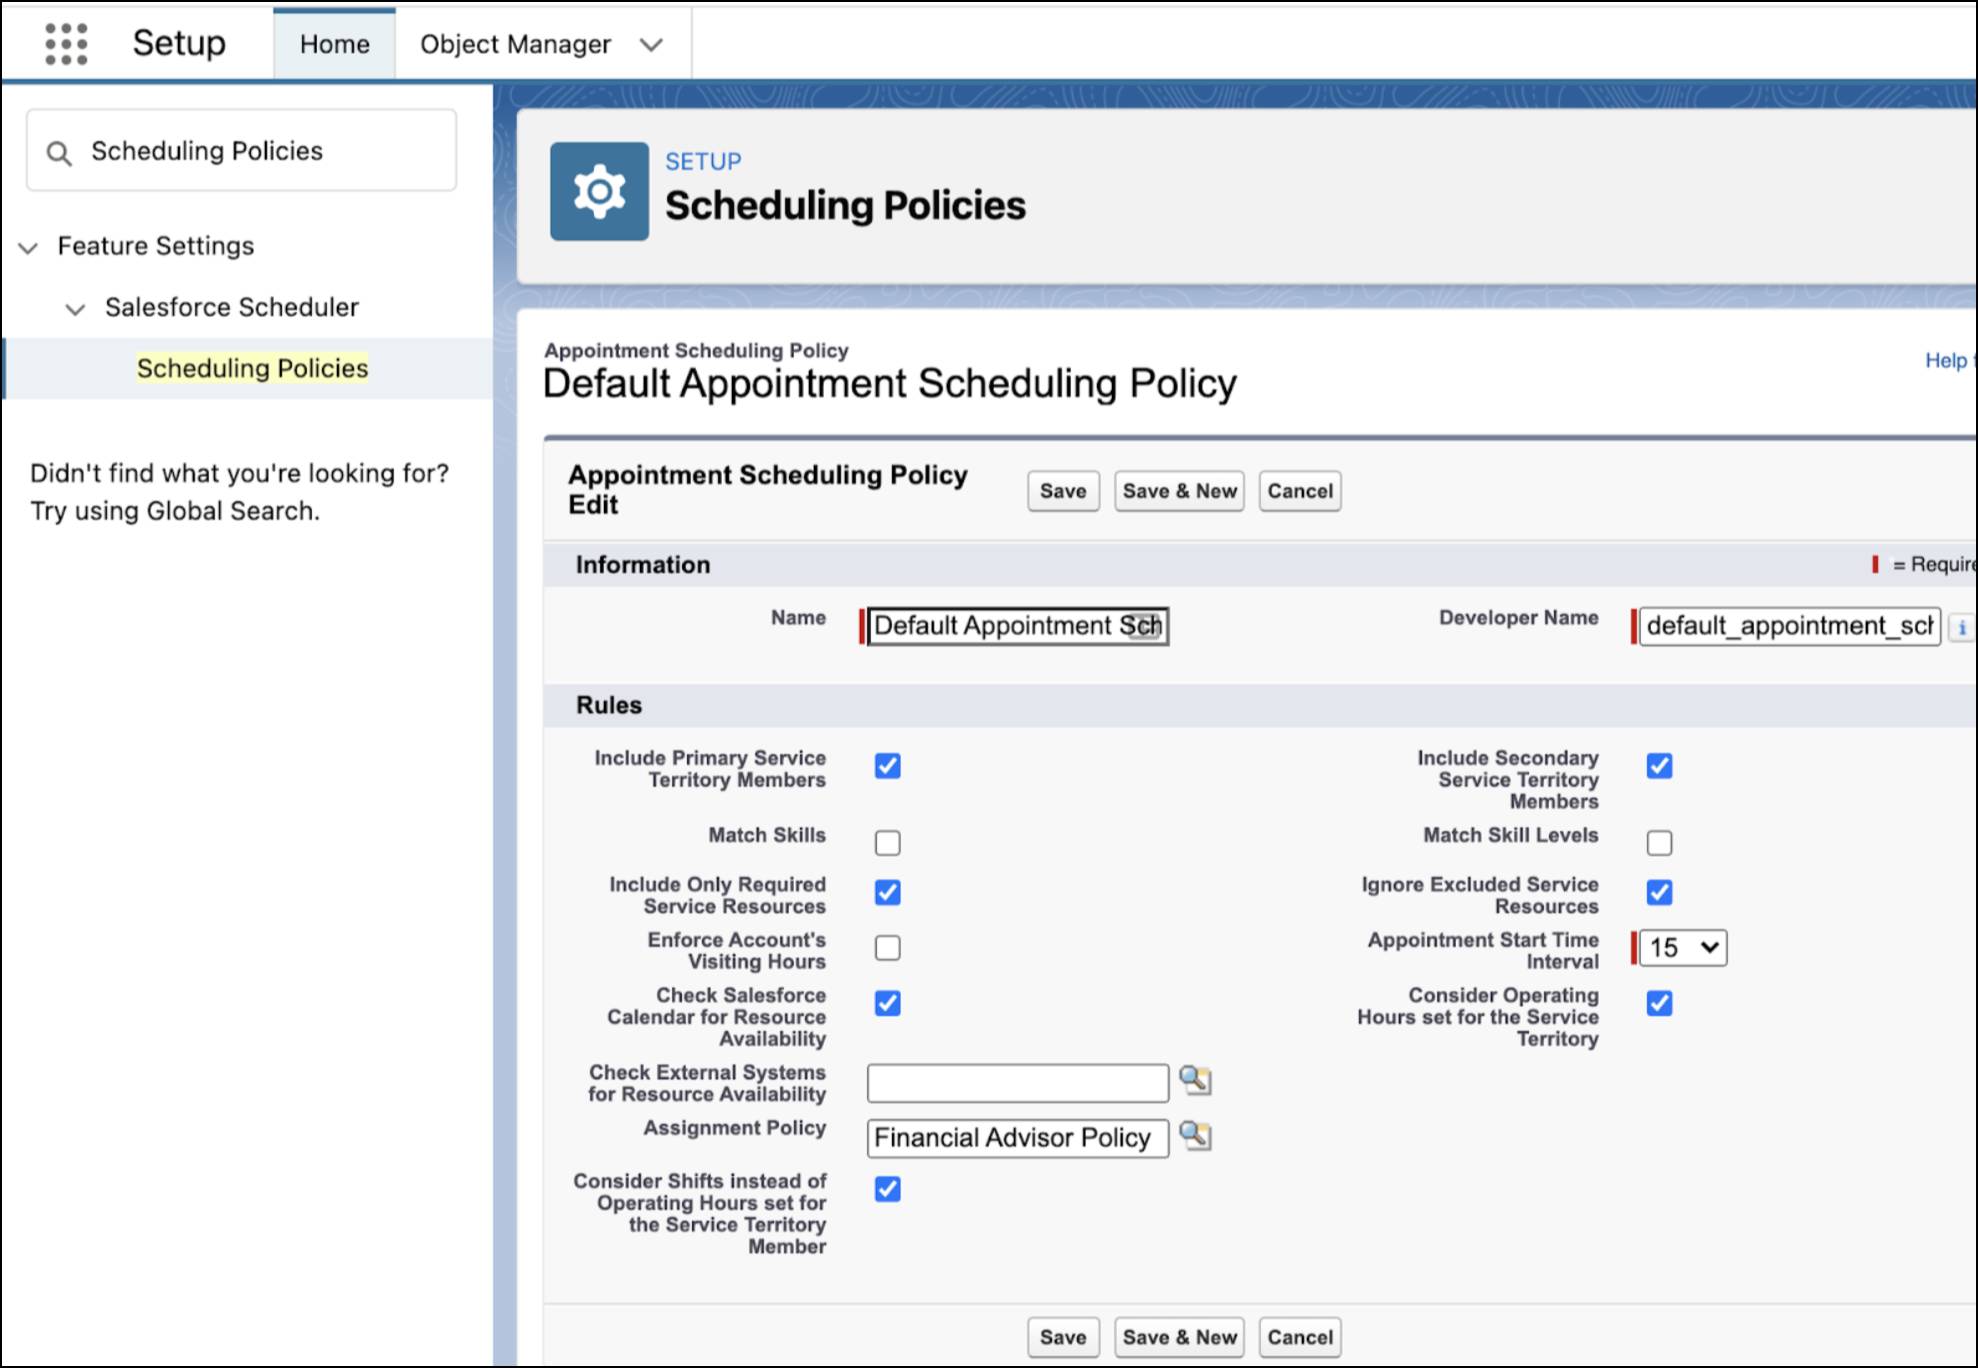
For the appointment assignment policy to come into effect, Matt assigns it to an existing scheduling policy.
- Click
 and select Setup.
 - In Setup, search for
Scheduling Policiesin the Quick Find box, and click Scheduling Policies. - Click Edit next to the scheduling policy that you want to associate the appointment assignment policy with.
- In the Assignment Policy field, enter the name of the appointment assignment policy that you created.
- Click Save.

Stuff You Must Know
Appointment Distribution uses a load balancing logic to determine the availability of financial advisors. It analyzes how busy the advisors are and shows the least occupied ones at the top to even out the distribution of appointments.
Matt reviews some important technical details about Appointment Distribution setup to make sure that the feature works smoothly.
- For best results in calculating resource utilization, set the Time Slot Preload Multiplier attribute to 1.
- The system needs a few weeks to capture sufficient data for equitable appointment distribution after you enable Appointment Distribution and Aggregate Resource Use. If you enable Appointment Distribution and not Aggregate Resource Use, data is not captured.
- For accurate utilization scores, the date from when an advisor is eligible for appointments isn’t considered for calculating utilization. For example, if the utilization calculation frequency is set to weekly and an advisor is on vacation or if they join midweek, that advisor appears the least utilized.
- A minimum period of 1 day is considered while calculating the utilization score for an appointment assignment policy, even if a smaller date range is set for the Parameter-Based option. For weekly or monthly frequency, the applicable week or month that’s considered for calculating the utilization score is based on the user locale.
- In addition to Salesforce Scheduler, Salesforce has Field Service and several other products that create service appointment records. Let’s say you’ve two or more of these products in the same org. If a financial advisor has appointments from multiple products, then every appointment is considered for calculating the utilization score for that financial advisor.
Time for Balanced Appointments
Matt has successfully set up Appointment Distribution for Cumulus, ensuring equitable distribution of appointments for Fola’s team of advisors. Salesforce Scheduler now analyzes and balances the workload while accommodating appointments of different durations. Advisors can now be more productive and not worry about having to deal with too few or too many appointments!
