Design a Flow
Learning Objectives
After completing this unit, you’ll be able to:
- Prepare to design a flow.
- Design a flow to automatically sync new or updated contacts in Salesforce with customers in Square.
Prepare to Design a Flow
Recall from MuleSoft Composer Basics that a flow is a sequence of steps you assemble and configure to integrate systems and data. Before designing a flow, you should sketch out the main steps of the flow using a flow chart. You can do this using paper and pencil to get a good idea of what your flow will look like.
Here’s an example flow chart showing the key steps of an integration flow for the NTO use case described in the previous unit.
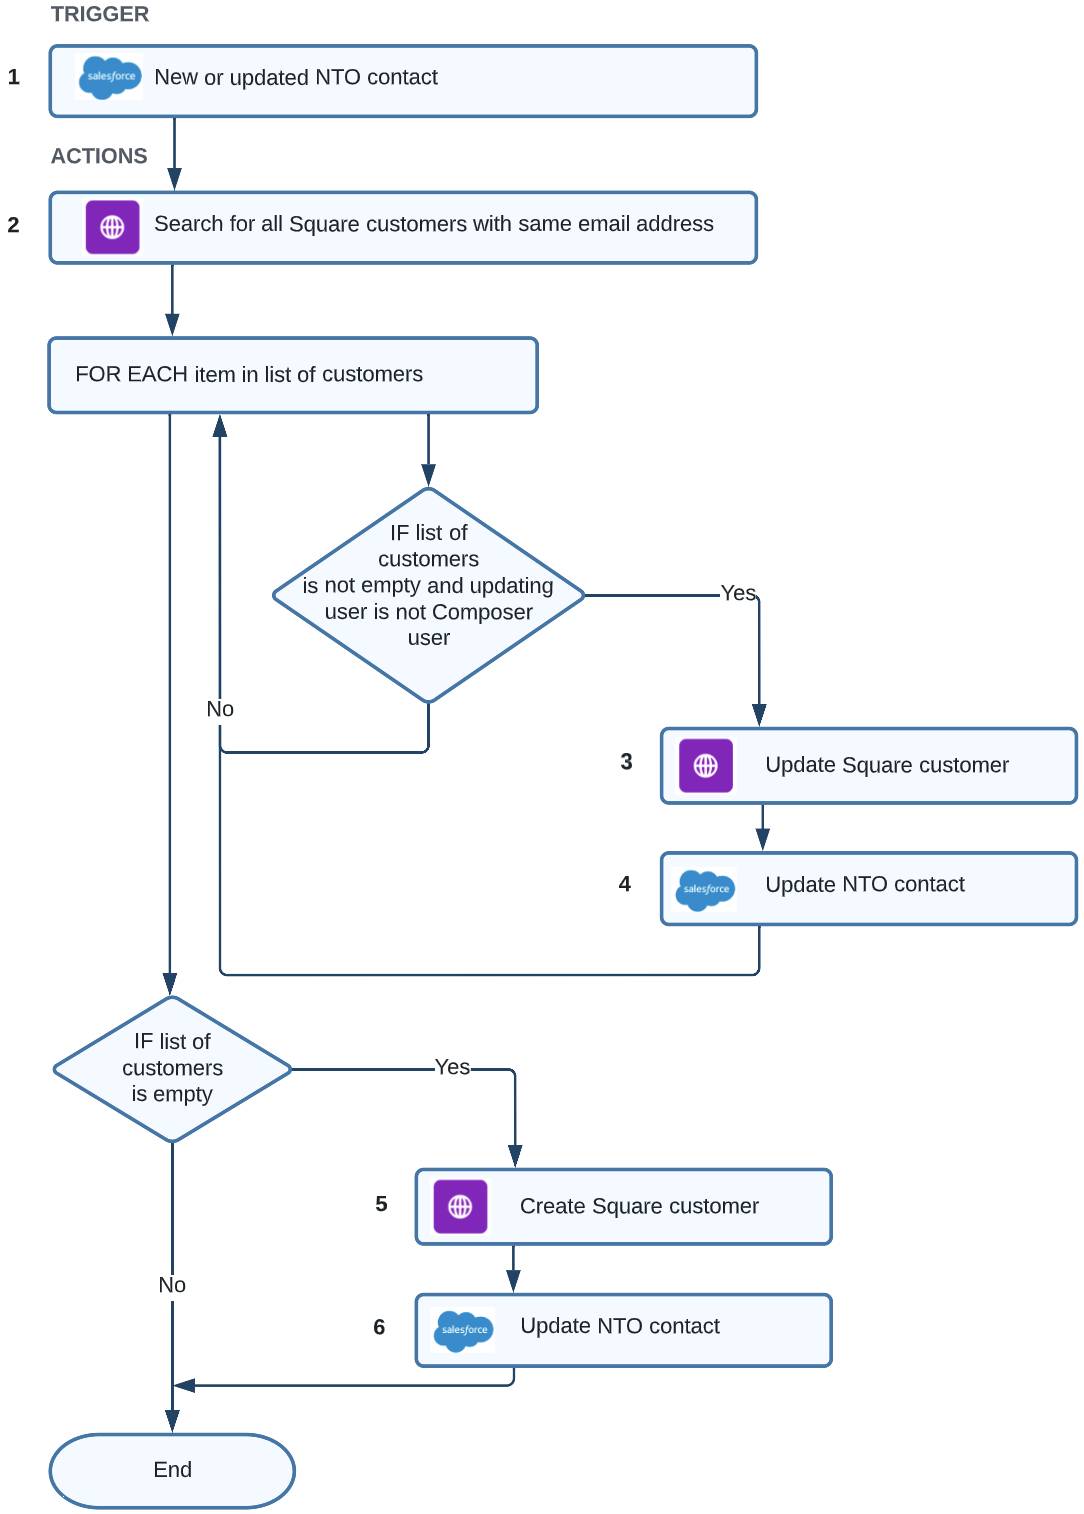
Here’s a detailed description of the tasks and their associated flow components to create a flow for this NTO use case.
|
Task
|
Flow Components
|
|---|---|
Find any new or updated NTO contact. |
Trigger from the NTO org on new or updated contact. |
Search for a corresponding Square customer. |
Action step to search for all customers with the same email address as the contact. |
Iterate over the list of customers. |
For Each block to iterate over the list of customers. |
Determine if the list of customers isn’t empty and the updating user isn’t the Composer user. |
If/Else block within For Each block to evaluate if the list of customers isn’t empty and the updating user isn’t the Composer user. |
|
If the list of customers is empty and the updating user isn’t the Composer user, meaning a corresponding customer exists:
|
In the If/Else block:
|
|
If a corresponding customer doesn’t exist:
|
Second If/Else block to evaluate if the list of customers is empty:
|
By default, MuleSoft Composer validates your work and provides contextual in-app help every step of the way. For example, when you add a connection to a system, MuleSoft Composer tests the connection to make sure it works before you can proceed to the next step. Also, to simplify building your flows, MuleSoft Composer prompts you to complete required fields within each step.
As a best practice, when building a flow, add a few steps and test iteratively until you complete the flow.

Take a look at this video demonstration showing how to sync Salesforce contacts with Square customers using MuleSoft Composer.
Design a Flow
Now, you’re ready to design an integration flow that automatically syncs new or updated contacts in Salesforce with customers in Square.
As you learned in unit 1, to avoid the problem of infinite looping when running your flow, use the Composer user’s username and password to create a connection to the NTO org when designing your flow.
Follow these steps to design a flow.
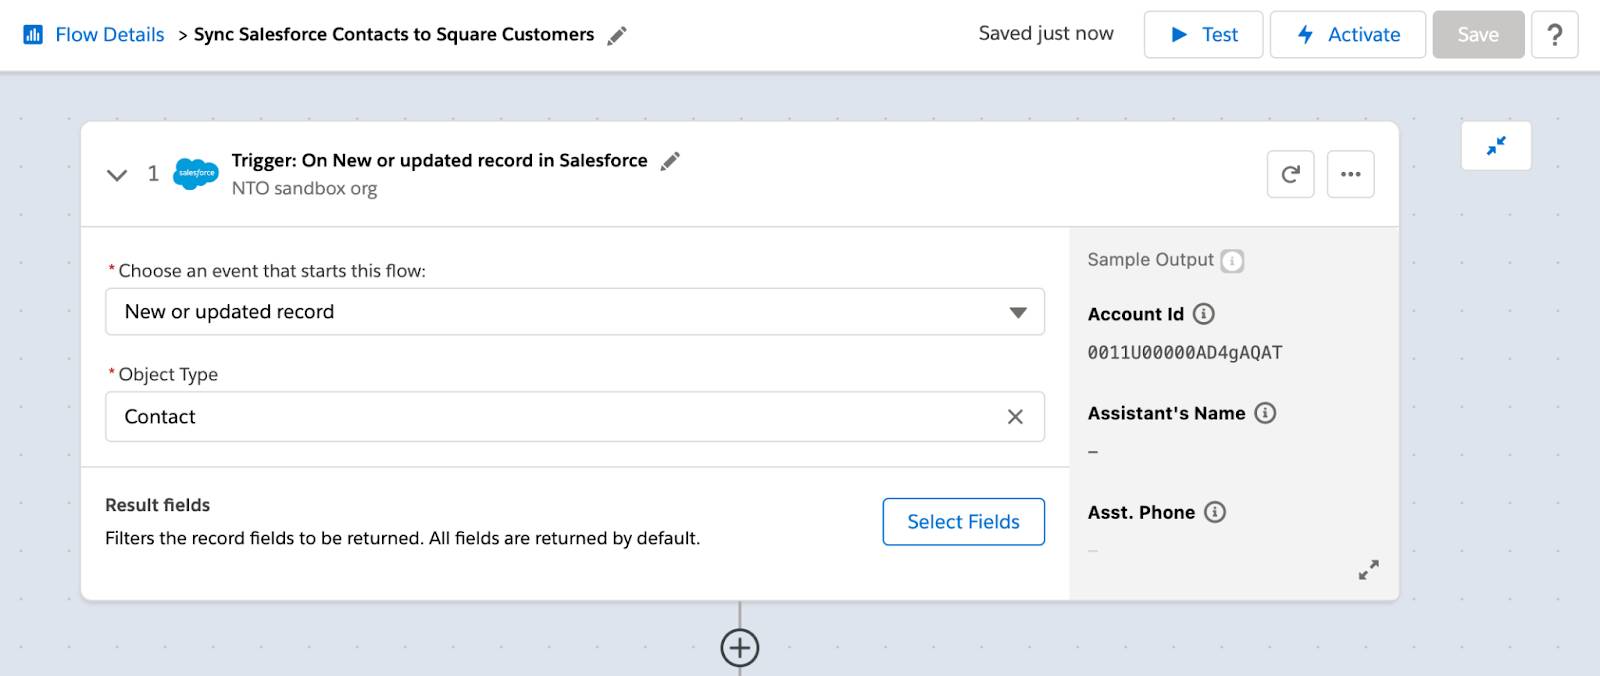
Launch MuleSoft Composer from the NTO org.
- Log in to your NTO org using your username and password.
- From the App Launcher, enter
Composerand select MuleSoft Composer.
Create a new flow.
- Click Create New Flow.
- Click the pencil icon next to the default flow name.
- Name the flow
Sync Salesforce Contacts to Square Customersand click Save.
Create a trigger for the flow using an NTO sandbox org connection.
- Click Salesforce.
- Click Add new Salesforce connection to create a connection to the NTO sandbox org.
Note: If this is your first Salesforce connection, this option doesn’t appear. Go to the next step.
- Name the connection
NTO sandbox org.
- Select the checkbox This is a sandbox organization and click Create.
Note: If you use a developer org, skip selecting this checkbox and click Create.
- Enter your NTO sandbox org’s username and password and click Log In to Sandbox.
- Click Allow to grant MuleSoft Composer the permissions to access the identity URL service, manage user data via APIs, and perform requests at any time. MuleSoft Composer automatically tests the connection. If no error message appears, you have a successful connection, and the first step (trigger) of the flow appears.
Configure the trigger to start the flow every time a contact is created or updated in the NTO org.
- Click in the Choose an event that starts this flow field and select New or updated record.
- Click in the Object Type field and select Contact.
- Look at the Sample Output section, which shows the fields and associated sample values from a contact in the NTO org. This confirms you’re connected to the correct org and lets you know the structure of the data that’s available in later steps of your flow.
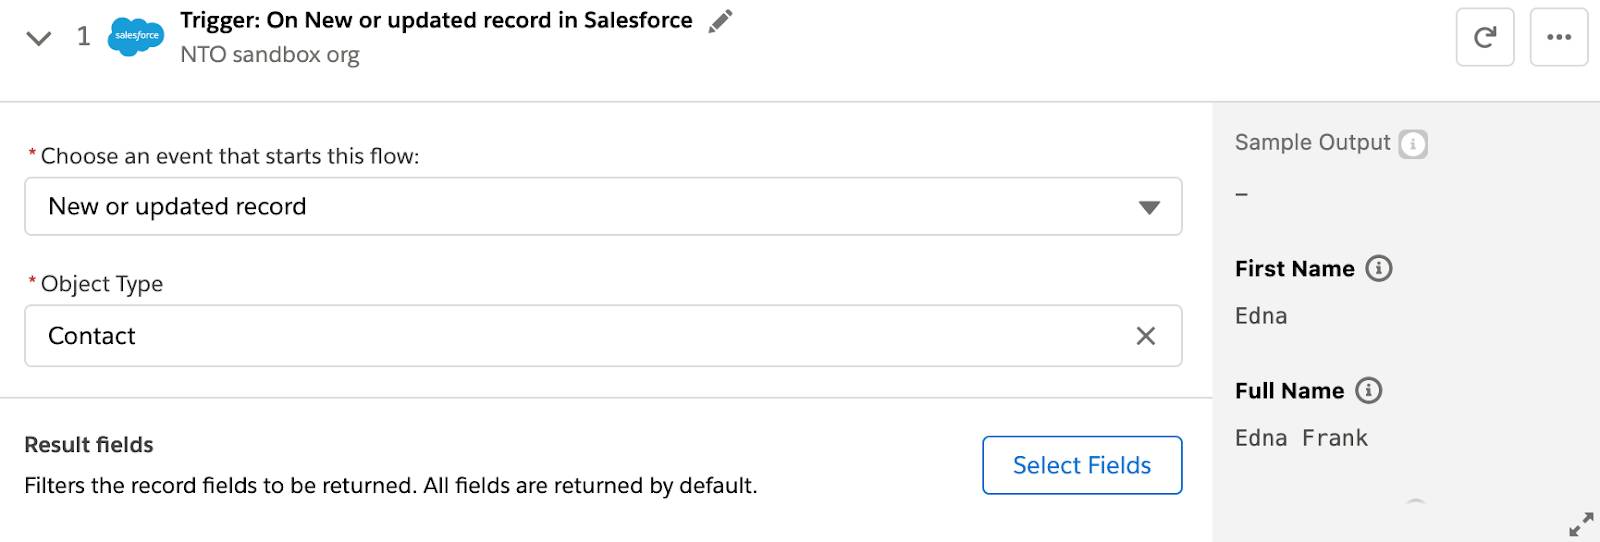
- Click Save to save the flow.
Create the second step for the flow using a Square sandbox connection.
- Click the plus icon to add a step.
- Click HTTP, and then click Add new HTTP connection.
- Name the connection
NTO Square sandbox.
- In the Authorization Type field, select Bearer Token.
- In the Base URL field, copy and paste the base URL from your text file obtained in unit 1. In this use case, it’s
https://connect.squareupsandbox.com.
- In the Token field, copy and paste the Square sandbox access token from the text file.
- Click Next.
- In the Request Method field, select Get.
- In the Request Path field, enter
/v2/customers.
- Click Connect. MuleSoft Composer automatically tests the connection. If no error message appears, you have a successful connection, and the second step of the flow appears.
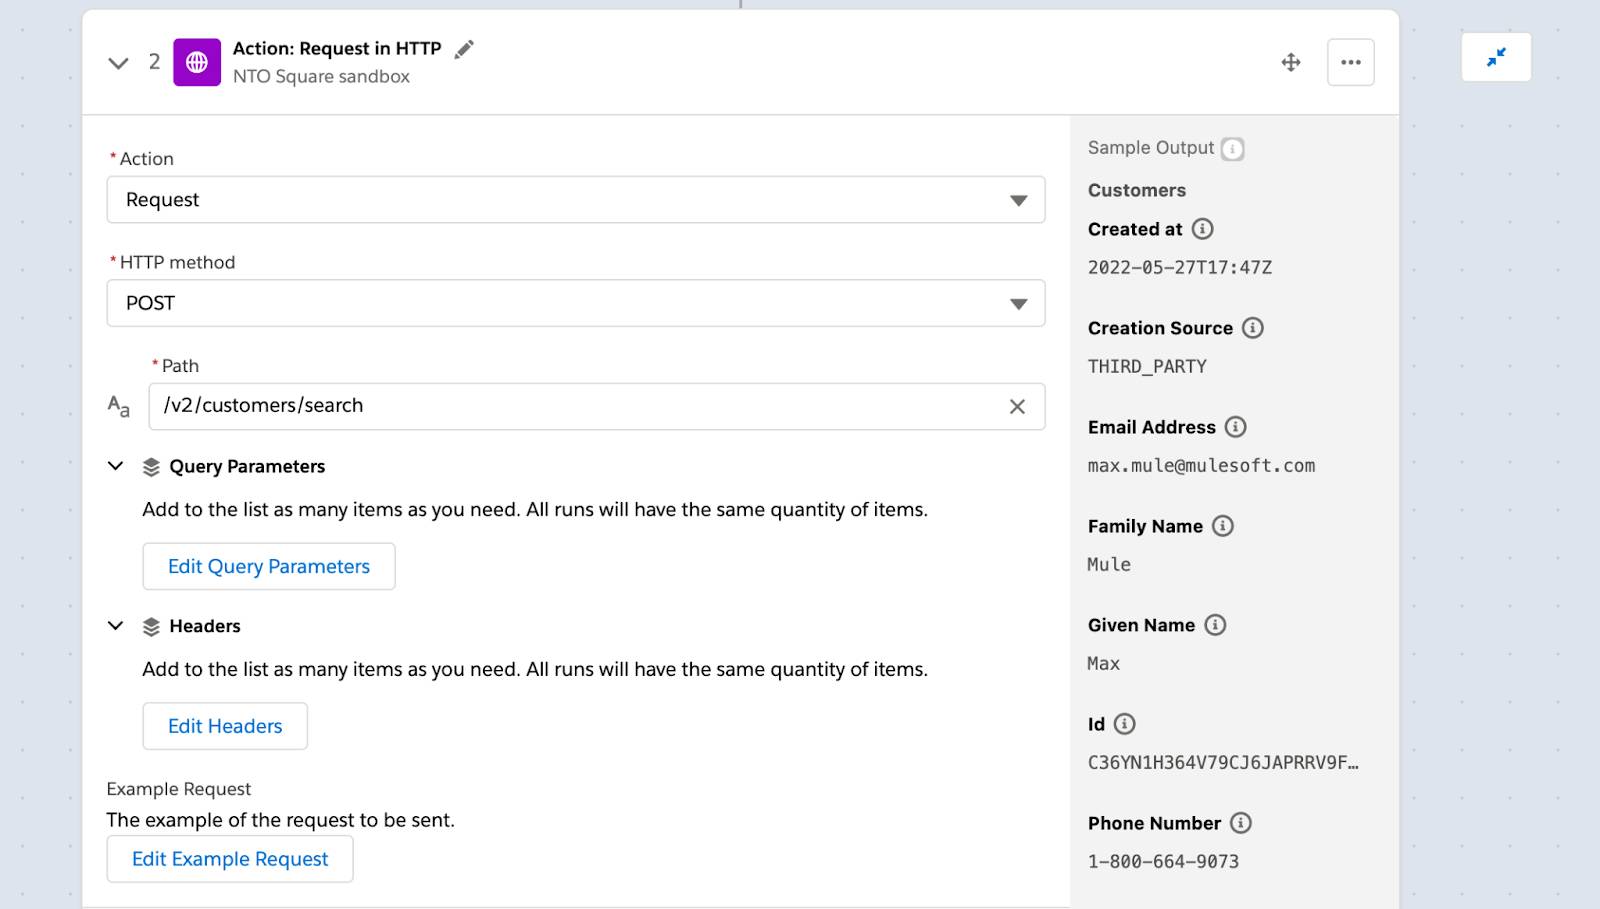
Configure the second step to search for a customer that matches the triggering contact.
- In the Action field, select Request.
- In the HTTP method field, select POST.
- In the Path field, enter
/v2/customers/search.
- Click Edit Example Request.
- Copy and paste the following, and then click Save. Note that this request is similar to the request the API Explorer tool generates when the Search customers(POST) endpoint is used.
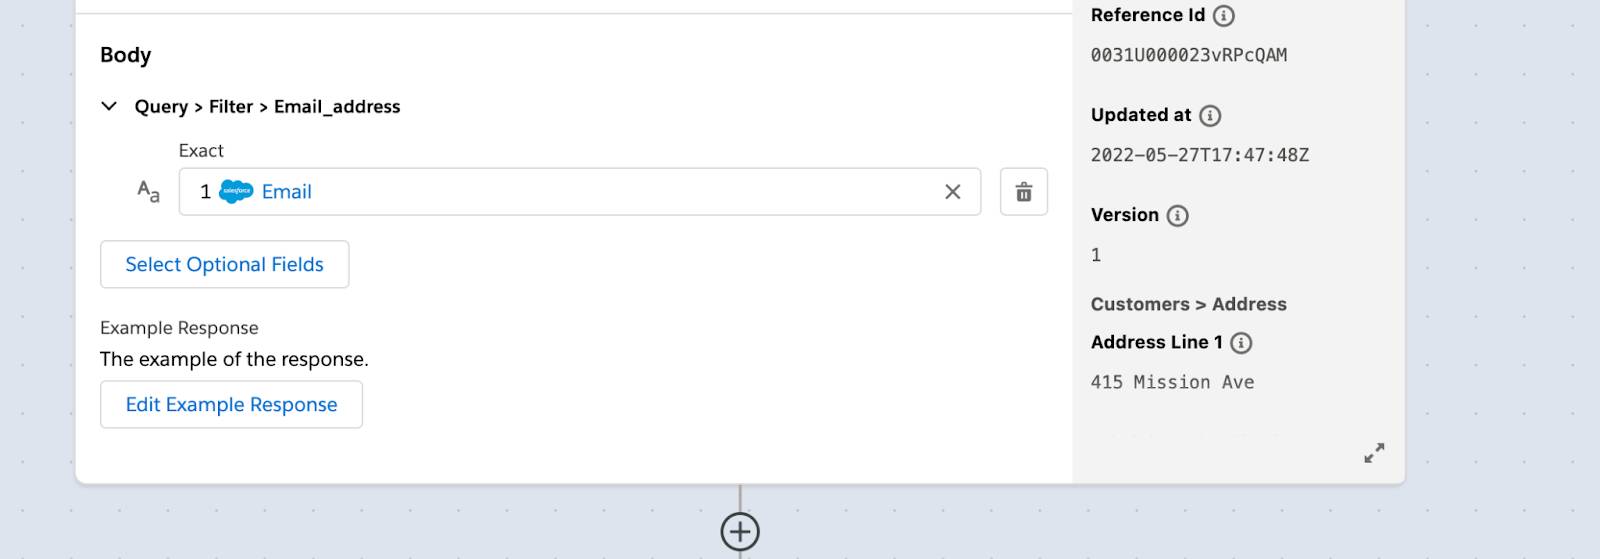
{ "query": { "filter": { "email_address": { "exact": "max.mule@mulesoft.com" } } }, "limit": 1 } - Click Select Optional Fields.
- Select Exact, and then click Apply. The Exact field appears in the Body section, and is automatically mapped to the Email field from step 1 of the flow.
- Click Edit Example Response.
- Copy and paste the following, and then click Save. Note that this response is similar to the response the API Explorer tool generates when the Search customers(POST) endpoint is used. Note also that the response returns a list of customers. As a result, you next need to use a For Each block to iterate over the list of customers.
{
  "customers": [
    {
      "id": "C36YN1H364V79CJ6JAPRRV9FRM",
      "created_at": "2022-05-27T17:47:08.613Z",
      "updated_at": "2022-05-27T17:47:48Z",
      "given_name": "Max",
      "family_name": "Mule",
      "email_address": "max.mule@mulesoft.com",
      "address": {
        "address_line_1": "415 Mission Ave",
        "locality": "San Francisco",
        "administrative_district_level_1": "CA",
        "postal_code": "94105",
        "country": "US"
      },
      "phone_number": "1-800-664-9073",
      "reference_id": "0031U000023vRPcQAM",
      "preferences": {
        "email_unsubscribed": false
      },
      "creation_source": "THIRD_PARTY",
      "version": 1
    }
  ]
}
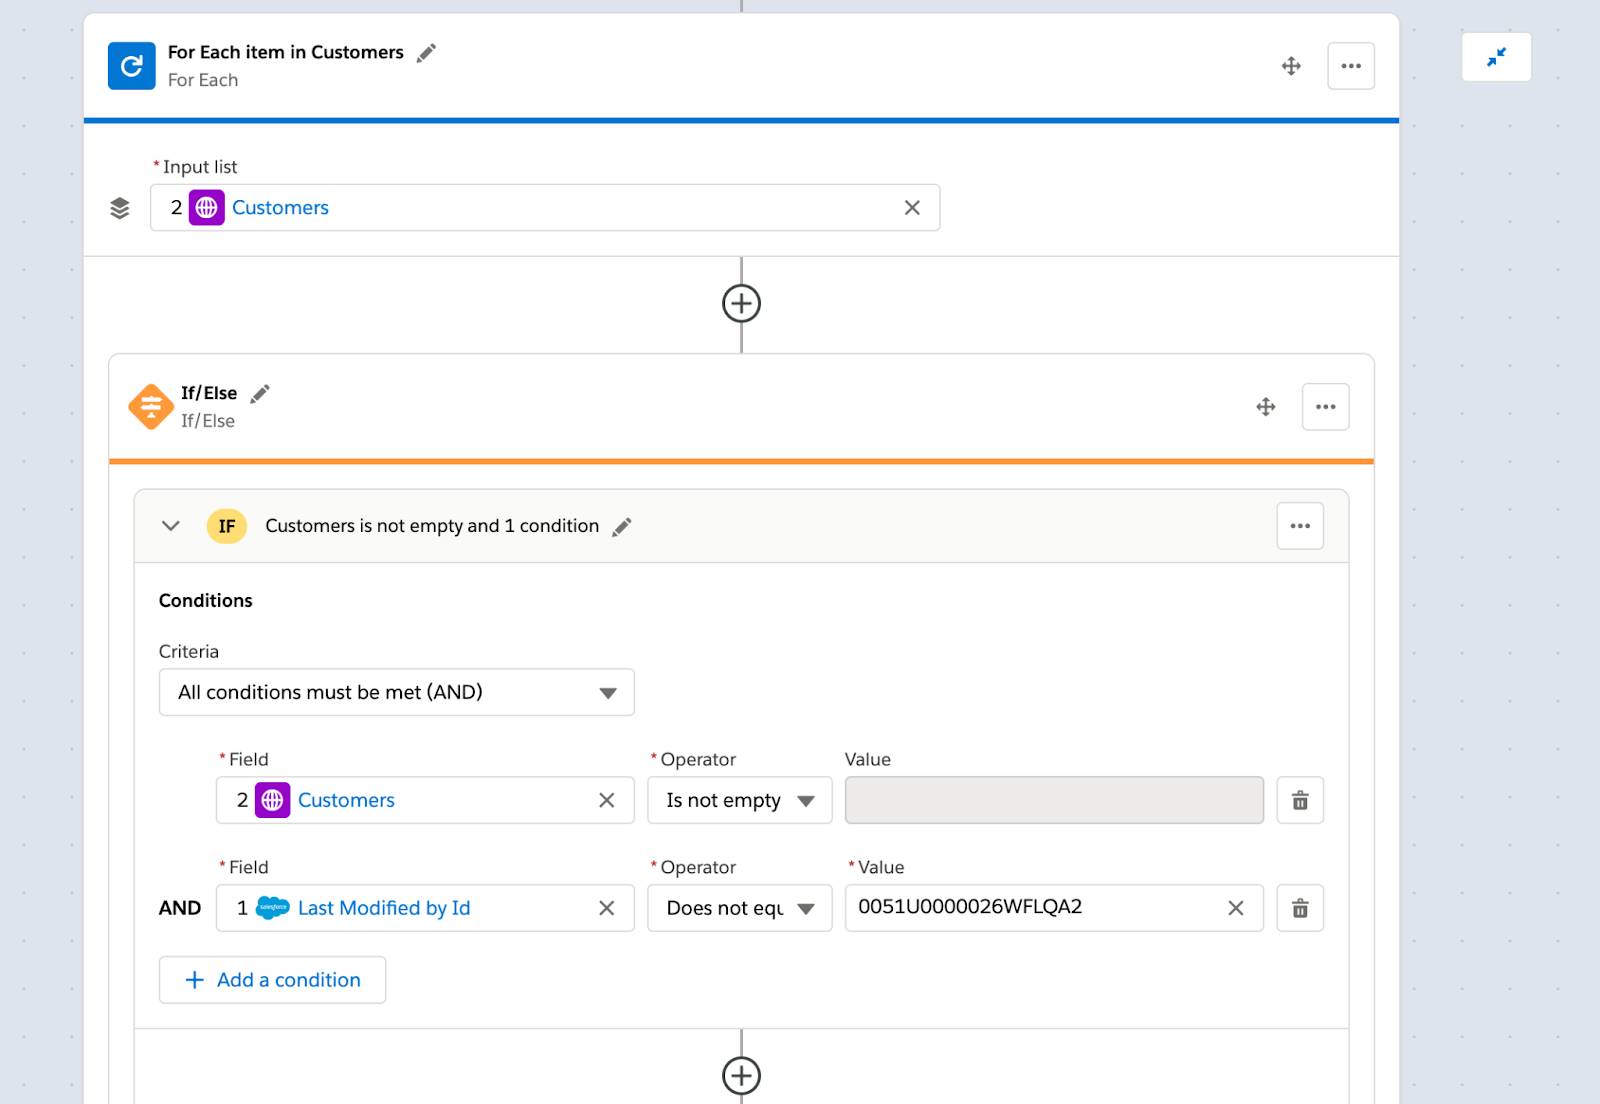
Create and configure a For Each block to iterate over each customer from the list of customers in step 2 of the flow.
- Click the plus icon to add a step.
- Scroll down and select For Each.
- In the Input list field, select List of Customers from step 2 of the flow.
Create and configure an If/Else block within the For Each block to evaluate if the triggering contact has a corresponding customer. The If/Else block also evaluates if the user performing the update isn’t the Composer user to ensure the infinite looping problem doesn’t occur at runtime.
- Click the plus icon to add a step within the For Each block.
- Scroll down and click If/Else Block. The All conditions must be met (AND) condition is selected by default.
- Select Customers from step 2 of the flow as the field and Is not empty as the operator. If this condition is met, the contact has a corresponding customer.
- Click Add a condition.
- Select Last Modified by Id from step 1 of the flow as the field, Does not equal as the operator, and enter the Salesforce ID of the Composer user found in unit 1. In this example, it’s 0051U0000026WFLQA2. If this condition is met, the user performing the update is an end user, not the Composer user. If both these conditions are met, the next two steps in the If branch (update Square customer and update NTO contact) are executed.
Create the third step for the flow within the If branch of the If/Else block using the existing NTO Square sandbox connection.
- Click the plus icon to add a step to the If branch.
- Click HTTP, and then click NTO Square sandbox.
Note: You reuse the existing NTO Square sandbox connection.
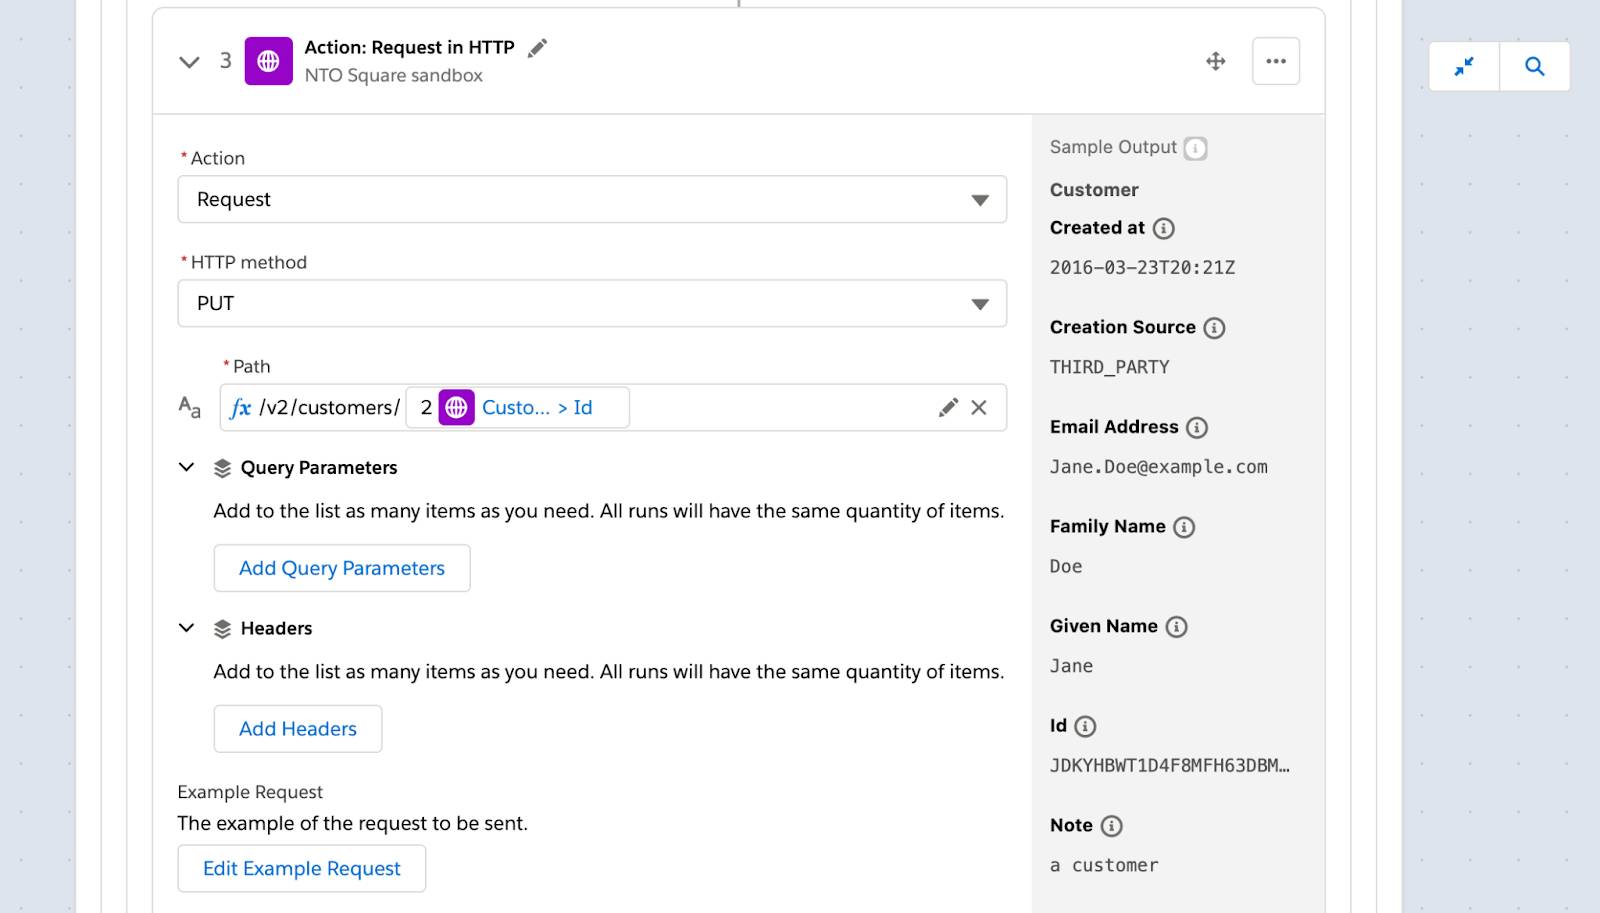
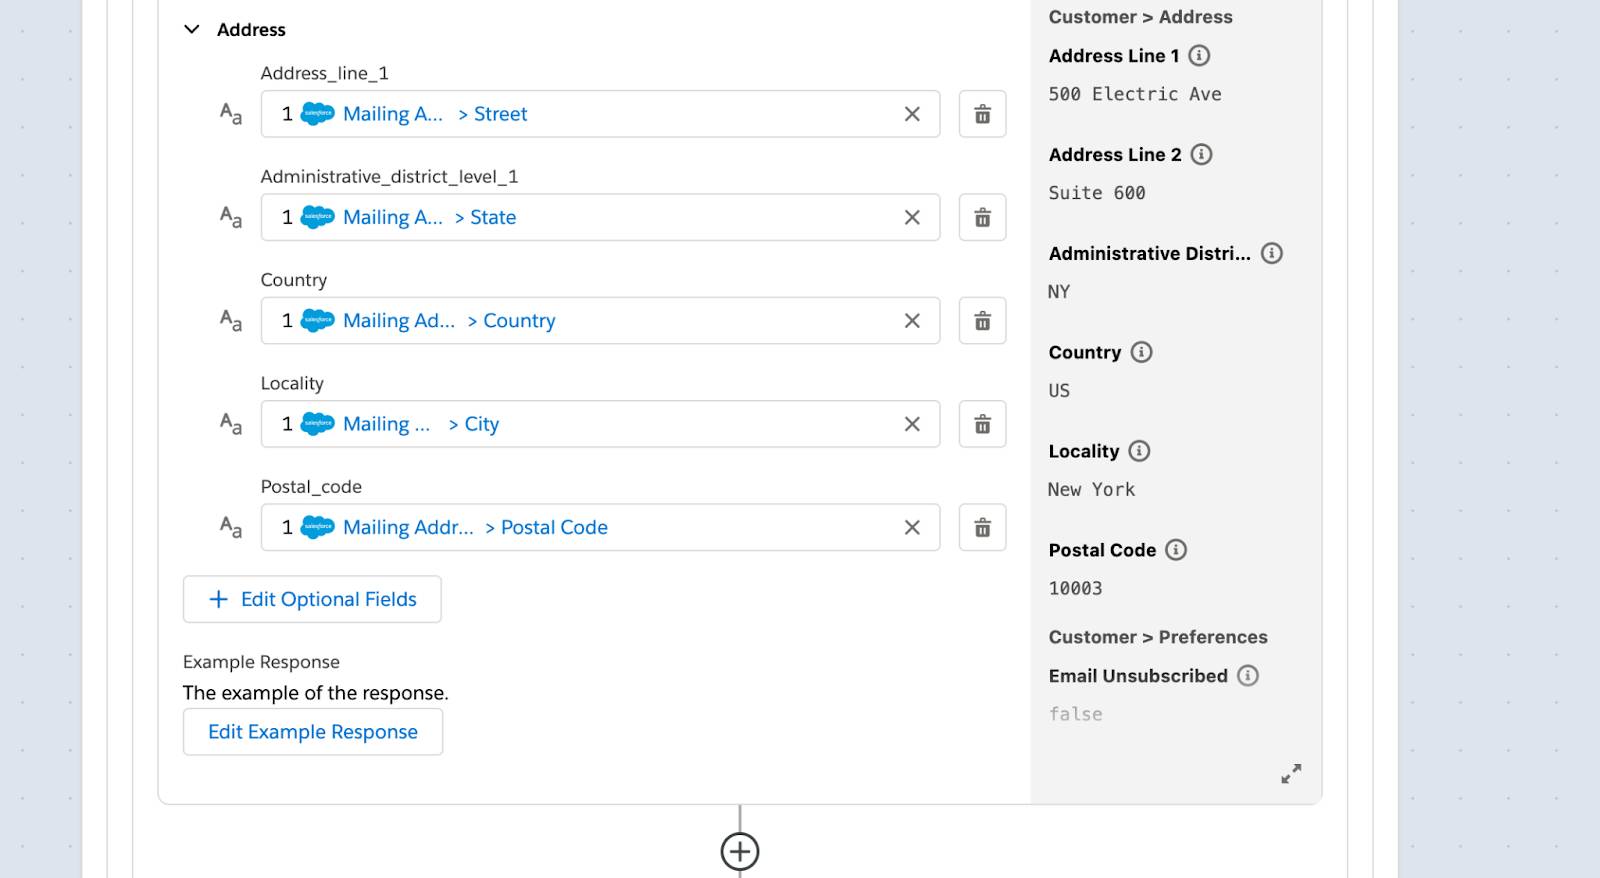
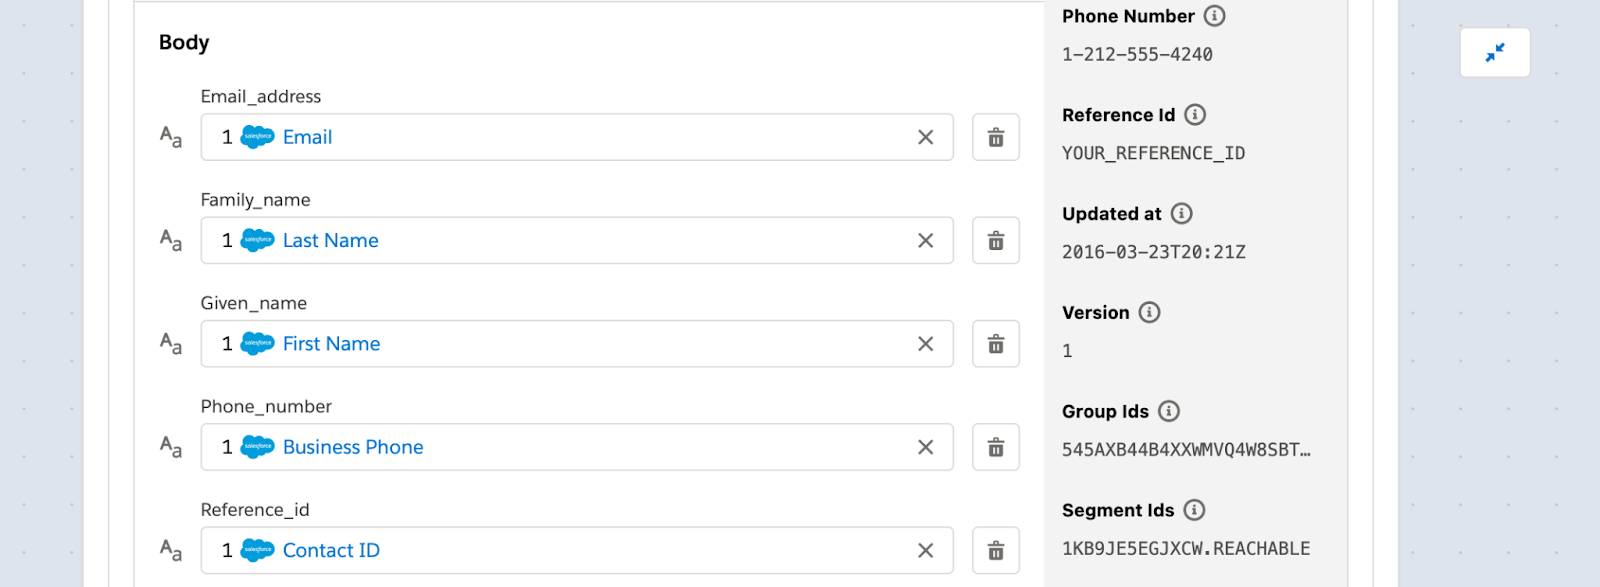
Configure the third step to update the customer with relevant contact details, including its associated contact ID.
- In the Action field, select Request.
- In the HTTP method field, select PUT.
- Click in the Path field, and then click Custom Expression. The Custom Expression Editor appears. You use this Custom Expression Editor to configure a message that has both dynamic field values from the preceding steps of a flow (also known as data pills) and static text that you enter.
- Enter
/v2/customers/, and then click the Data tab and select Customers > Id from step 2 of the flow.
- Click Apply.
- Click Edit Example Request.
- Copy and paste the following, and then click Save. Note that this request is similar to the request the API Explorer tool generates when the Update customer(PUT) endpoint is used.
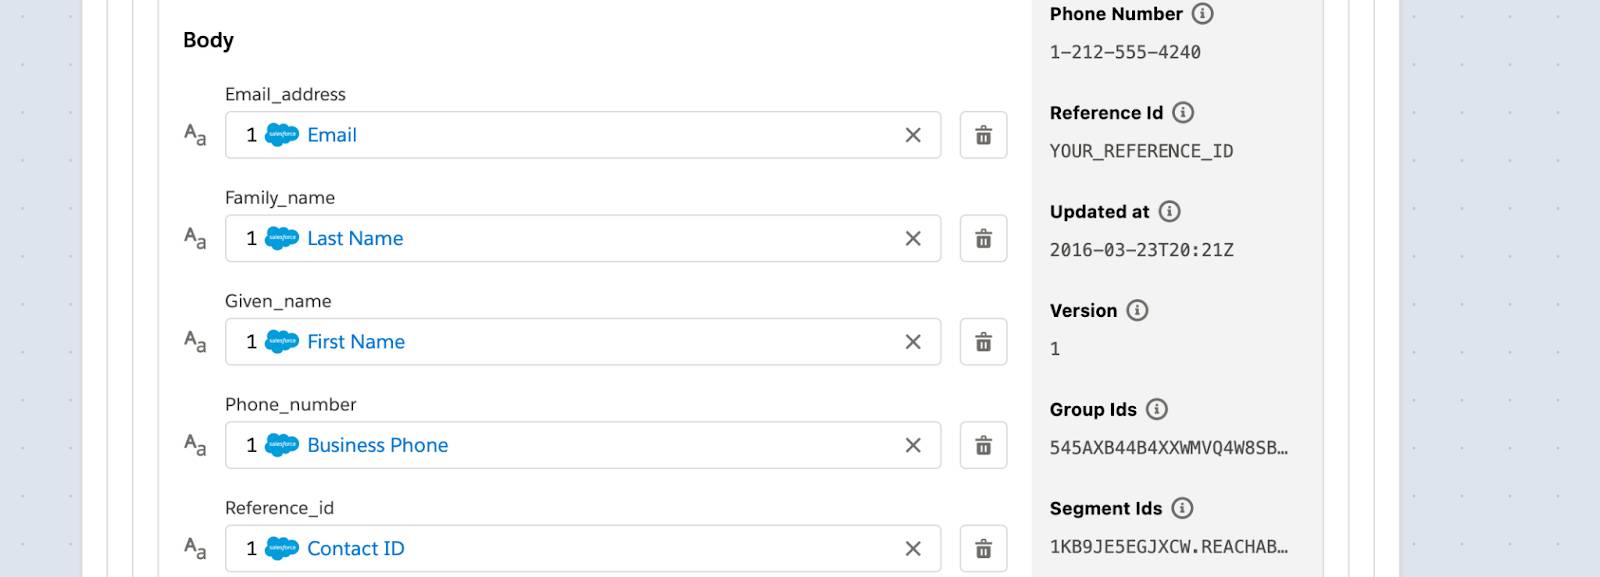
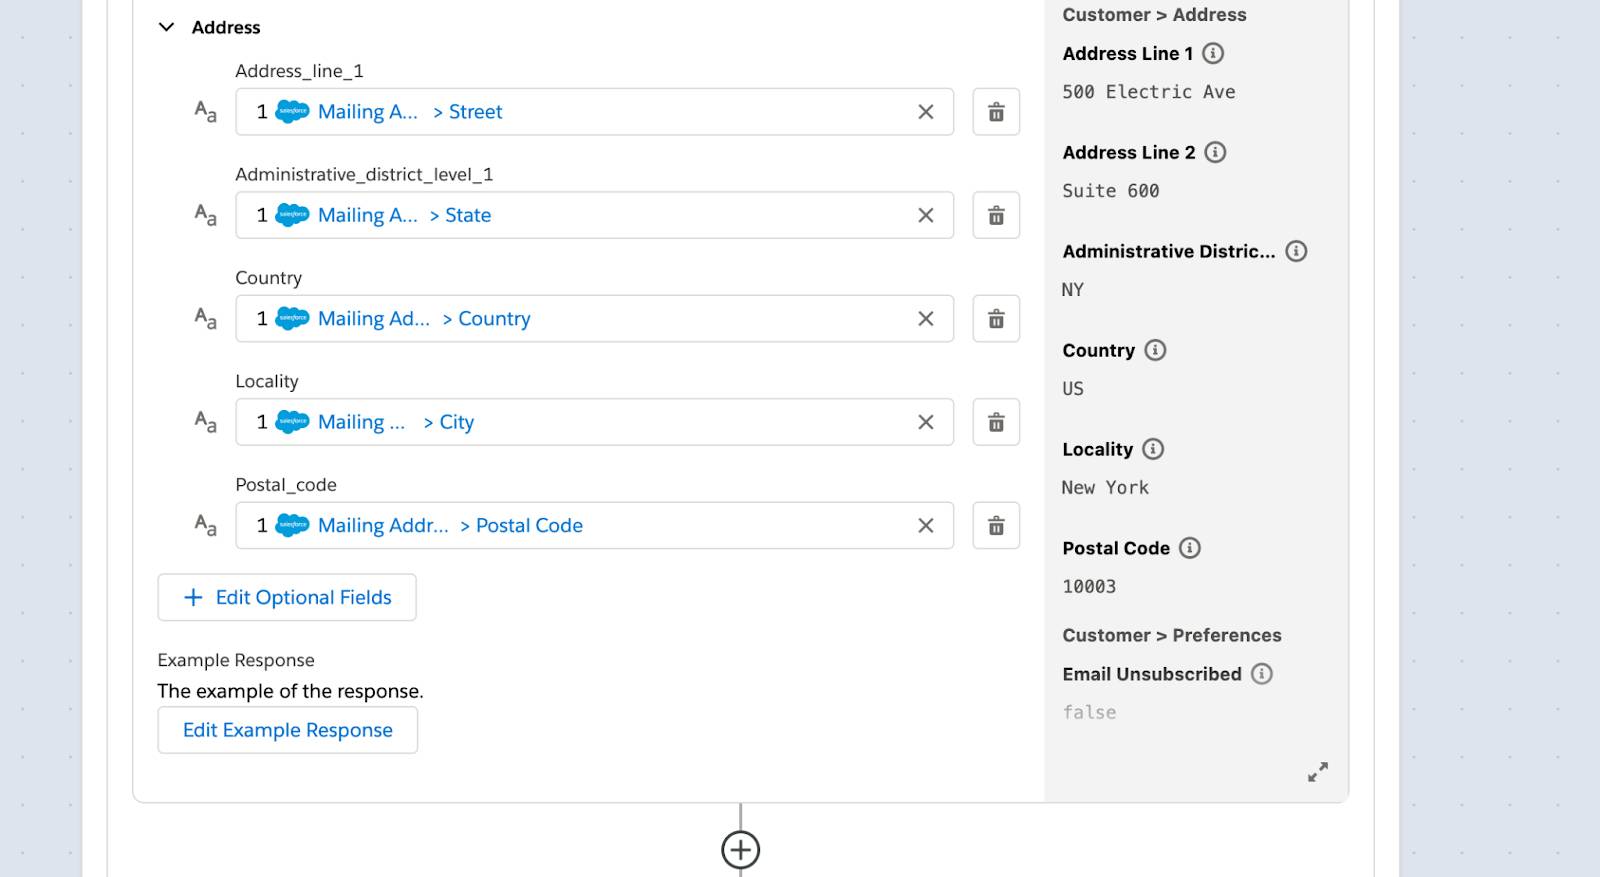
{ "given_name": "Jane", "family_name": "Doe", "email_address": "Jane.Doe@example.com", "address": { "address_line_1": "500 Electric Ave", "address_line_2": "Suite 600", "locality": "New York", "administrative_district_level_1": "NY", "postal_code": "10003", "country": "US" }, "phone_number": "1-212-555-4240", "reference_id": "salesforce_id" } - Click Add Fields.
- Using the search field, locate and select the following fields, and then click Add.
Tip: Enter a keyword for a field you want to search, and then select the relevant field that appears. Clear the keyword and repeat the process for the next field. When done with selecting all fields, click Add.
- Email_address
- Family_name
- Given_name
- Phone_number
- Reference_id
- Address_line_1
- Administrative_district_level_1
- Country
- Locality
- Postal_code
- Map the Customer fields to their corresponding Contact fields captured in step 1 of the flow as follows.
- Email_address = Email
- Family_name = Last Name
- Given_name = First Name
- Phone_number = Business Phone
- Reference_id = Contact ID
- Address
- Address_line_1 = Mailing Address > Street
- Administrative_district_level_1 = Mailing Address > State
- Country = Mailing Address > Country
- Locality = Mailing Address > City
- Postal_code = Mailing Address > Postal Code
- Click Edit Example Response.
- Copy and paste the following, and then click Save. Note that this response is similar to the response the API Explorer tool generates when the Update customer (PUT) endpoint is used.
{
"customer": {
"id": "JDKYHBWT1D4F8MFH63DBMEN8Y4",
"created_at": "2016-03-23T20:21:54.859Z",
"updated_at": "2016-03-23T20:21:54.859Z",
"given_name": "Jane",
"family_name": "Doe",
"email_address": "Jane.Doe@example.com",
"address": {
"address_line_1": "500 Electric Ave",
"address_line_2": "Suite 600",
"locality": "New York",
"administrative_district_level_1": "NY",
"postal_code": "10003",
"country": "US"
},
"phone_number": "1-212-555-4240",
"reference_id": "YOUR_REFERENCE_ID",
"note": "a customer",
"preferences": {
"email_unsubscribed": false
},
"creation_source": "THIRD_PARTY",
"group_ids": [
"545AXB44B4XXWMVQ4W8SBT3HHF"
],
"segment_ids": [
"1KB9JE5EGJXCW.REACHABLE"
],
"version": 1
}
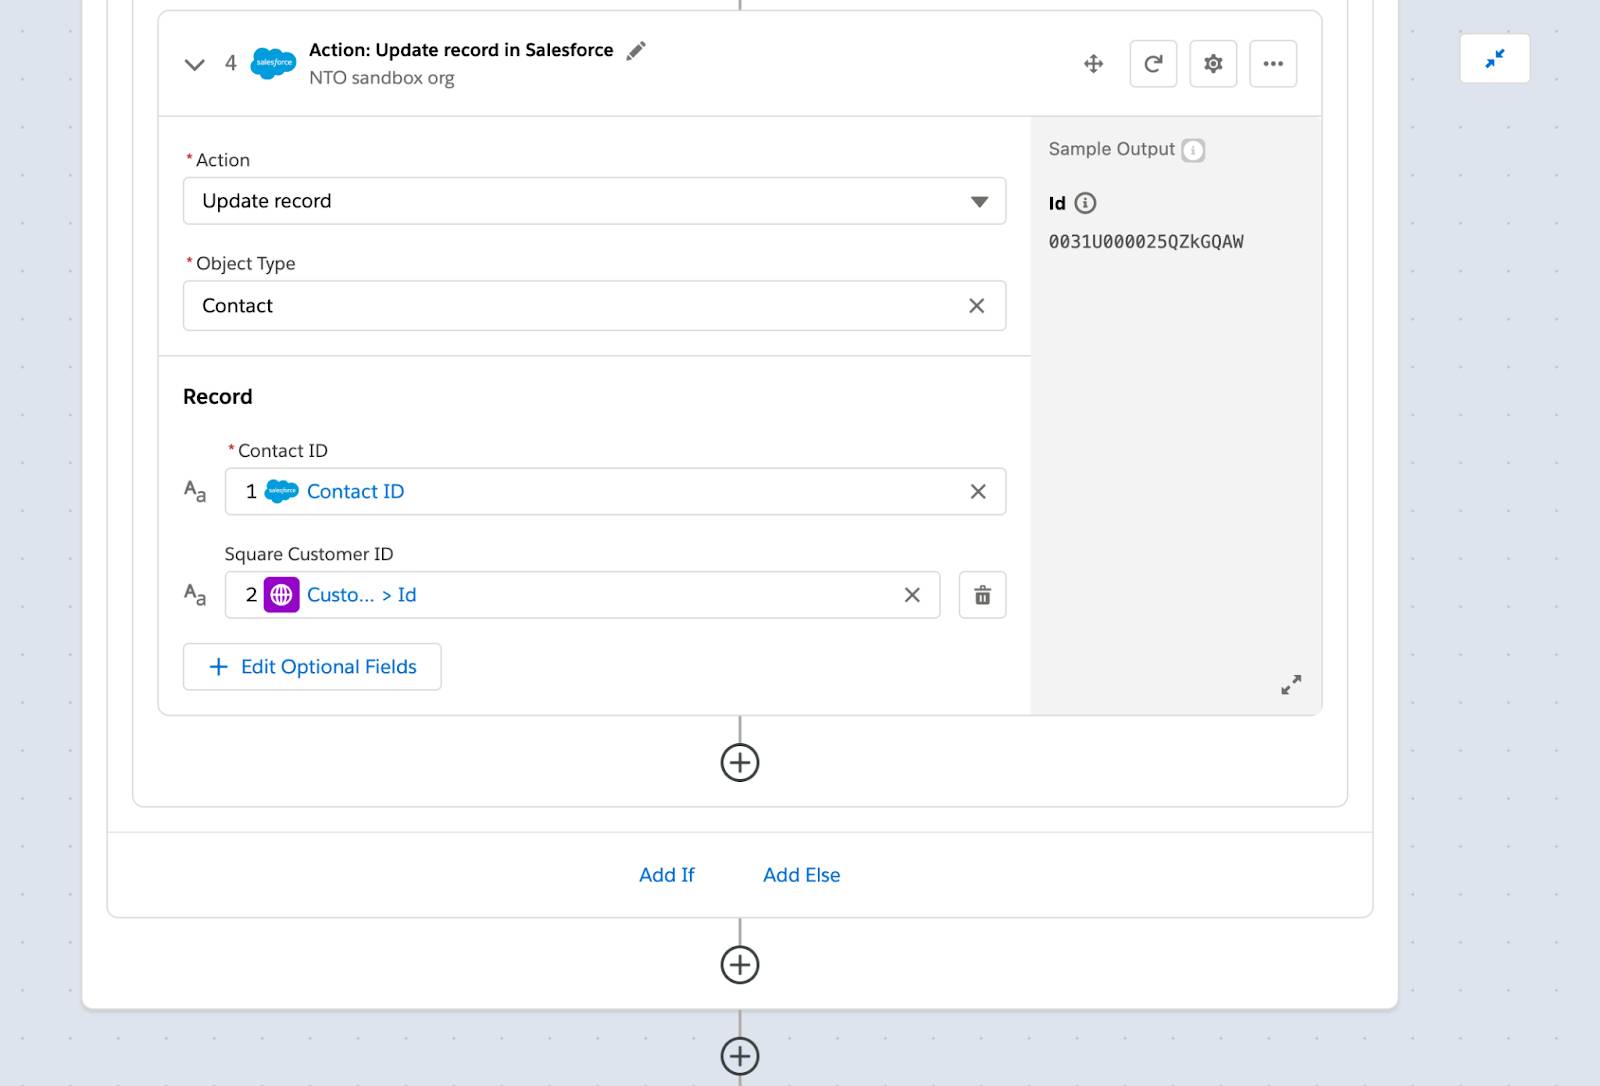
}Create the fourth step for the flow within the If branch using the existing NTO sandbox org connection.
- Click the plus icon to add a step within the If branch.
- Click Salesforce, and then click NTO sandbox org.
Note: You reuse the existing NTO sandbox org connection.
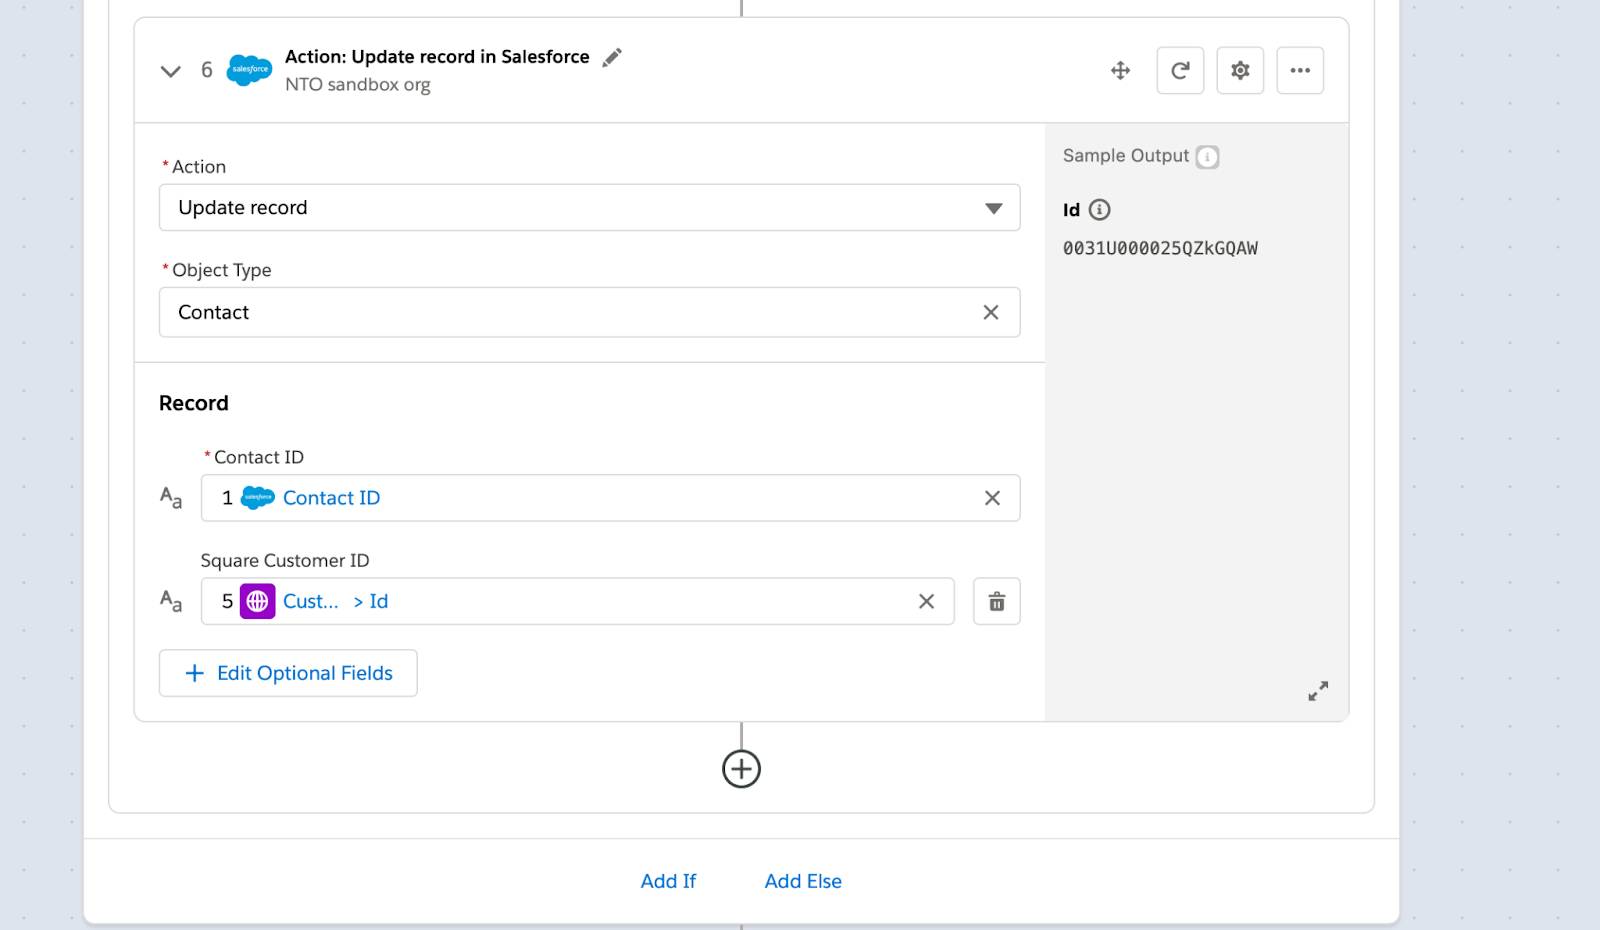
Configure the fourth step to update the triggering contact with its associated customer ID.
- Click in the Action field and select Update record.
- In the Object Type field, enter
Contact. The Contact ID is automatically selected because it’s a required field.
- Click Add Fields.
- Use the search tool to select Square Customer ID and click Add.
- Map the Contact fields to their corresponding fields captured in the preceding steps of the flow as follows.
- Contact ID = Contact ID from step 1
- Square Customer ID = Customers > Id from step 2
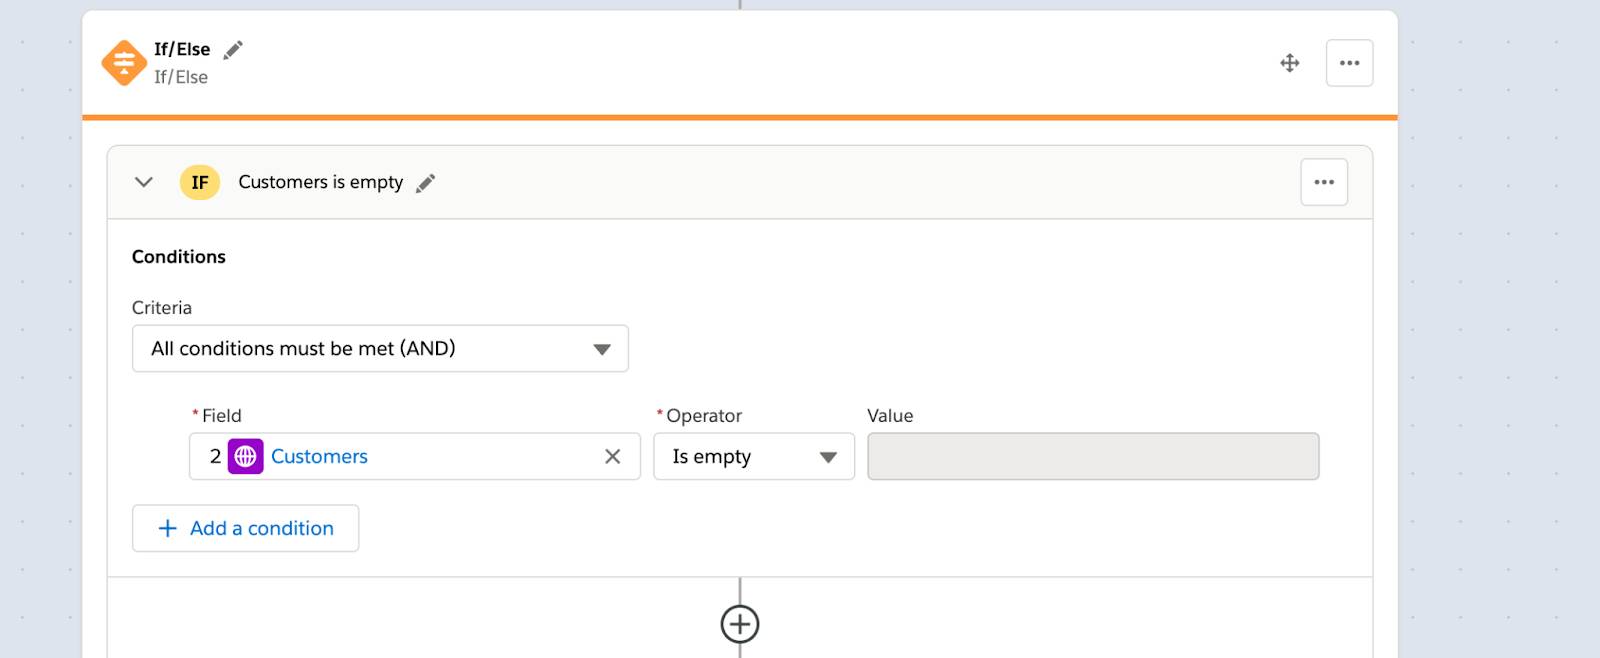
Create and configure a second If/Else block outside of the For Each block to handle the contact that has no corresponding customer.
- Click the plus icon at the very bottom of the flow outside of the For Each block to add a step.
- Scroll down and click If/Else Block. The All conditions must be met (AND) condition is selected by default.
- Select Customers from step 2 of the flow as the field and Is empty as the operator. If this condition is met, the contact has no corresponding customer.
Create the fifth step for the flow within the second If branch by duplicating step 3 of the flow.
- Scroll up to step 3 of the flow, click the ellipsis button on the step, and then click Duplicate Step. Step 4 of the flow is created.
- Click the Move Step (four-headed arrow) button on step 4. The Move Step window appears, showing the list of steps in your flow. The Move step picklist is set to After by default.
- Expand the If/Else block using the right arrow.
- Expand the Customers is empty (Branch 1).
- Click Move inside Customers is empty (Branch 1), and then click Move. Step 4 is moved to the second If branch and becomes step 5 of the flow.
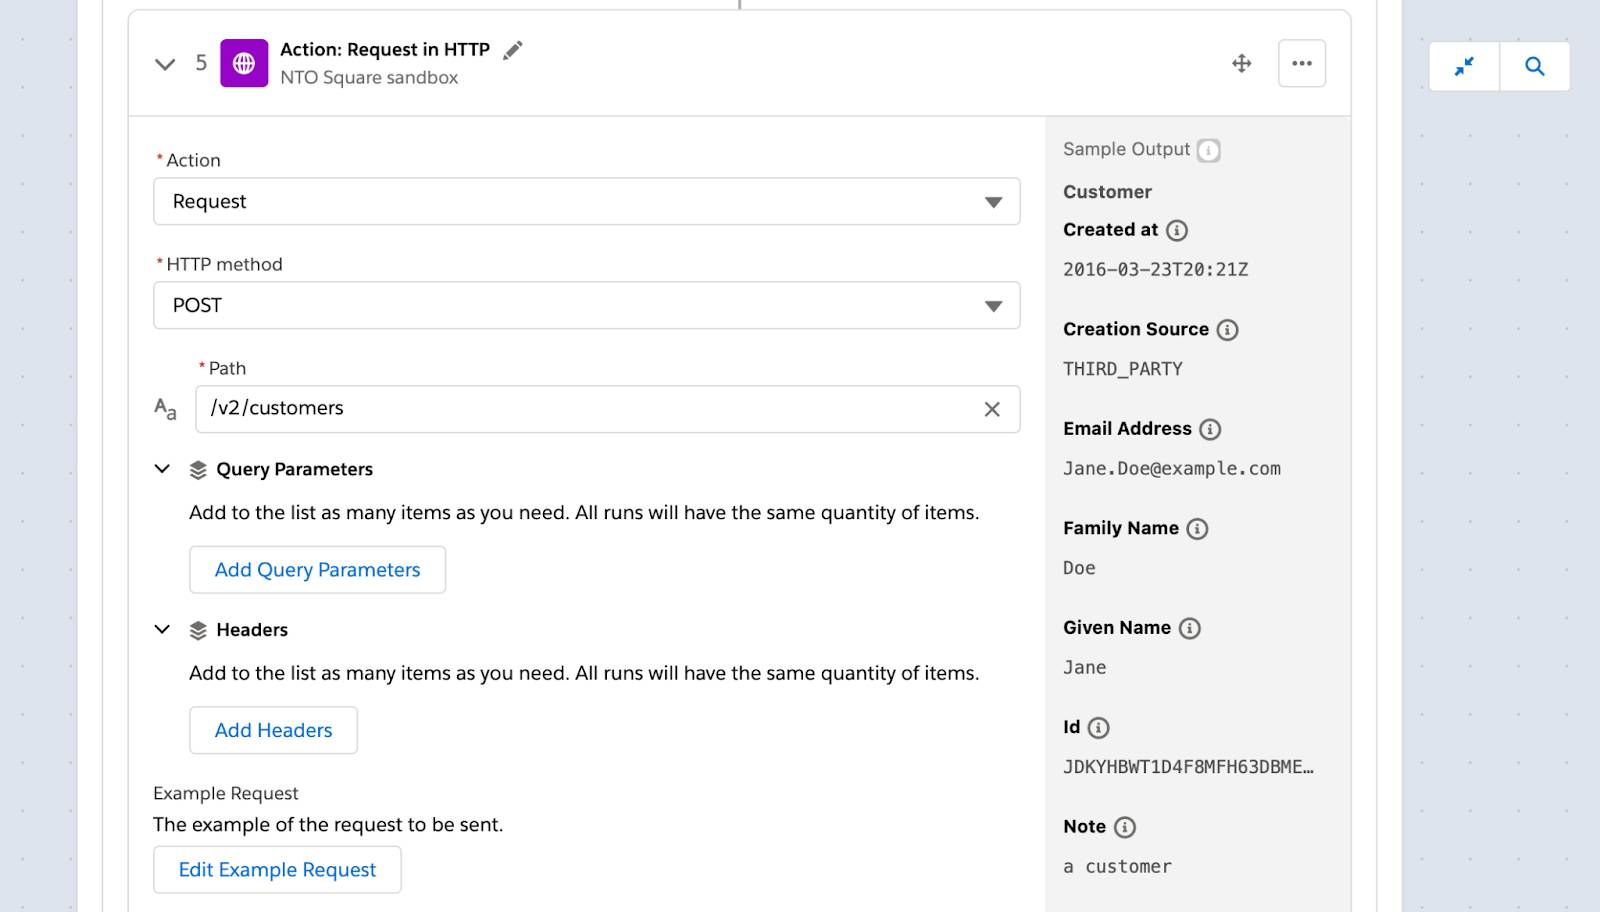
Configure the fifth step to create a customer with relevant contact details, including its associated contact ID.
- Scroll down to step 5 of the flow. The Action field is still set to Request.
- In the HTTP method field, select POST.
- Change the Path field to
/v2/customers.
- Click Edit Example Request.
- Copy and paste the following, and then click Save. Note that this request is similar to the request the API Explorer tool generates when the Create customer(POST) endpoint is used.
{ "given_name": "Jane", "family_name": "Doe", "email_address": "Jane.Doe@example.com", "address": { "address_line_1": "500 Electric Ave", "address_line_2": "Suite 600", "locality": "New York", "administrative_district_level_1": "NY", "postal_code": "10003", "country": "US" }, "phone_number": "1-212-555-4240", "reference_id": "salesforce_id" } - Ensure the Customer fields are mapped to their corresponding Contact fields captured in step 1 of the flow as follows.
- Email_address = Email
- Family_name = Last Name
- Given_name = First Name
- Phone_number = Business Phone
- Reference_id = Contact ID
- Address
- Address_line_1 = Mailing Address > Street
- Administrative_district_level_1 = Mailing Address > State
- Country = Mailing Address > Country
- Locality = Mailing Address > City
- Postal_code = Mailing Address > Postal Code
- Click Edit Example Response.
- Copy and paste the following, and then click Save. Note that this response is similar to the response the API Explorer tool generates when the Create customer (POST) endpoint is used.
{
  "customer": {
    "id": "JDKYHBWT1D4F8MFH63DBMEN8Y4",
    "created_at": "2016-03-23T20:21:54.859Z",
    "updated_at": "2016-03-23T20:21:54.859Z",
    "given_name": "Jane",
    "family_name": "Doe",
    "email_address": "Jane.Doe@example.com",
    "address": {
      "address_line_1": "500 Electric Ave",
      "address_line_2": "Suite 600",
      "locality": "New York",
      "administrative_district_level_1": "NY",
      "postal_code": "10003",
      "country": "US"
    },
    "phone_number": "1-212-555-4240",
    "reference_id": "YOUR_REFERENCE_ID",
    "note": "a customer",
    "preferences": {
      "email_unsubscribed": false
    },
    "creation_source": "THIRD_PARTY",
    "group_ids": [
      "545AXB44B4XXWMVQ4W8SBT3HHF"
    ],
    "segment_ids": [
      "1KB9JE5EGJXCW.REACHABLE"
    ],
    "version": 1
  }
}
Create the sixth step for the flow within the second If branch by duplicating step 4 of the flow.
- Scroll up to step 4 of the flow, click the ellipsis button on the step, and then click Duplicate Step. Step 5 of the flow is created.
- Click the Move Step (four-headed arrow) button on step 5. The Move Step window appears, showing the list of steps in your flow. The Move step picklist is set to After by default.
- Expand the If/Else block.
- Expand the Customers is empty (Branch 1).
- Click 6. Action: Request in HTTP, and then click Move. Step 5 is moved to the second If branch and becomes step 6 of the flow.
Configure the sixth step to update the triggering contact with its associated customer ID.
- Scroll down to step 6 of the flow. The Action field is still set to Update record, and the Object Type field is still set to Contact.
- Ensure the Contact fields are mapped to their corresponding fields captured in the preceding steps of the flow as follows.
- Contact ID = Contact ID from step 1
- Square Customer ID = Customer > Id from step 5
- Save the flow. Your entire flow should look like this.
Good job! In the next unit, you learn how to test your flow to ensure it works as expected.