Get Started with Apex Unit Tests
Learning Objectives
After completing this unit, you’ll be able to:
- Describe the key benefits of Apex unit tests.
- Define a class with test methods.
- Execute all test methods in a class and inspect failures.
- Create and execute a suite of test classes.
Apex Unit Tests
The Apex testing framework enables you to write and execute tests for your Apex classes and triggers. Apex unit tests ensure high quality for your Apex code and let you meet requirements for deploying Apex.
Testing is the key to successful long-term development and is a critical component of the development process. The Apex testing framework makes it easy to test your Apex code. Apex code can only be written in a sandbox or a developer org, not in a production org. Apex code can be deployed to a production org from a sandbox. Also, app developers can distribute Apex code to customers from their developer orgs by uploading packages to the Salesforce AgentExchange. In addition to being critical for quality assurance, Apex unit tests are also requirements for deploying and distributing Apex.
Apex unit tests lead to better code. The Apex testing framework:
- Ensures that your Apex classes and triggers work as expected.
- Has a suite of regression tests that can be rerun every time classes and triggers are updated to ensure that future updates you make to your app don’t break existing functionality.
- Meets the code coverage requirements for deploying Apex to production or distributing Apex to customers via packages.
- Delivers high-quality apps to the production org, which makes production users more productive.
- Delivers high-quality apps to package subscribers, which increases your customers’ trust.
Code Coverage Requirement for Deployment
Before you can deploy your code or package it for the Salesforce AgentExchange, at least 75% of Apex code must be covered by tests, and all those tests must pass. In addition, each trigger must have some coverage. Even though code coverage is a requirement for deployment, don’t write tests only to meet this requirement. Make sure to test the common use cases in your app, including positive and negative test cases, and bulk and single-record processing.
Test Class and Test Method Syntax
Apex test classes are annotated with the @IsTest annotation. Test classes can be defined with either private or public access modifiers. If you’re using a test class for unit testing only, declare it as private. Public test classes are typically used for test data factory classes, which we’ll cover in the Create Test Data for Apex Tests unit. Classes defined as @IsTest must be top-level classes.
Within the test class, test methods are also defined using the @IsTest annotation.The visibility of a test method doesn’t matter, so declaring a test method as public or private doesn’t make a difference, as the testing framework is always able to access test methods. For this reason, the access modifiers are omitted in the method syntax.
This code sample shows a definition of a test class with one test method.
@IsTest
private with sharing class MyTestClass {
  @IsTest static void myTest() {
    // code_block
  }
}
The @IsTest annotation can take multiple modifiers within parentheses, where a space separates each modifier. We’ll briefly discuss the @IsTest(seeAllData=true) annotation in the Create Test Data for Apex Tests unit.
Unit Test Example: Test the TemperatureConverter Class
The following simple example is of a test class with three test methods. The class method that’s being tested takes a temperature in Fahrenheit as an input. It converts this temperature to Celsius and returns the converted result. Let’s add the custom class and its test class.
- In the Developer Console, click File | New | Apex Class, and enter
TemperatureConverterfor the class name, and then click OK.
- Replace the default class body with the following.
public with sharing class TemperatureConverter { // Takes a Fahrenheit temperature and returns the Celsius equivalent. public static Decimal FahrenheitToCelsius(Decimal fh) { Decimal cs = (fh - 32) * 5/9; return cs.setScale(2); } } - Press Ctrl+S to save your class.
- Repeat the previous steps to create the
TemperatureConverterTestclass. Replace the default class body with the following.@IsTest private with sharing class TemperatureConverterTest { @IsTest static void testWarmTemp() { Decimal celsius = TemperatureConverter.FahrenheitToCelsius(70); Assert.areEqual(21.11,celsius); } @IsTest static void testFreezingPoint() { Decimal celsius = TemperatureConverter.FahrenheitToCelsius(32); Assert.areEqual(0,celsius); } @IsTest static void testBoilingPoint() { Decimal celsius = TemperatureConverter.FahrenheitToCelsius(212); Assert.areEqual(100,celsius,'Boiling point temperature is not expected.'); } @IsTest static void testNegativeTemp() { Decimal celsius = TemperatureConverter.FahrenheitToCelsius(-10); Assert.areEqual(-23.33,celsius); } }
The TemperatureConverterTest test class verifies that the method works as expected by calling it with different inputs for the temperature in Fahrenheit. Each test method verifies one type of input: a warm temperature, the freezing point temperature, the boiling point temperature, and a negative temperature. The verifications are done by calling the Assert.areEqual() method, which takes two parameters. The first parameter is the expected value, and the second parameter is the actual value. This method can also accept a third parameter, which is a string that describes the comparison being done. This optional third parameter is used in the testBoilingPoint() example. The specified string is logged if the assertion fails.
Let’s run the methods in this class.
- In the Developer Console, click Test | New Run.
- Under Test Classes, click TemperatureConverterTest.
- To add all the test methods in the
TemperatureConverterTestclass to the test run, click Add Selected.
- Click Run.
- In the Tests tab, you see the status of your tests as they’re running. Expand the test run, and expand again until you see the list of individual tests that were run. They all have green checkmarks, which indicates that all the tests passed.

After you run tests, code coverage is automatically generated for the Apex classes and triggers in the org. You can check the code coverage percentage in the Tests tab of the Developer Console. In this example, the TemperatureConverter class has 100% coverage, as shown in this image.


While one test method would have resulted in full coverage of the TemperatureConverter class, it’s still important to test for different inputs to ensure the quality of your code. Obviously, it isn’t possible to verify every data point, but you can test for common data points and different ranges of input. For example, you can verify passing positive and negative numbers, boundary values, and invalid parameter values to verify negative behavior. The tests for the TemperatureConverter class verify common data points, such as the freezing and boiling points, as well as a positive and negative temperature.
However, the TemperatureConverterTest test class doesn’t currently cover boundary conditions or invalid inputs. Boundary conditions are the minimum and maximum values that the method can handle. For invalid inputs, consider what happens if null is passed as an argument to FahrenheitToCelsius(). In this case, when the Apex runtime dereferences the parameter variable to evaluate the formula, it throws a System.NullPointerException. To handle this error, you can modify the FahrenheitToCelsius() method to check for an invalid input and return null in that case. Then add a test method to the TemperatureConverterTest class to verify the invalid input behavior.
Up to this point, all tests pass because the conversion formula used in the class method is correct. But that’s boring! Let’s try to simulate a failure just to see what happens when an assertion fails. For example, let’s modify the boiling point temperature test and pass in a false expected value for the boiling point Celsius temperature (0 instead of 100). This causes the corresponding test method to fail.
- Change the
testBoilingPoint()test method to the following.@IsTest static void testBoilingPoint() { Decimal celsius = TemperatureConverter.FahrenheitToCelsius(212); // Simulate failure Assert.areEqual(0,celsius,'Boiling point temperature is not expected.'); } - To execute the same test run, click the latest run in the Tests tab, and then click Test | Rerun from the navigation bar. The assertion in
testBoilingPoint()fails and throws a fatal error (anAssertExceptionthat can’t be caught).
- Check the results in the Tests tab by expanding the latest test run. The test run reports one out of four tests failed. To get more details about the failure, double-click the test run. Detailed results appear in a separate tab.
- To get the error message for the test failure, double-click inside the Errors column for the failed test. The error message includes the text that we provided in the
Assert.areEqual()statement:System.AssertException: Assertion Failed: Boiling point temperature is not expected.: Expected: 0, Actual: 100.00
The test data in these test methods are numbers and not Salesforce records. You’ll find out more about how to test Salesforce records and how to set up your data in the next unit.
Increase Your Code Coverage
When writing tests, try to achieve the highest code coverage possible. Don’t just aim for 75% coverage, which is the lowest coverage that Salesforce requires for deployments and packages. The more test cases that your tests cover, the higher the likelihood that your code is robust. Sometimes, even after you write test methods for all your class methods, code coverage is not at 100%. One common cause is not covering all data values for conditional code execution. For example, some data values tend to be ignored when your class method has if statements that cause different branches to be executed based on whether the evaluated condition is met. Ensure that your test methods account for these different values.
This example includes the class method, getTaskPriority(), which contains two if statements. The main task of this method is to return a priority string value based on the given lead state. The method validates the state first and returns null if the state is invalid. If the state is CA, the method returns 'High'; otherwise, it returns 'Normal' for any other state value.
public with sharing class TaskUtil {
  public static String getTaskPriority(String leadState) {
    // Validate input
    if(String.isBlank(leadState) || leadState.length() > 2) {
      return null;
    }
    String taskPriority;
    if(leadState == 'CA') {
      taskPriority = 'High';
    } else {
      taskPriority = 'Normal';
    }
    return taskPriority;
  }
}This is the test class for the getTaskPriority() method. The test method simply calls getTaskPriority() with one state (NY).
@IsTest
private with sharing class TaskUtilTest {
  @IsTest
  static void testTaskPriority() {
    String pri = TaskUtil.getTaskPriority('NY');
    Assert.areEqual('Normal', pri);
  }
}
Let’s run this test class (TaskUtilTest) in the Developer Console and check code coverage for the corresponding TaskUtil class that this test covers. After the test run finishes, the code coverage for TaskUtil is shown as 75%.
Open the TaskUtil class in the Developer Console. If you haven’t already, change the setting from Code Coverage: None to Code Coverage: All Tests. With this setting, you’ll see six blue (covered) lines and two red (uncovered) lines, as shown in this image.
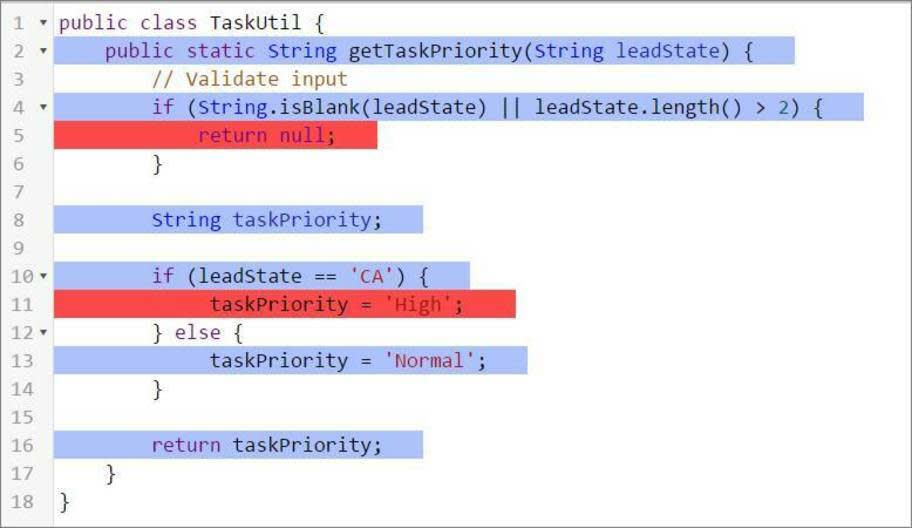
The reason why line 5 isn’t covered is because our test class doesn’t contain a test to pass an invalid state parameter. Similarly, line 11 isn’t covered because the test method doesn’t pass 'CA' as the state. Let’s add two more test methods to cover those scenarios. The following shows the full test class after adding the testTaskHighPriority() and testTaskPriorityInvalid() test methods. If you rerun this test class using Test | Run All or Test | New Run, the code coverage for TaskUtil is now at 100%!
@IsTest
private with sharing class TaskUtilTest {
  @IsTest
  static void testTaskPriority() {
    String pri = TaskUtil.getTaskPriority('NY');
    Assert.areEqual('Normal', pri);
  }
  @IsTest
  static void testTaskHighPriority() {
    String pri = TaskUtil.getTaskPriority('CA');
    Assert.areEqual('High', pri);
  }
  @IsTest
  static void testTaskPriorityInvalid() {
    String pri = TaskUtil.getTaskPriority('Montana');
    Assert.isNull(pri);
  }
}
Create and Execute a Test Suite
A test suite is a collection of Apex test classes that you run together. For example, create a suite of tests that you run every time you prepare for a deployment or Salesforce releases a new version. Set up a test suite in the Developer Console to define a set of test classes that you execute together regularly.
You now have two test classes in your org. These two classes aren’t related, but let’s pretend for the moment that they are. Assume that there are situations when you want to run these two test classes but don’t want to run all the tests in your org. Create a test suite that contains both classes, and then execute the tests in the suite.
- In the Developer Console, select Test | New Suite.
- Enter
TempConverterTaskUtilSuitefor the suite name, and then click OK.
- Select TaskUtilTest, hold down the Ctrl key, and then select TemperatureConverterTest.
- To add the selected test classes to the suite, click >.

- Click Save.
- Select Test | New Suite Run.
- Select TempConverterTaskUtilSuite, and then click > to move
TempConverterTaskUtilSuiteto the Selected Test Suites column.
- Click Run Suites.
- On the Tests tab, monitor the status of your tests as they’re running. Expand the test run, and expand again until you see the list of individual tests that were run. Like in a run of individual test methods, you can double-click method names to see detailed test results.
Create Test Data
Salesforce records that are created in test methods aren’t committed to the database. They’re rolled back when the test finishes execution. This rollback behavior is handy for testing because you don’t have to clean up your test data after the test executes.
By default, Apex tests don’t have access to pre-existing data in the org, except for access to setup and metadata objects, such as the User or Profile objects. Set up test data for your tests. Creating test data makes your tests more robust and prevents failures that are caused by missing or changed data in the org. You can create test data directly in your test method, or by using a utility test class as you’ll find out later.
Tell Me More
- You can use Salesforce Apex Extension for Visual Studio Code to run Apex tests and verify the functionality of your code.
- You can save up to 6 MB of Apex code in each org. Test classes annotated with
@IsTestdon’t count toward this limit.
- Even though test data rolls back, no separate database is used for testing. As a result, for some sObjects that have fields with unique constraints, inserting duplicate sObject records results in an error.
- Test methods don’t send emails.
- Test methods can’t make callouts to external services. You can use mock callouts in tests.
- SOSL searches performed in a test return empty results. To ensure predictable results, use
Test.setFixedSearchResults()to define the records to be returned by the search.
Resources
- Apex Developer Guide: Testing Best Practices
- Apex Developer Guide: What Are Apex Unit Tests?
- Apex Developer Guide: Isolation of Test Data from Organization Data in Unit Tests
- Salesforce Help: Checking Code Coverage
Get Ready for the Hands-on Challenge
In order to complete the hands-on challenge for this unit, you’ll need to create a new Apex class named VerifyDate with the code copied from below:
public with sharing class VerifyDate {
  //method to handle potential checks against two dates
  public static Date CheckDates(Date date1, Date date2) {
    //if date2 is within the next 30 days of date1, use date2.  Otherwise use the end of the month
    if(DateWithin30Days(date1,date2)) {
      return date2;
    } else {
      return SetEndOfMonthDate(date1);
    }
  }
  //method to check if date2 is within the next 30 days of date1
  private static Boolean DateWithin30Days(Date date1, Date date2) {
    //check for date2 being in the past
    if( date2 < date1) { return false; }
    //check that date2 is within (>=) 30 days of date1
    Date date30Days = date1.addDays(30); //create a date 30 days away from date1
    if( date2 >= date30Days ) { return false; }
    else { return true; }
  }
  //method to return the end of the month of a given date
  private static Date SetEndOfMonthDate(Date date1) {
    Integer totalDays = Date.daysInMonth(date1.year(), date1.month());
    Date lastDay = Date.newInstance(date1.year(), date1.month(), totalDays);
    return lastDay;
  }
}