Set Up a Simple Flow
Learning Objectives
After completing this unit, you’ll be able to:
- Set up a simple flow.
- Configure a schedule and filter for your flow.
- Confirm AppFlow is connected in Salesforce Setup.
The following walks you through setting up a simple flow between AWS and Salesforce. As it is a paid service and your data may vary, we won’t have you set up a flow using a Trailhead Playground or Developer org. Rather, we offer these steps as guidelines for the integration. This also familiarizes you with the process so you can set up automation and get data flowing in different directions later on.
Let's first look at the use case of a simple flow—a flow that sends data from Salesforce to AWS on a set schedule. You start in the AWS Management Console.
Navigate to AppFlow and Give Your Flow a Name
You use the AWS Management Console to configure your AppFlow integration.
-
Sign in to AWS and enter AWS Management Console.
- Enter
AppFlowin the Find Services field then click Amazon AppFlow.
- Click Create flow.
- In the Flow details section, give the flow a name and enter a description.
In this example, the Flow name is “SalesforceToAmazonS3Demo” (1), and the description is “Copy opportunity records from Salesforce into an Amazon S3 bucket.” (2). It’s best to be clear and concise so your colleagues know exactly what the flow is about.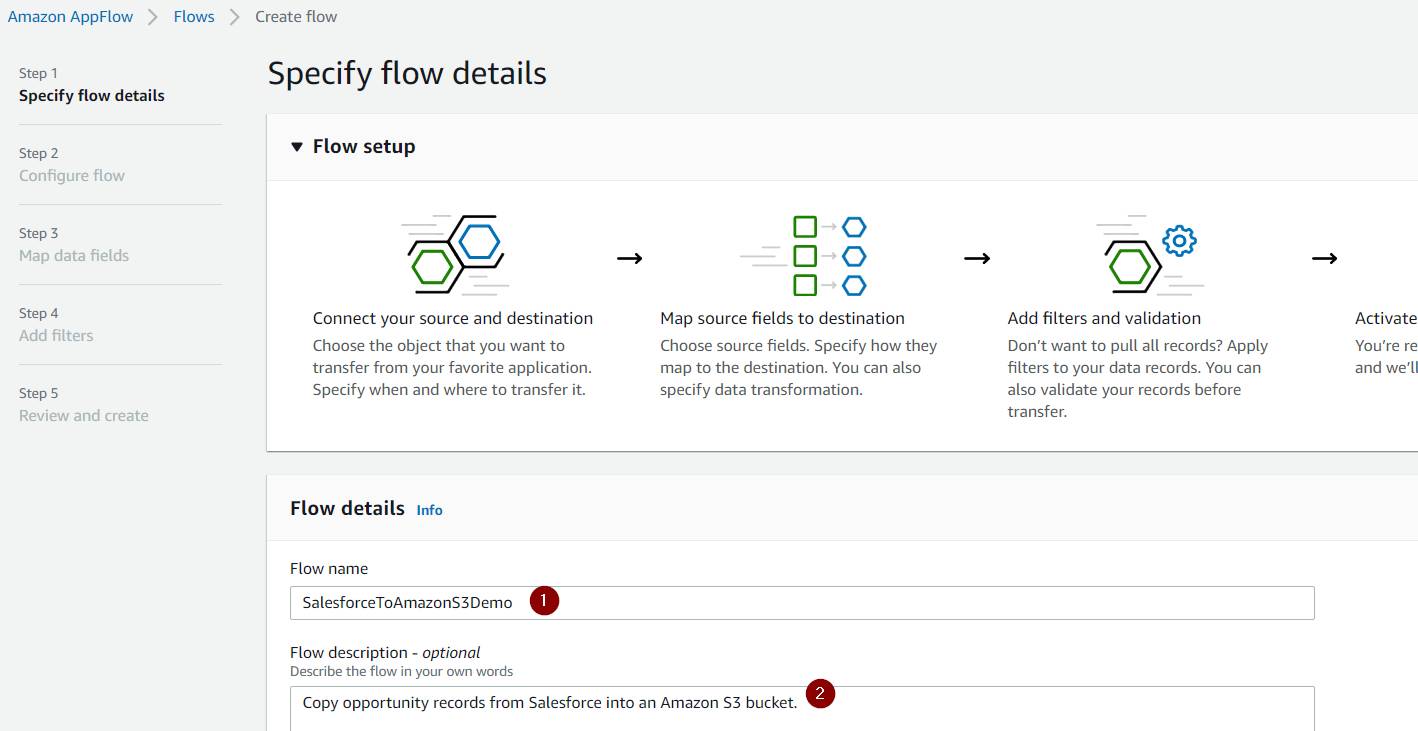
- Then click Next.
Connect Salesforce
- Select Salesforce from the Source name dropdown.
- Choose a Salesforce connection from the dropdown. If no connection exists, either select Create new connection, or Create new connection with AWS PrivateLink if you are using Salesforce Private Connect.
- Click Connect.
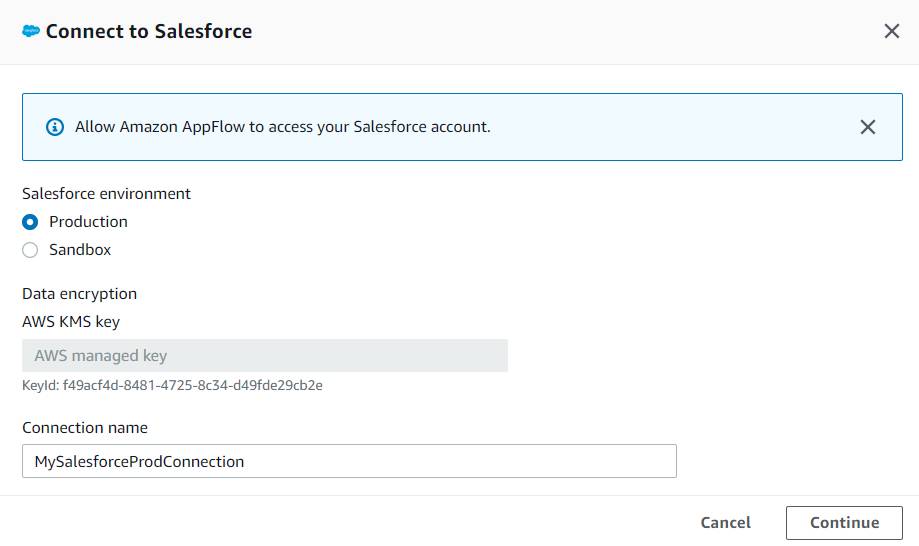
- In the popup window, choose either your production or sandbox org.
- Enter a name in the Connection name field. In this example, Production is selected and the Connection name is "MySalesforceProdConnection".
- Click Continue.
- You’re taken to a Salesforce authorization page. Depending on your settings in Salesforce:
- You may only need to allow access. If that’s the case, check that you’re connecting via the correct Salesforce user name, then click Allow.
- If you’re asked to enter your Salesforce credentials, enter the appropriate credentials, sign in, and click Allow.
- Next, you have to select if you want to fetch specific Salesforce Objects, or if you want to subscribe to Salesforce Events (Change Data Capture and Platform Events) to Amazon S3. You can choose from all objects, including custom ones.
- In the destination, select Amazon S3.
- From the dropdown, choose an S3 bucket in the same AWS region where you’re creating this flow. If you don’t have an S3 bucket, here are the steps to create one.

- Under Additional Settings, you can also choose advanced settings to configure different data formats, like JSON, CSV, or Parquet, file naming, and aggregation preferences.
Configure Your Flow
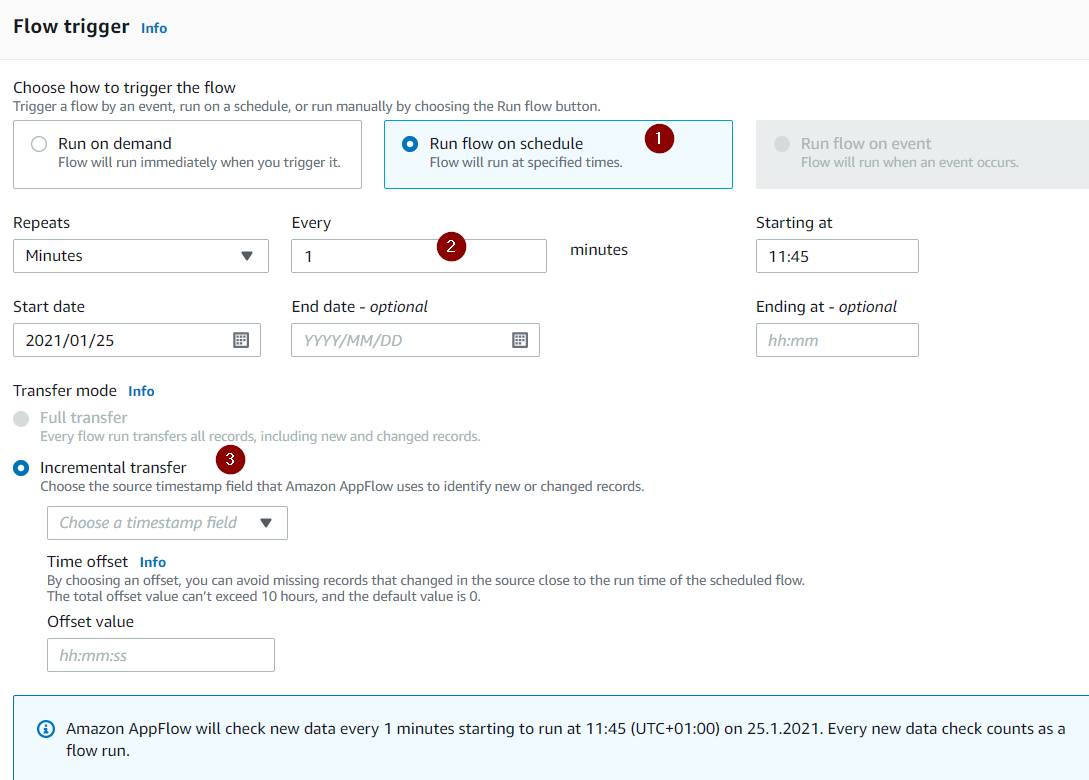
Next, you choose when to run the flow. The on-demand option lets you run the flow as soon as you save your configuration. The other option is to schedule your flow. In this example, Run flow on schedule (1) is selected. The flow is set to repeat every 1 minute (2), it’s configured to only transfer new data (3).
You can choose from different Salesforce Date fields like Create Date or Last Modified Date to identify changes.
After you’ve configured the flow the way you want it, click Next.
Map the Fields
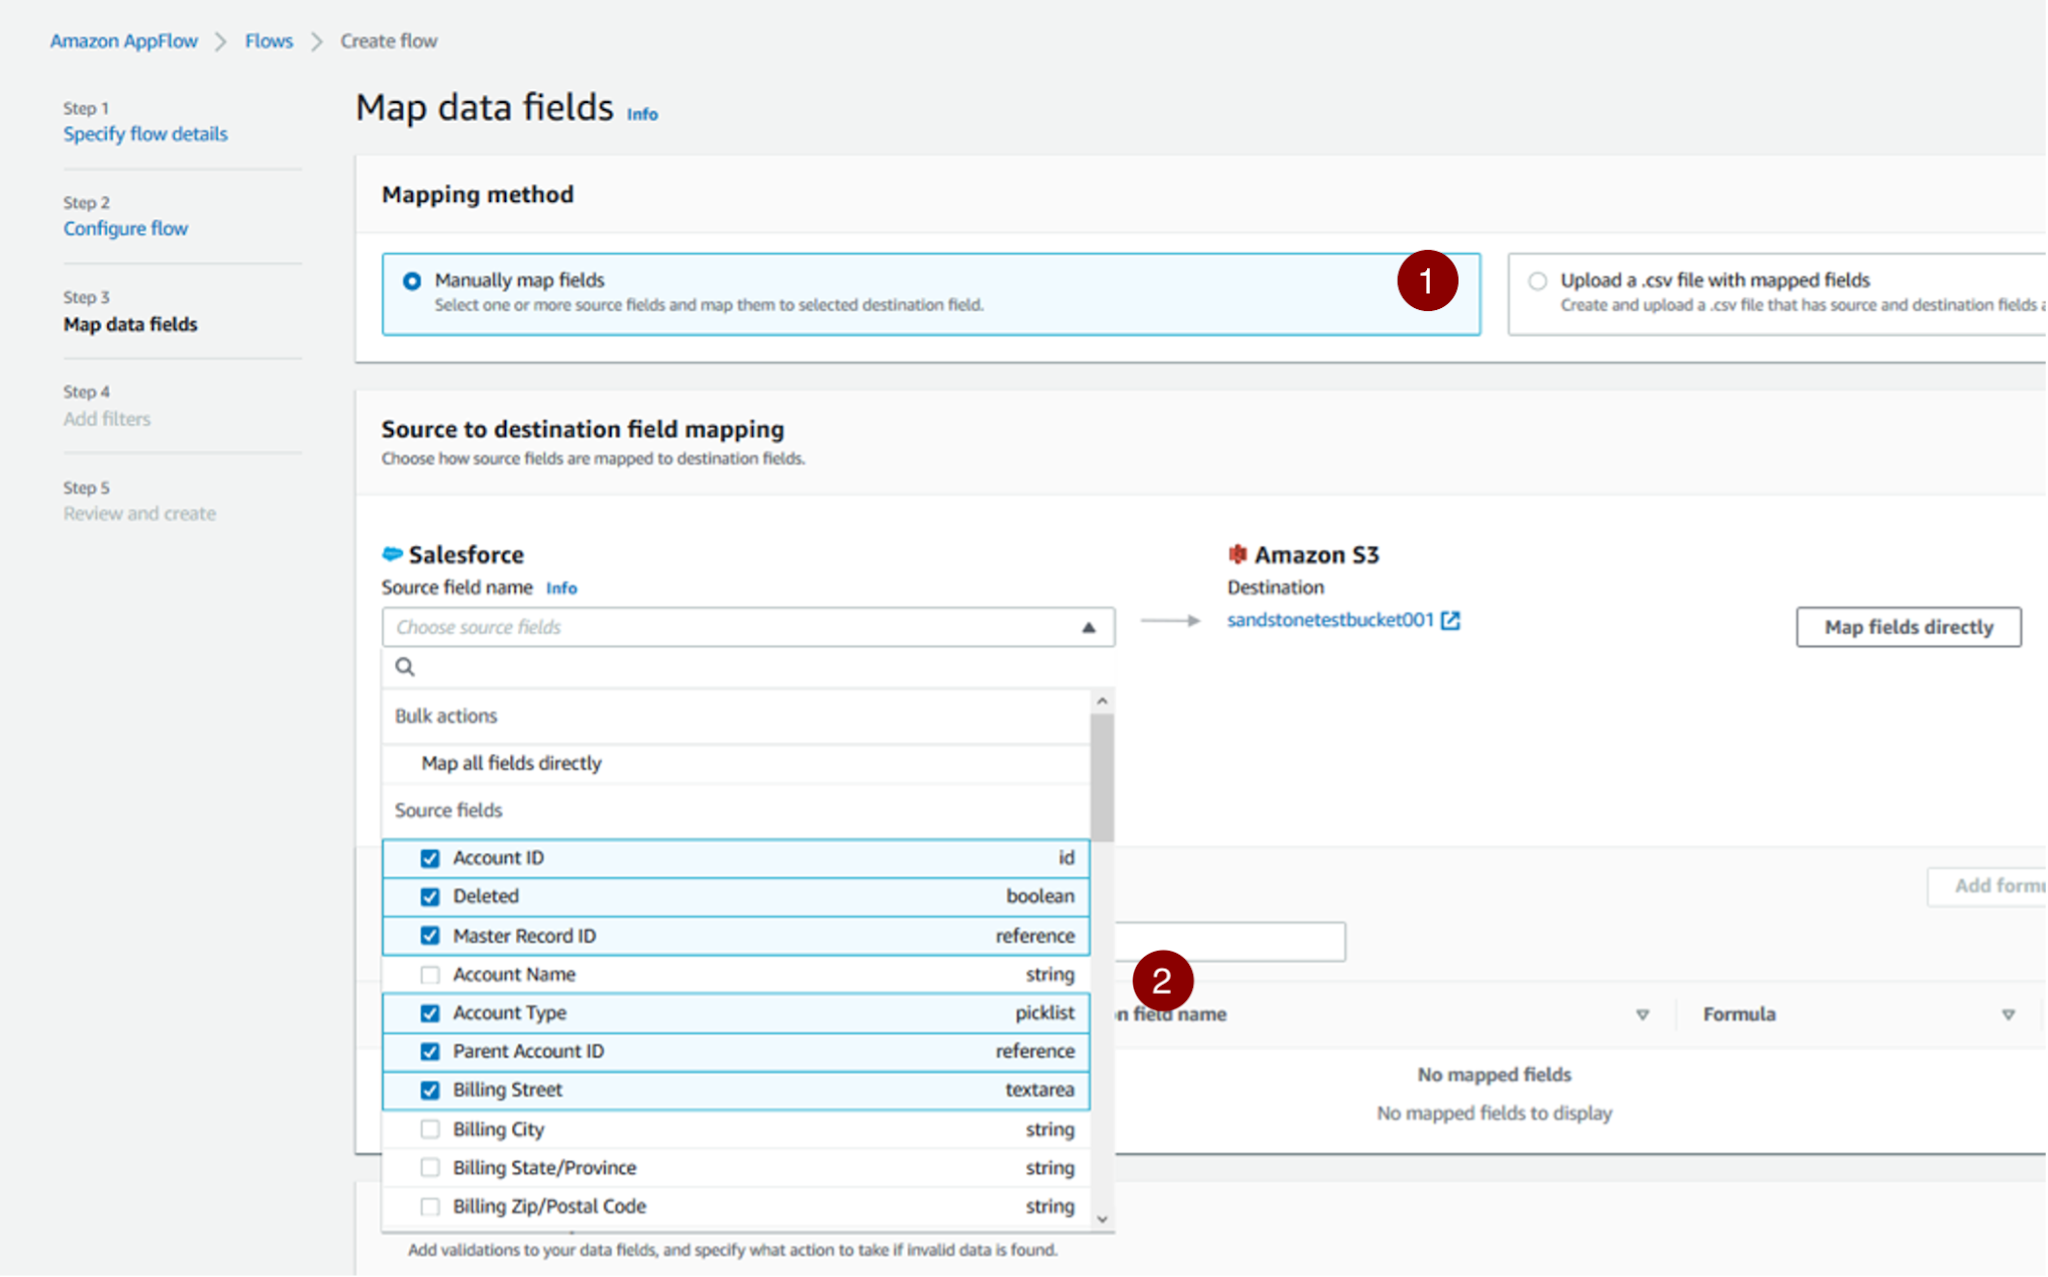
It’s time to map fields between Salesforce and Amazon S3. AppFlow allows you to either map fields manually (1) or upload CSV files with mapped fields.
In the Map data fields section, select the fields of the Salesforce object that you want to transfer. You can also choose to map all fields in one click. In this example (2), the following fields are selected.
- Account ID
- Deleted
- Master Record ID
- Account Type
- Parent Account ID
- Billing Street
During this step, you can also add formula to the fields—you can mask characters or truncate fields. You can also combine two fields to create a new destination field.
Click Next when you’re ready to proceed.
Validations
In the Validations section, you can add specific validations per field to drive specific actions. For example, you can select the Account Type field and apply a condition such as if the Account Type is missing or null, ignore that record. Configuration of Validations is optional.
Filter Your Data
Next, you have the option to filter data. For example, on the created date field, you can filter in records that were created before or after a certain date.
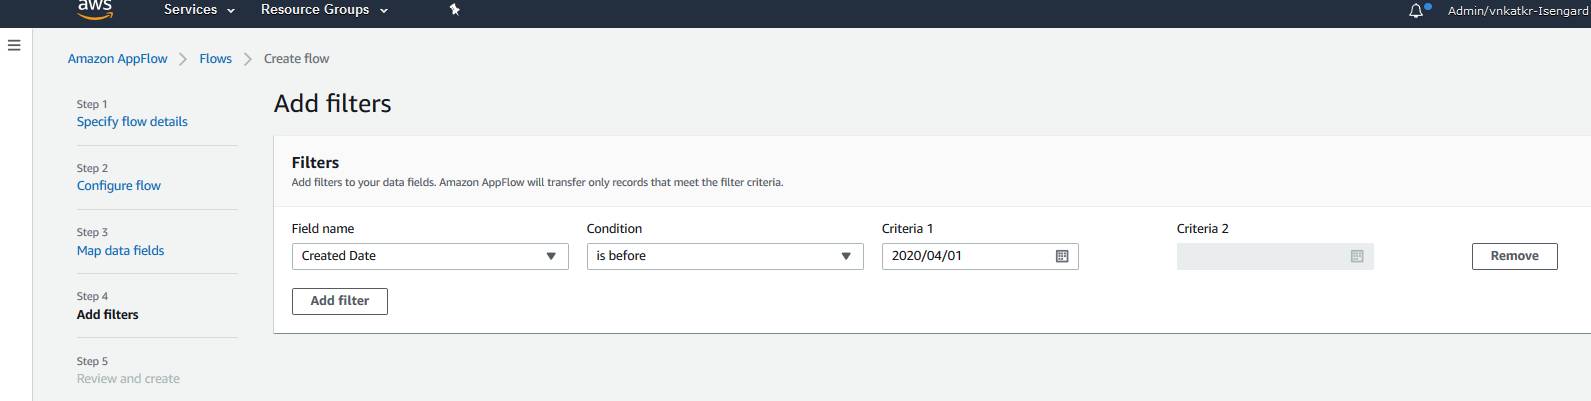
Click Next when you’re ready to proceed.
Review Your Flow
The final step is to review and create your flow. Review the flow configuration and click Create flow. That’s it. Your flow is ready to run.
Click Activate Flow if you set up the flow to run on the defined schedule, or Run Flow if you set up the flow to run on-demand.
Ensure Your Flow Is Connected
Back in Salesforce, double-check to see if AppFlow is connected.
- Log in to Salesforce.
- Click
 and select Setup.
- Enter
connected appin Quick Find and select Manage Connected Apps.
- Verify Amazon AppFlow Embedded Login App is on your list of connected apps. Once you completed the authentication step, this connected app was automatically enabled in Salesforce.
One more check.
- Enter
connected appin Quick Find if you're not there already, and selectConnected Apps OAuth Usage.
- AppFlow Embedded Login App should be listed and should have Refresh token is valid until revoked under Manage App Policies. You can edit the policy to reflect this if you need to.