Set Up Testing Criteria
Learning Objectives
After completing this unit, you’ll be able to:
- Explain how to get the testing template.
- Describe the different parts of test criteria.
What to Test
Testing is all about making sure you achieve an acceptable level of risk for your agent. After testing and troubleshooting your agent manually in Agentforce Builder, you’ve updated the instructions, subagents, actions, filters, and guardrails based on those test results. Now, you can use the Agentforce Testing Center to store those tests and run them over and over again.
Your customers put your agents to the test because they want answers to their every question. Hackers, and sometimes even employees, might try to get around restrictions and attempt to perform tasks or manipulate the model’s output in ways that the model wasn’t designed for. These scenarios get added to the tests in the Agentforce Testing Center.
The trick is to try and predict the types of questions they’re going to ask. You should try to cover every angle, every possibility. That’s what you’re designing your tests to cover.
You can expect to find errors or at least issues as you start testing. Test for positive, expected results. Then test for negative, unexpected, or even invalid results. You want to be sure the agent responds correctly to even the most wrong requests. This is called positive and negative testing. It makes for a more robust test suite.
Here's an example: While testing an agent email input, test for the correct email response. This is testing the positive, valid, and expected behavior. But don’t stop there. Test for an incorrect email input to the agent, and be sure the correct response for that scenario is returned. This is testing the negative, invalid, and unexpected behavior.
While this can sound like a daunting task, doing your due diligence pays off in the end. Ready to get started?
Sign Up for a Developer Edition Org with Agentforce Testing Center
To complete this module, you need a special Developer Edition org that contains Agentforce Testing Center and our sample data. Get the free Developer Edition and connect it to Trailhead now so you can complete the challenges in this module. Note that this Developer Edition is designed to work with the challenges in this badge, and might not work for other badges. Always check that you’re using the Trailhead Playground or special Developer Edition org that we recommend.
When you’re finished completing the step-by-step instructions, click Check Challenge to Earn 500 Points at the bottom of the page.
- Sign up for a free Developer Edition org with Agentforce Testing Center.
- Fill out the form:
- For Email, enter an active email address.
- For Username, enter a username that looks like an email address and is unique, but it doesn't need to be a valid email account (for example, yourname@example.com).
- For Email, enter an active email address.
- After you fill out the form, click Sign me up. A confirmation message appears.
- When you receive the activation email (this might take a few minutes), open it and click Verify Account.
- Complete your registration by setting your password and challenge question. Tip: Save your username, password, and login URL in a secure place—such as a password manager—for easy access later.
- You are logged in to your Developer Edition.
Now connect your new Developer Edition org to Trailhead.
- Make sure you're logged in to your Trailhead account.
- In the Challenge section at the bottom of this page, click the org name and then click Connect Org.
- On the login screen, enter the username and password for the Developer Edition you just set up.
- On the Allow Access? screen, click Allow.
- On the Want to connect this org for hands-on challenges? screen, click Yes! Save it. You are redirected back to the challenge page and ready to use your new Developer Edition to earn this badge.
Turn on Agentforce
- Click the Setup icon
 , then click Setup.
- In the Quick Find box, search for and select Einstein Setup.
- Verify Einstein is turned On. If it is already On, then turn it Off and then back On again.

- Refresh your browser.
- In the Setup Quick Find, search for and select Salesforce Go.
- In the Search features... textbox, enter and select Agentforce (Default).
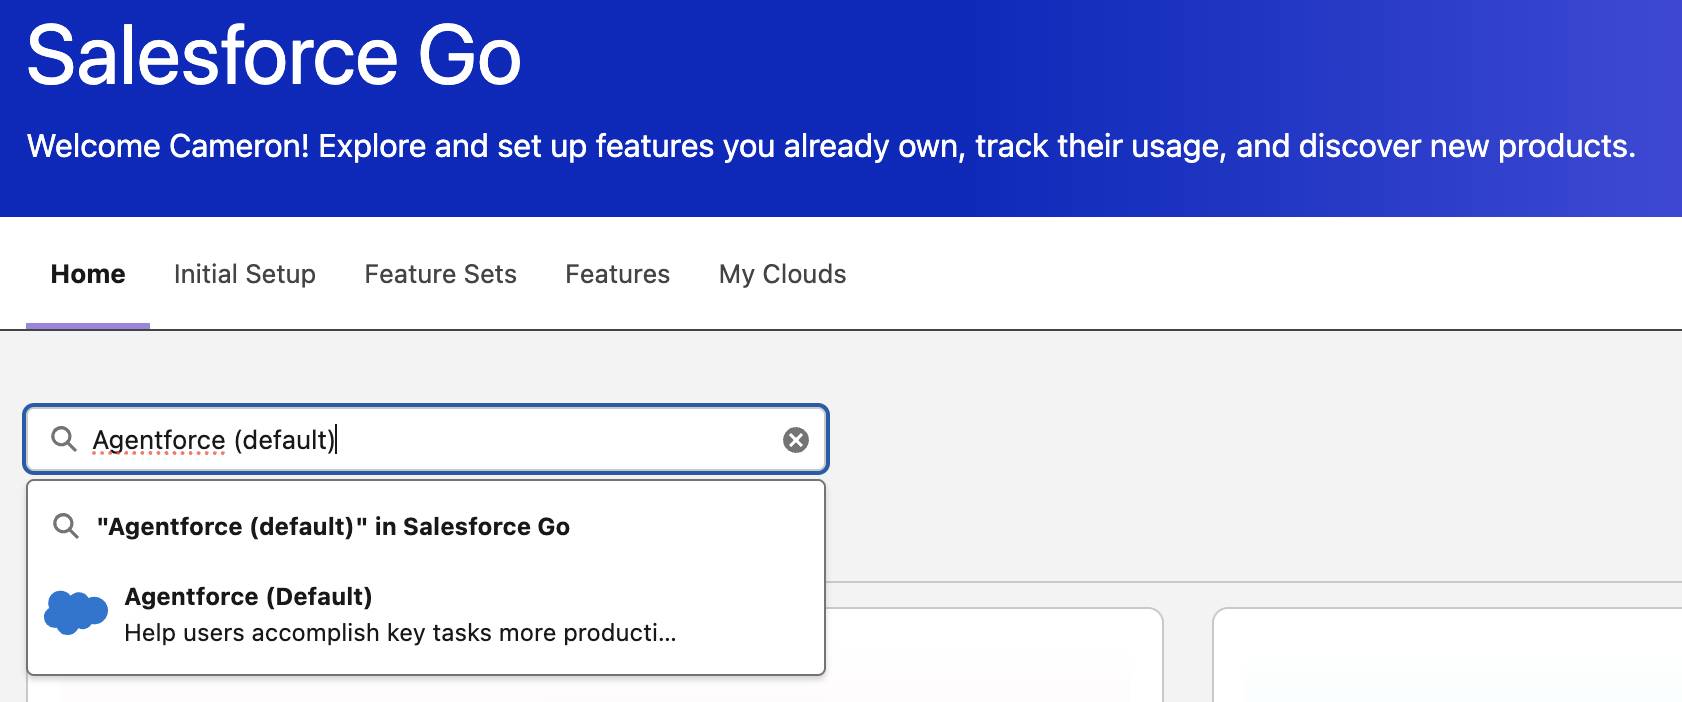
- Click Get Started.
- Click Turn On.
- Click Confirm.
Agentforce is now enabled and the Agentforce Testing Center is available. But before we begin testing agents, let’s talk about permissions.
Got Permissions?
The Developer Edition that you’re using for this badge already has the correct permissions set up, but what if they weren’t set up?
Part of creating trust is making sure only the right access is given. Working with Agentforce requires certain permissions. Not only for the Agentforce tools but also for the automations that agents might use. Like access to data, apps, and Apex. Let's start with getting access to Agentforce.
Control access to the Agentforce (Default) agent with type-specific permissions. To use Agentforce (Default), users must have the Access Agentforce Default Agent permission set group or be an admin with the Customize Application permission.
Legacy Testing Center (Setup)
To work with the legacy Agentforce Testing Center in Setup, these permissions are needed:
- Manage AI Agents AND the required permissions for your agent type AND System Admin profile
Or
- Customize Application AND System Admin profile

New Testing Center in Agentforce Studio (Beta)
The new Testing Center supports non-admin users. Add these permissions to an existing permission set — no System Administrator profile required:
- Manage Agentforce Grids AND Manage Agentforce Testing
Create Test Cases
To start crafting the test cases, you need a place to store them so you can upload them into the Agentforce Testing Center. The Agentforce Testing Center has a template you can use to help get you on your way, so let’s start with that. Here’s how you get the testing template.
- From Setup, in the Quick Find box, search for and select Testing Center.
- Click New Test.
- For Test Name, enter
template.
- Select Einstein Copilot - v1 or Agentforce (Default) - v1 for the agent to test.
- Click Next.
- Click Next.
- Click the Upload Test Cases tab.
- Click the Template link.

This downloads a testing_template.csv file to your device.
- Close the New Test without saving. We were just looking for the testing template.
- Open the file in a text editor to see the comma-separated values.
CSV files are one of the most common ways to store tabular data. Each value is separated with a comma, and each line is a data record, or a test case. The top row is the header designating what each column is used for by the Agentforce Testing Center. Each question or utterance and its expected outcomes are on a separate line.
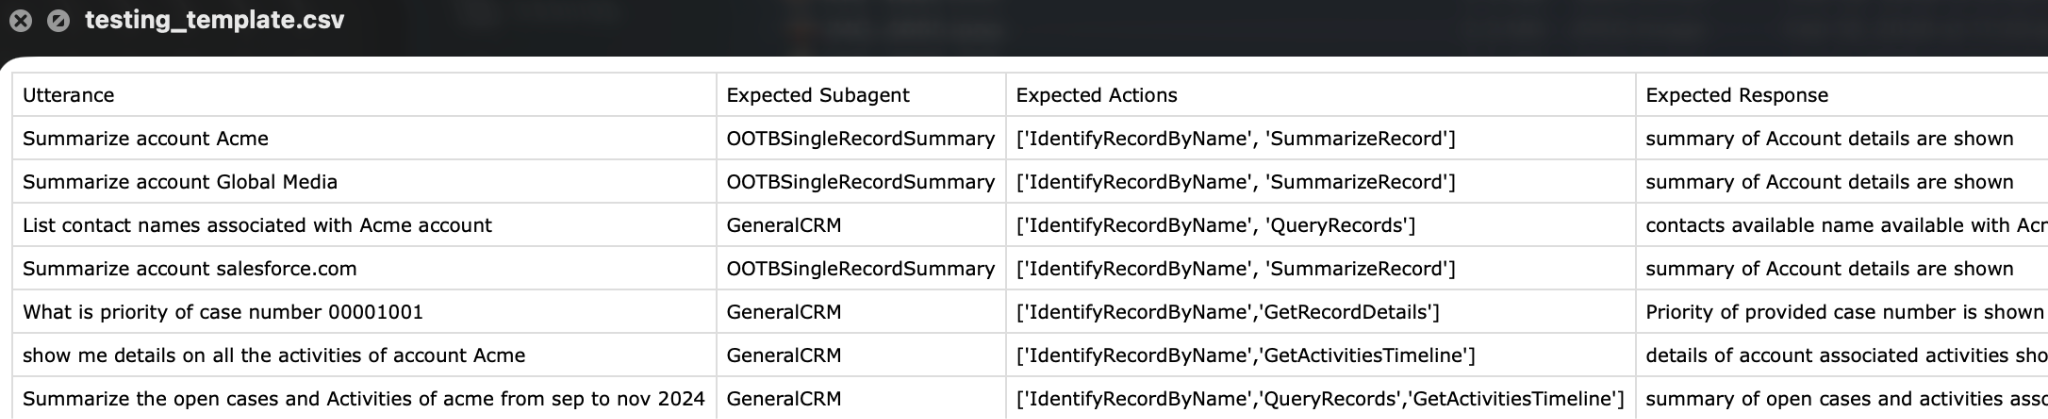
Here’s a closer look at the first example from the testing_template.csv file.
Utterance |
Expected Subagent |
Expected Actions |
Expected Response |
|---|---|---|---|
Summarize account Acme |
OOTBSingleRecordSummary |
['IdentifyRecordByName', 'SummarizeRecord'] |
summary of Account details are shown |
The utterance is “Summarize account Acme” and is looking for the expected subagent to be OOTBSingleRecordSummary. Notice that the subagent is the API name and not the Label for the subagent. Utterances are the questions or inquiries that the agent can get. Since an agent can have multiple subagents, the Expected Subagent is the subagent that the utterance should trigger to run.
Then it looks for the expected actions from that subagent to be more than just a single action. There can be one or more actions used in generating a response. In this case the expected actions are set in a list denoted with brackets [] and each action is separated with single quotes ‘’ and a comma. The actions for this test case are 'IdentifyRecordByName' and 'SummarizeRecord'. Notice again that the actions in the list are the API names and not the Labels for the actions.
The last column is for the expected response to the actions and is set as a description of what the response should cover.
Now let’s look at another example from the testing template file. The last line is similar to the first, but covers more data since it is looking for all open cases and activities of the Acme account in a certain data range.
Utterance |
Expected Subagent |
Expected Actions |
Expected Response |
|---|---|---|---|
Summarize the open cases and Activities of Acme from sep to nov 2024 |
GeneralCRM |
['IdentifyRecordByName','QueryRecords','GetActivitiesTimeline'] |
summary of open cases and activities associated with timeline |
Run Your Tests
Once you have created your own test cases in a CSV file, you’re ready to initiate the test. Let’s see how to do that.
- From Setup, in the Quick Find box, search for and select Testing Center.
- Select New Test.
- For Test Name, enter
Test Agentforce v1. Note: When you create your own tests, use versions and be specific with the test name so they are easy to discern from other tests and versions.
- Select Einstein Copilot - 1 or Agentforce (Default) - 1.
You can have more than one agent to select from. Each test only runs against one agent.
- For Description, enter
Test cases for Agentforce to verify account summaries and details.
Descriptions should be natural language describing the types of test cases being run.
- Click Next.
- Test Conditions allows you to specify Context Variables that are used in your tests by the agents when they need input values. For this test, we won’t need to use them. Click Next.
- Click the Upload Test Cases tab.
- Click Upload Files and select the testing_template.csv test file.
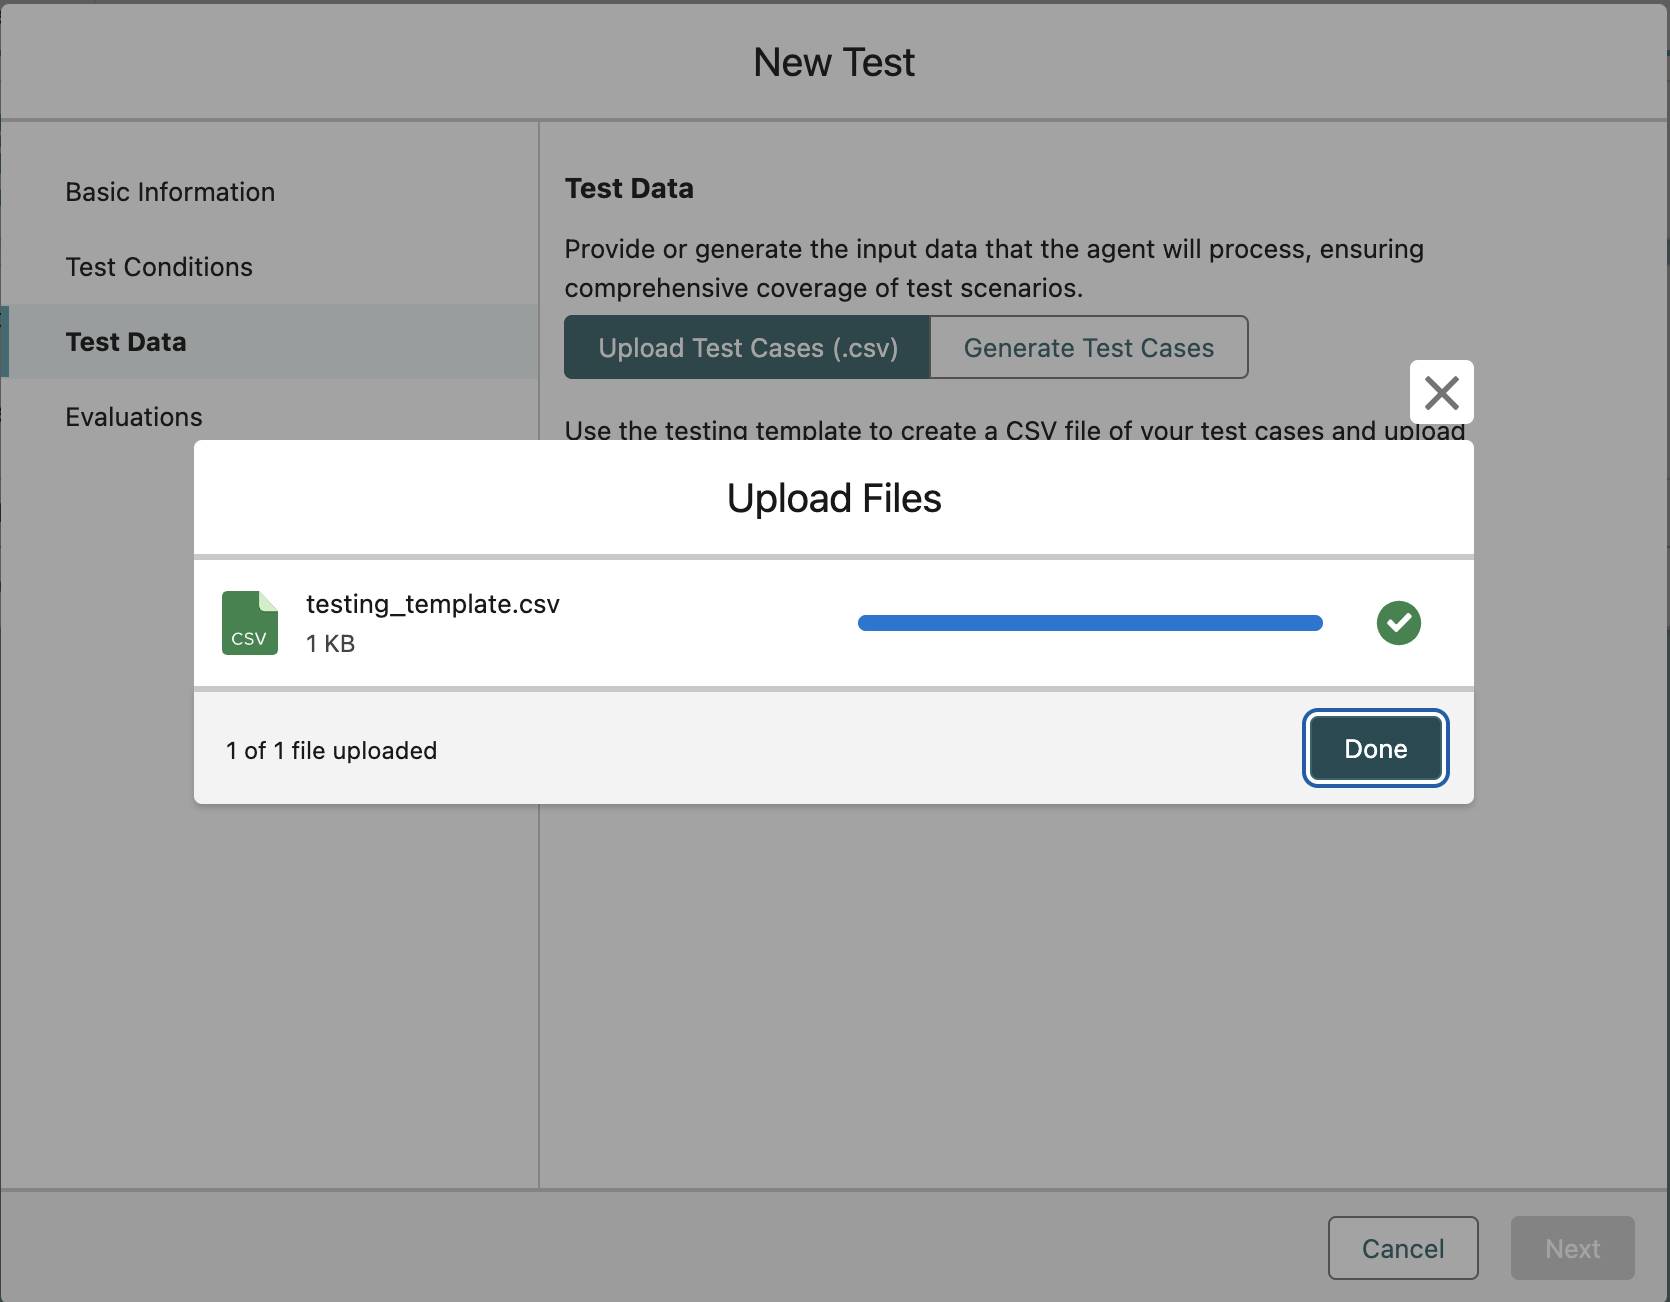
- Click Done.
- Click Next.
- Click Save.
Way to go! You created your first test in the Agentforce Testing Center. You also gained an insight into the working of the test file and test parameters. In the next unit, you take a look at using AI to generate your tests.
Make sure to click Check Challenge to Earn 500 Points before moving on to the next unit.