Customize Agent Topics
Learning Objectives
After completing this unit, you’ll be able to:
- Preview an agent in the Conversation Preview panel.
- Refine and add new topic instructions.
- Explain how to add and remove topics.
Trailcast
If you'd like to listen to an audio recording of this module, please use the player below. When you’re finished listening to this recording, remember to come back to each unit, check out the resources, and complete the associated assessments.
Let’s Chat
An agent wouldn’t be your agent without customizations. The topics, actions, and settings you define when you build an agent make it unique and qualify it to do the job or jobs you need it to do. But that doesn’t mean it does everything you need it to do right away. Let’s look at how Ryan customizes his agent to do the jobs he needs it to do.
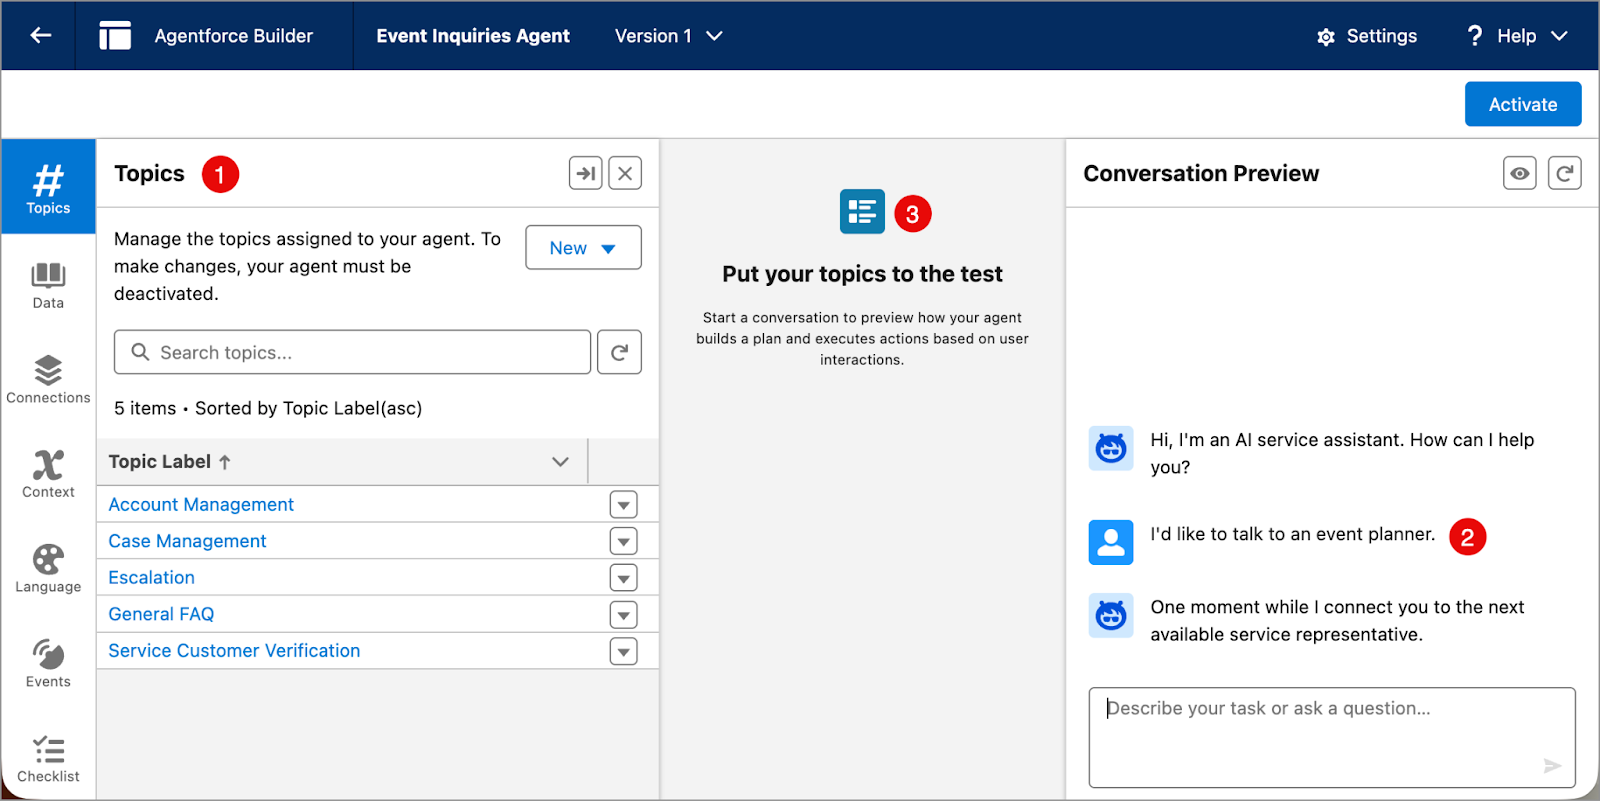
When Ryan clicked Create and landed on the next Agentforce Builder screen, he takes a look around. He sees three new panels.
- On the left, he sees a panel where he can customize various components for his agent (1).
- On the right, he sees a panel called Conversation Preview, where he can engage with the agent to test how his agent responds (2).
- In the center panel where it says, Put your topics to the test, he sees the Plan Tracer, which shows the work the agent does behind the scenes to generate responses to queries (3).
Converse with Natural Language
If you earned the Introduction to Agentforce Builder badge, you know that you engage with an agent using natural, conversational language that is routed through a large language model (LLM) and a reasoning engine to help it understand and retain context and make decisions based on the instructions and guardrails you set up.
Ryan wants to see what kind of response his brand-new agent returns. In the Preview window, Ryan types I’d like to talk to an event planner. The agent replies: “One moment while I connect you to the next available service agent.”
Customize the Conversation
Not surprisingly, the new agent returned a response that’s not quite what Ryan wants. This agent, as it’s configured right now, immediately offers to connect Ryan to the next available service representative. Also, the agent isn’t personalized enough to align with the event planning services Opal Media provides. Ryan needs to customize it a bit.
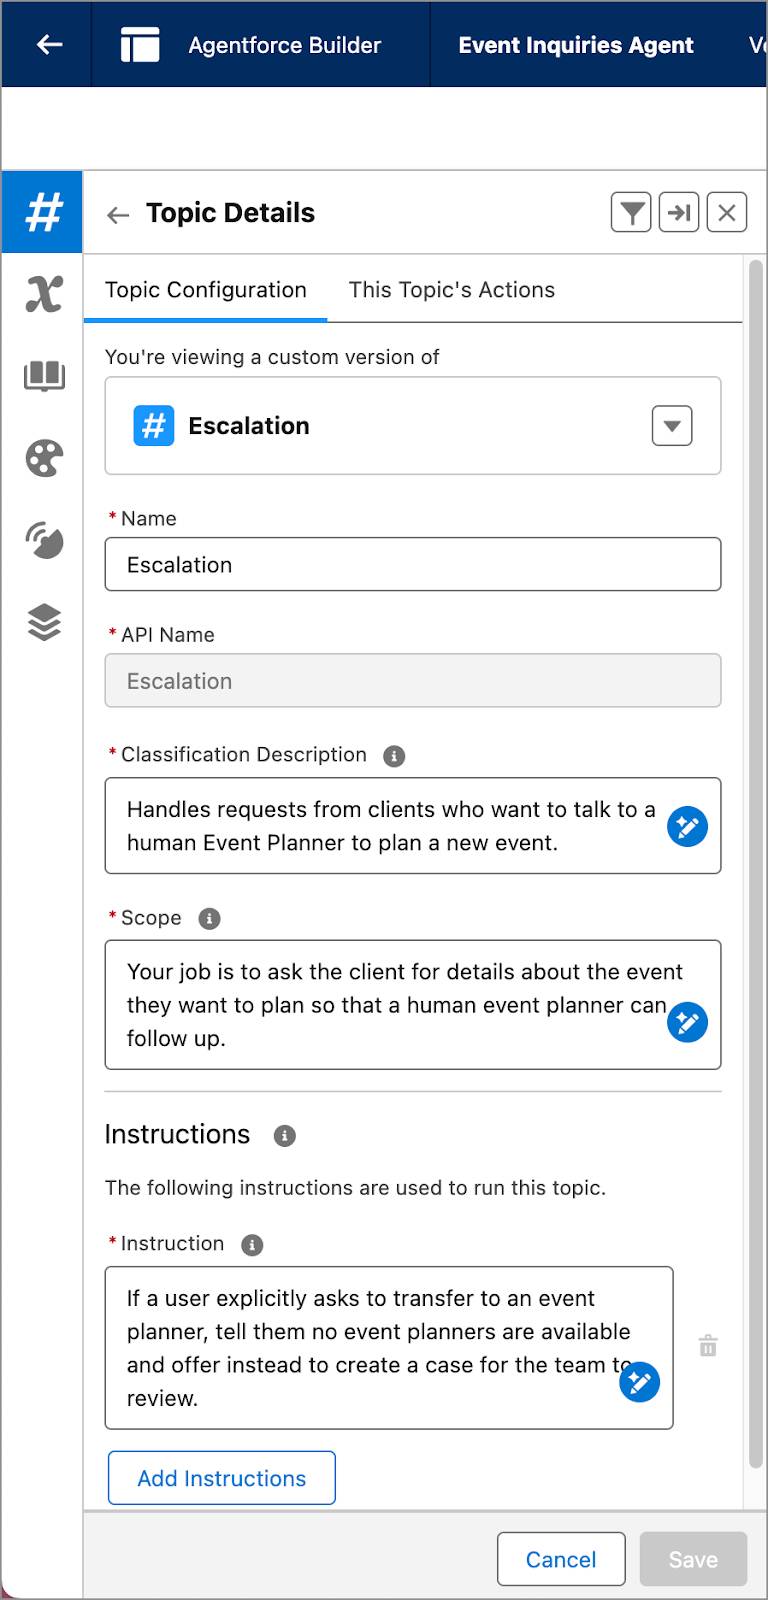
Before customizing or refining an agent, it’s a best practice to read its topics, topic instructions, and actions carefully to understand why it works the way it does so you know where to begin customizing. In the left panel, on the Topics tab, Ryan clicks the Escalation topic and reads through the Classification Description, Scope, and Instruction fields.
-
Classification Description: Tells the agent when to use a topic. The Agentforce reasoning engine can detect user intent and call a topic that aligns with that intent.
-
Scope: Defines what an agent is able to do within the parameters of this topic.
-
Instructions: Provides details of the job the agent performs. Instructions can also act as guardrails for the agent to work within.
Ryan wants to edit the text in each field to be more relevant to the job he wants this agent to perform. Here’s how he edits the fields.
- On the Escalation topic, he clicks the dropdown arrow and selects Edit.
- Then, in the Classification Description field, he types:
Handles requests from clients who want to talk to a human Event Planner to plan a new event.
- In the Scope field, he types:
Your job is to ask the client for details about the event they want to plan so that a human event planner can follow up. - In the first Instruction field, he types:
If a user explicitly asks to transfer to an event planner, tell them no event planners are available and offer instead to create a case for the events team to review.
- Next to the second instruction, he clicks
 to delete it, then he clicks Save.
Iterate and Retest
With the changes made, Ryan retests his agent to see what happens.
- He refreshes the Conversation Preview window to apply the changes.

- In the Conversation Preview window, he enters
I’d like to talk to an event planner.
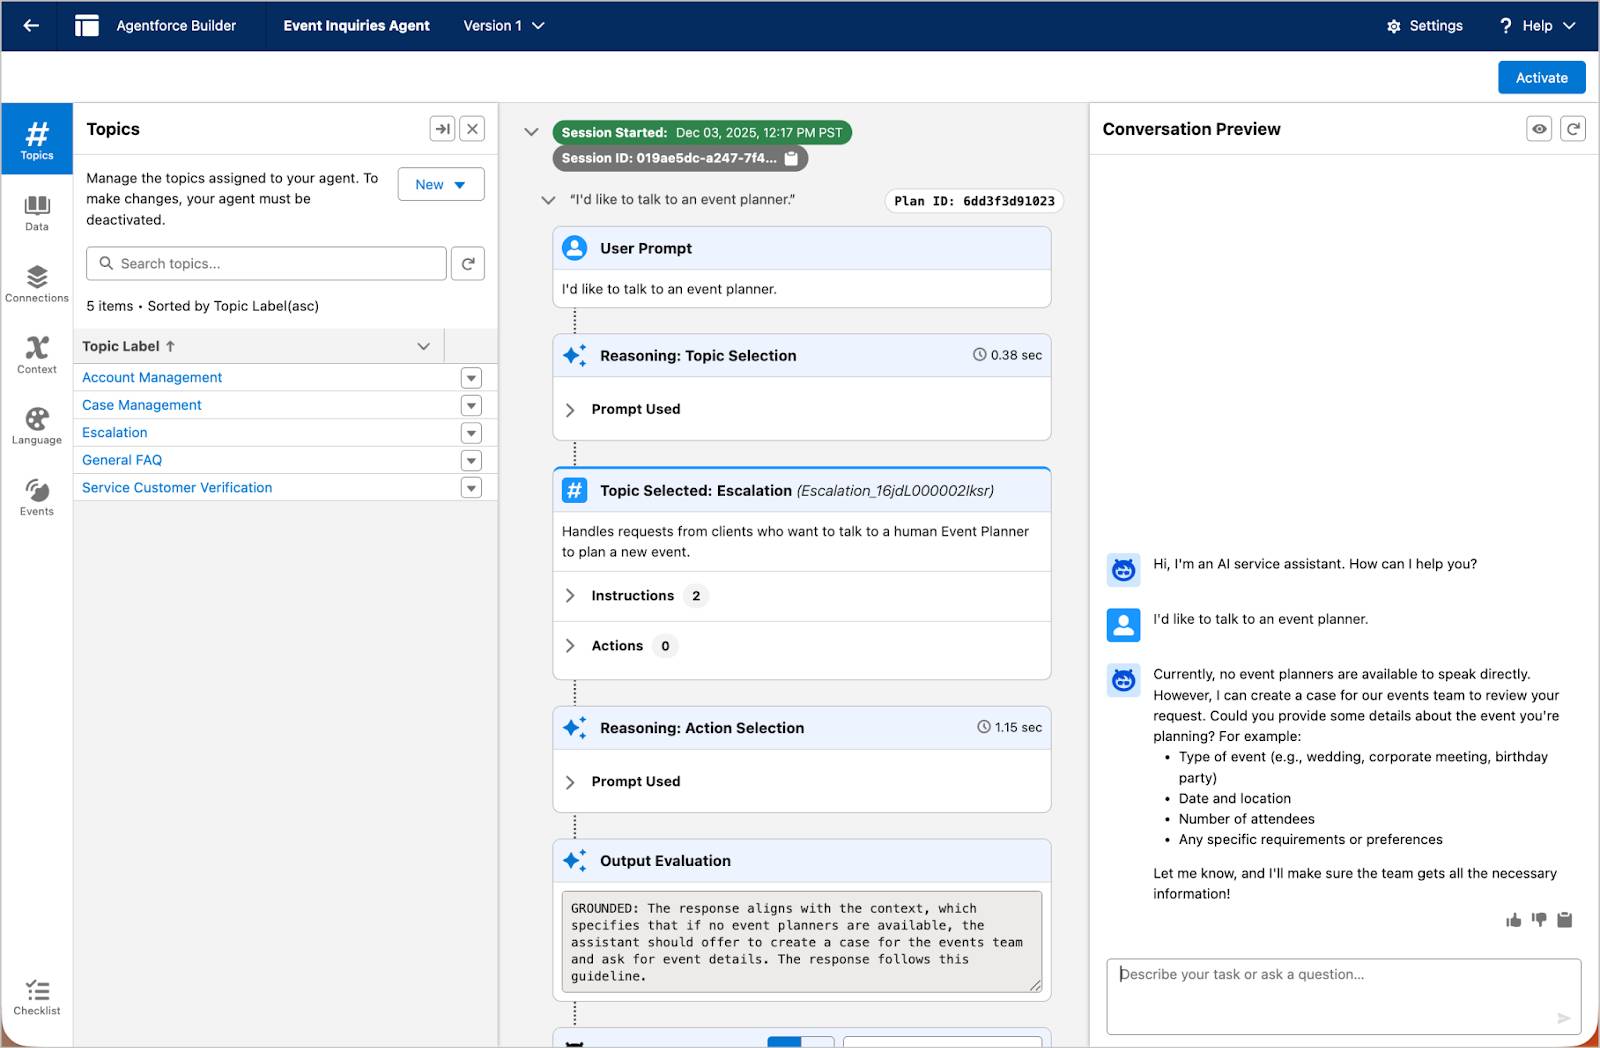
The agent responds with, “Currently, no event planners are available to speak directly. However, I can create a case for our events team to review your request. Could you please provide some details about the event you’re planning?”
Ryan is thrilled by the accuracy and detail in the new response after making only a few minor updates. The agent is already much more aligned to the job he wants it to perform. The agent picks up the context of the conversation and politely asks for details about a client’s event!
He’s also impressed that Agentforce Builder lets him see how the agent works behind the scenes. In the Plan Tracer window in the center panel, he can easily follow how the simple prompt “I’d like to talk to an event planner” first called the Escalation topic, then used his new instruction, and then verified, through reasoning, that the agent followed the context of the conversation to ground the response.
Ryan plans to refine this interaction further and also tailor a few more instructions so his agent can respond to other types of questions and gather details in a format that matches Opal Media’s records.
Add or Remove Topics
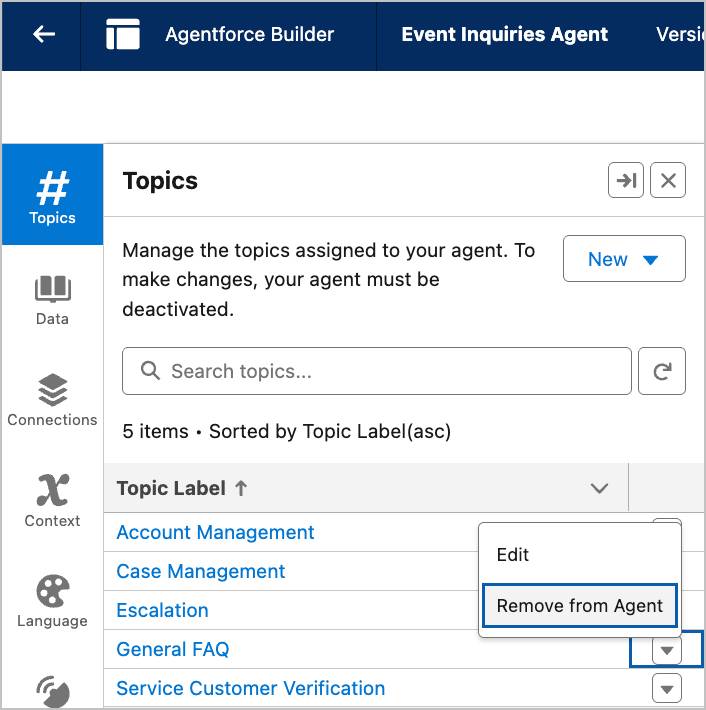
Ryan is still feeling the thrill of creating an agent that he can so easily modify to get different kinds of responses. However, when he initially built it, he wasn’t quite sure which topics he would need. Now that he understands how Agentforce Builder works and how easy it is to customize an agent with just a few clicks, he wants to remove the General FAQ topic until he gathers more details about the types of inquiries clients make. He knows he can easily add it again later.
- In the Topics Label section, he clicks on the dropdown arrow next to General FAQ and selects Remove from Agent.
He wants to see if there are any other topics he wants to include right now.
- He clicks New.
- He selects Add From Asset Library.
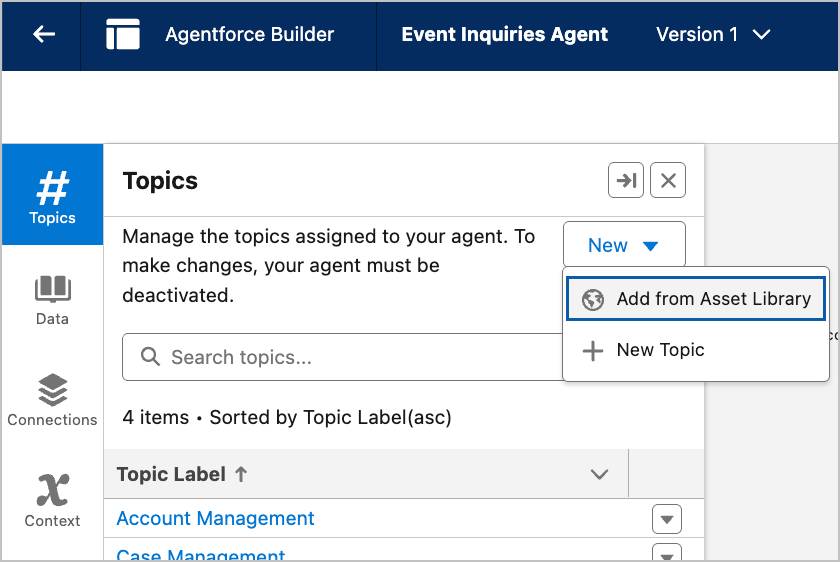
The Asset Library is a list of standard topics that can be included with the Agentforce Service Agent. Ryan can also create a brand-new topic if he doesn’t see a topic that fits his needs. It’s a best practice to use preconfigured topics and actions wherever possible because, with a few customizations, they cover almost any use case imaginable. 
- Ryan clicks Cancel to close the asset library and return to Agentforce Builder.
Summary
You followed along as Ryan previewed his agent and refined its response. In the next unit, you customize your agent further and update its settings.