Add a Branch and Test Expression Set
Learning Objectives
After completing this unit, you’ll be able to:
- Add a branch with condition and calculation elements for each branch path.
- Simulate an expression set.
- Test an expression set in a Salesforce flow.
Add a Branch to an Expression Set
A branch element in an expression set version has multiple conditional paths that you can use to calculate output for different input conditions.
Jessica wants to try out the branch element and see how it helps her calculate subsidies based on the applicant’s annual income. She captures this requirement by creating branch paths with conditions and calculates the final premium that each applicant has to pay for each condition.
Here’s the breakdown of subsidy percentage based on an applicant’s annual income.
Annual Income |
Subsidy |
|---|---|
$0 to $30,000 |
20% |
$30,000 to $60,000 |
15% |
$60,000 to $90,000 |
10% |
$90,000 and above |
No subsidy |
Annual income is already captured in the Contact object in your Developer Edition org. This is used as a field alias value in the branch.
With this information, Jessica creates multiple branch paths with conditions to fetch an applicant’s annual income. She also adds calculation elements for each condition to calculate the final premium.
- Click
 , then find and select Expression Sets.
- Open the Insurance Premium Calculation V1 expression set version in Expression Set Builder.
- After the Discounted Premium element, click
 and select a Branch element. The branch is created with two conditional paths and a default path.
- Click the three dots beside Branch
 and select Add Path. A new conditional path is added to the branch. You now have three paths, each with a single condition, and one Default path.
- Click the name of the condition under each path and rename each one as follows.
- Path 1:
Income Below 30000 - Path 2:
Income From 30000-60000 - Path 3:
Income From 60000-90000
Add Data to Branch Path Elements
Jessica sets the values in the conditions and adds calculations for each path.
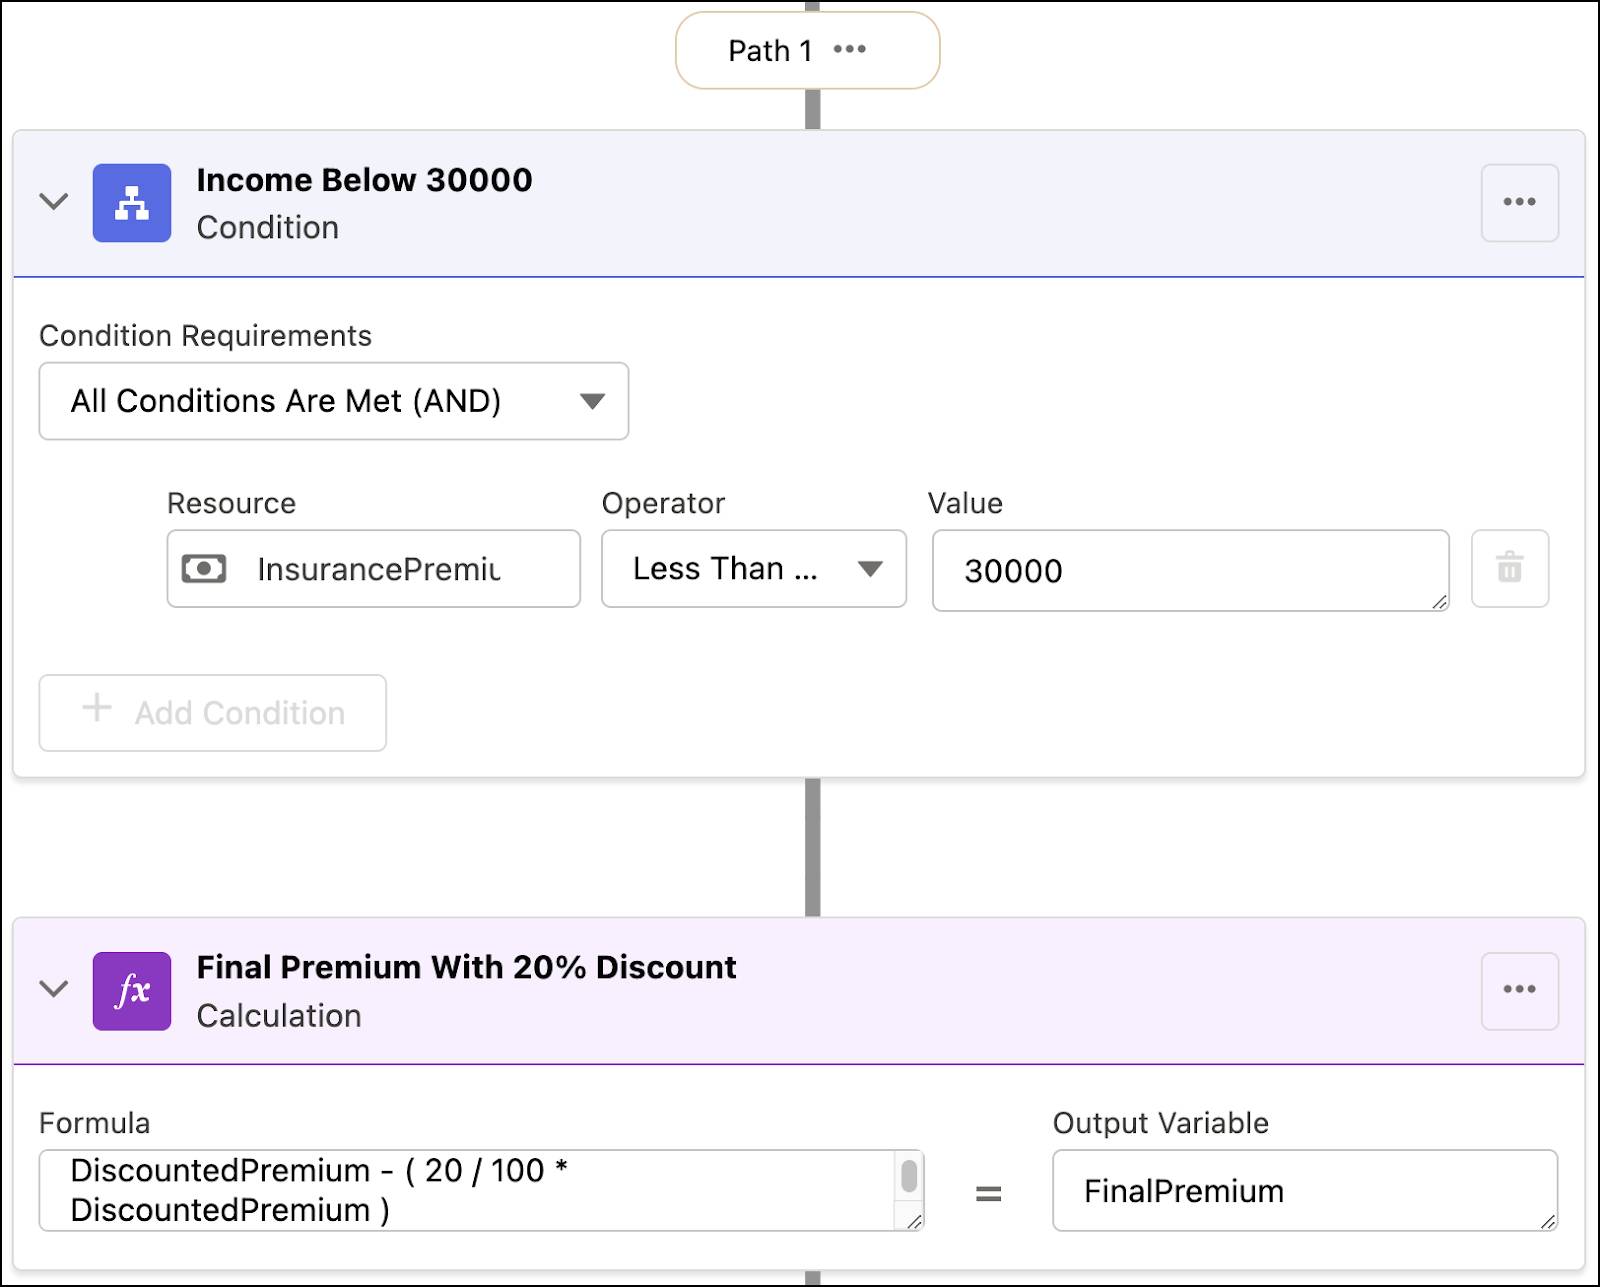
Path 1
In this scenario, Jessica sets the condition that if the applicant’s annual income is less than or equal to $30,000, they get an additional discount of 20% on the discounted premium. She then captures the final premium using a formula.
- Enter these details in the Income Below 30000 condition.
- Condition Requirements: All Conditions Are Met (AND)
- Resource: InsurancePremium > ApplicantIncome
- Operator: Less Than or Equal
- Value:
30000
- Condition Requirements: All Conditions Are Met (AND)
- After the condition, click
 , and add a Calculation element.
- Rename the calculation element to
Final Premium With 20% Discount.
- Enter these details in the calculation:
- Formula:
DiscountedPremium - ( 20 / 100 * DiscountedPremium ) - Output Variable: FinalPremium
- Formula:
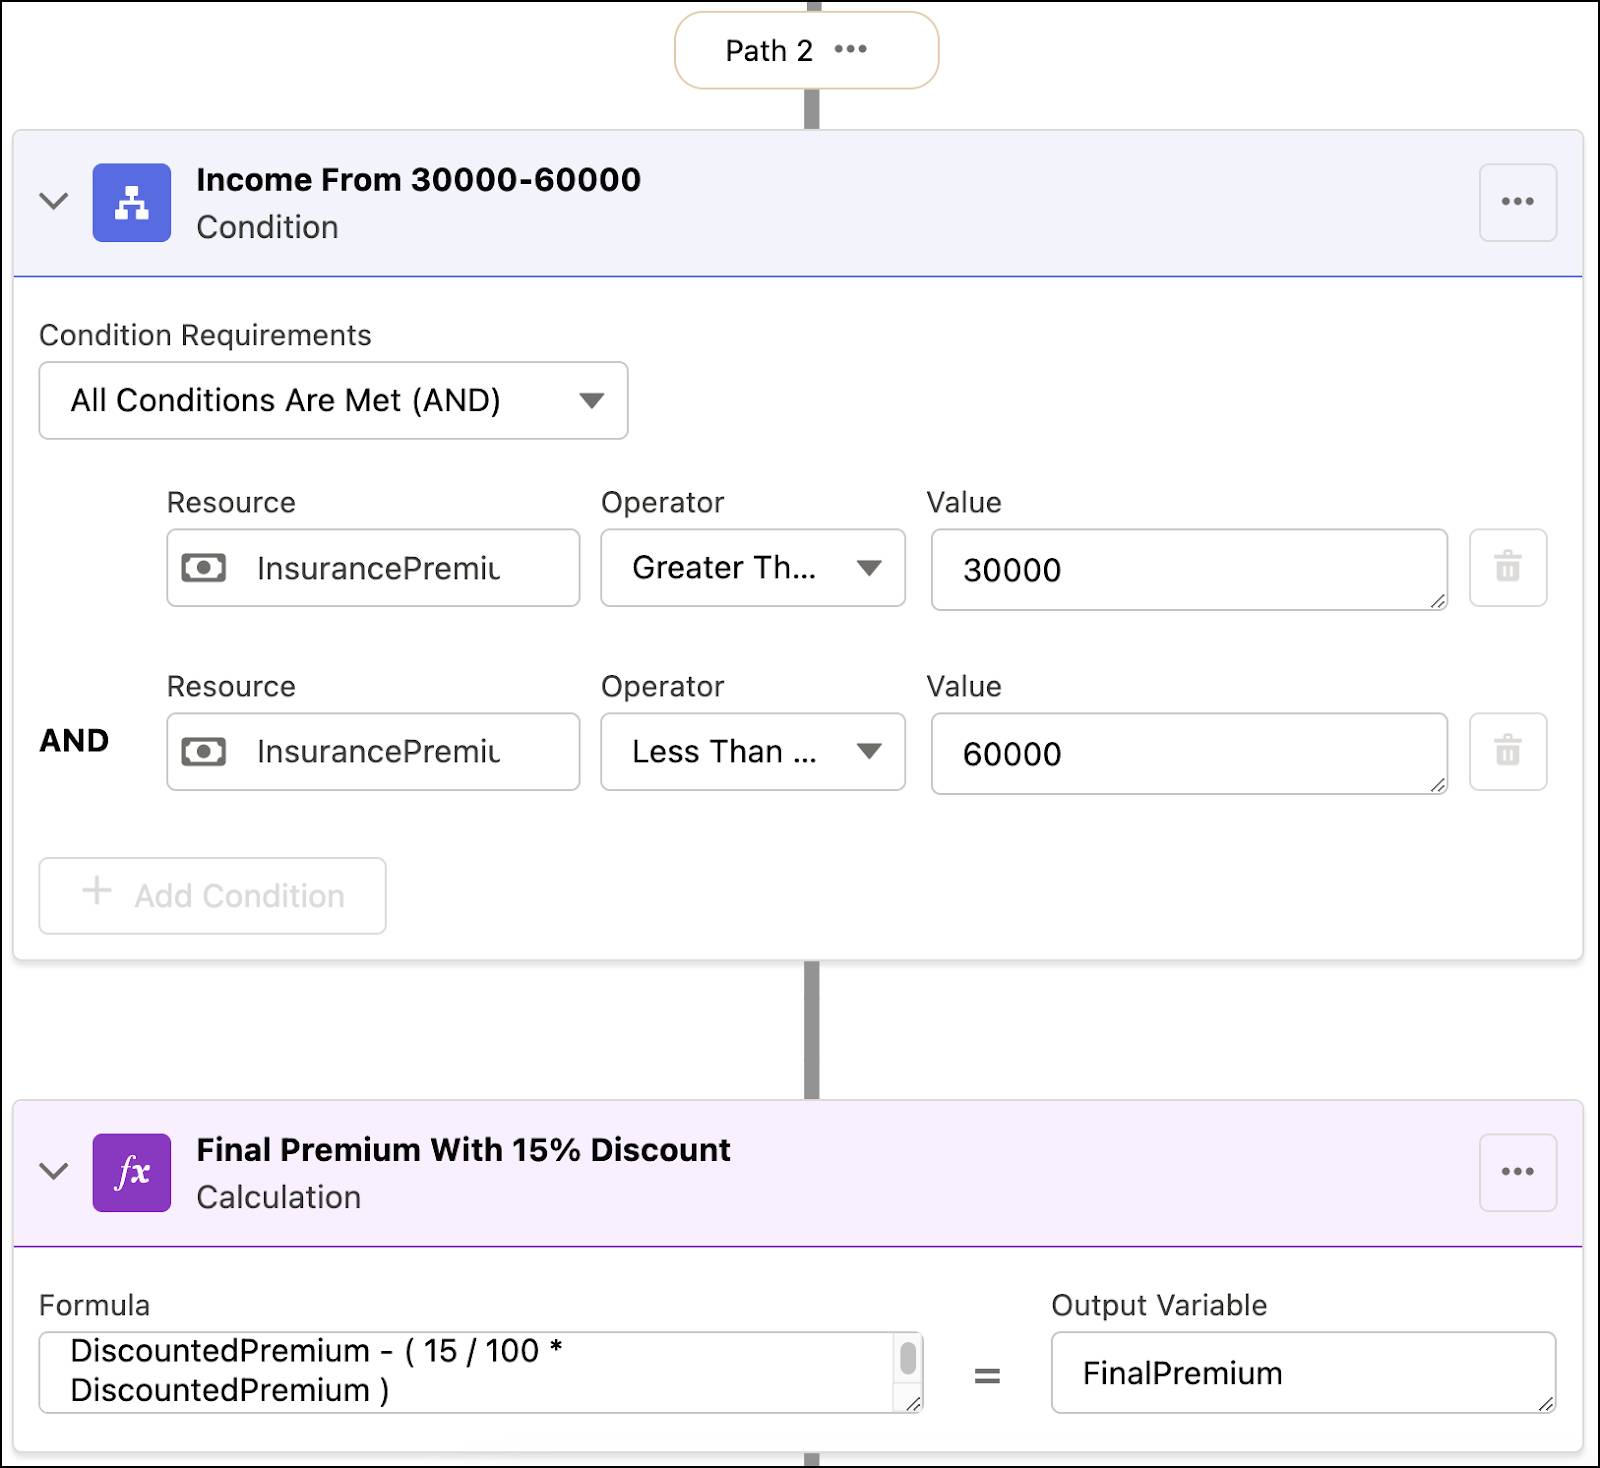
Path 2
In this scenario, Jessica sets the condition that if the applicant’s annual income is greater than $30,000 and less than or equal to $60,000, they get an additional discount of 15% on the discounted premium. She then captures the final premium using a formula.
- Enter these details in the Income From 30000-60000 condition.
- Condition Requirements: All Conditions Are Met (AND)
- Resource: InsurancePremium > ApplicantIncome
- Operator: Greater Than
- Value:
30000
- Condition Requirements: All Conditions Are Met (AND)
- Click Add Condition and enter these details.
- Resource: InsurancePremium > ApplicantIncome
- Operator: Less Than or Equal
- Value:
60000
- Resource: InsurancePremium > ApplicantIncome
- Click
 and add a Calculation element after the condition.
- Rename the calculation element to
Final Premium With 15% Discount.
- Enter these details in the calculation.
- Formula:
DiscountedPremium - ( 15 / 100 * DiscountedPremium ) - Output Variable: FinalPremium
- Formula:
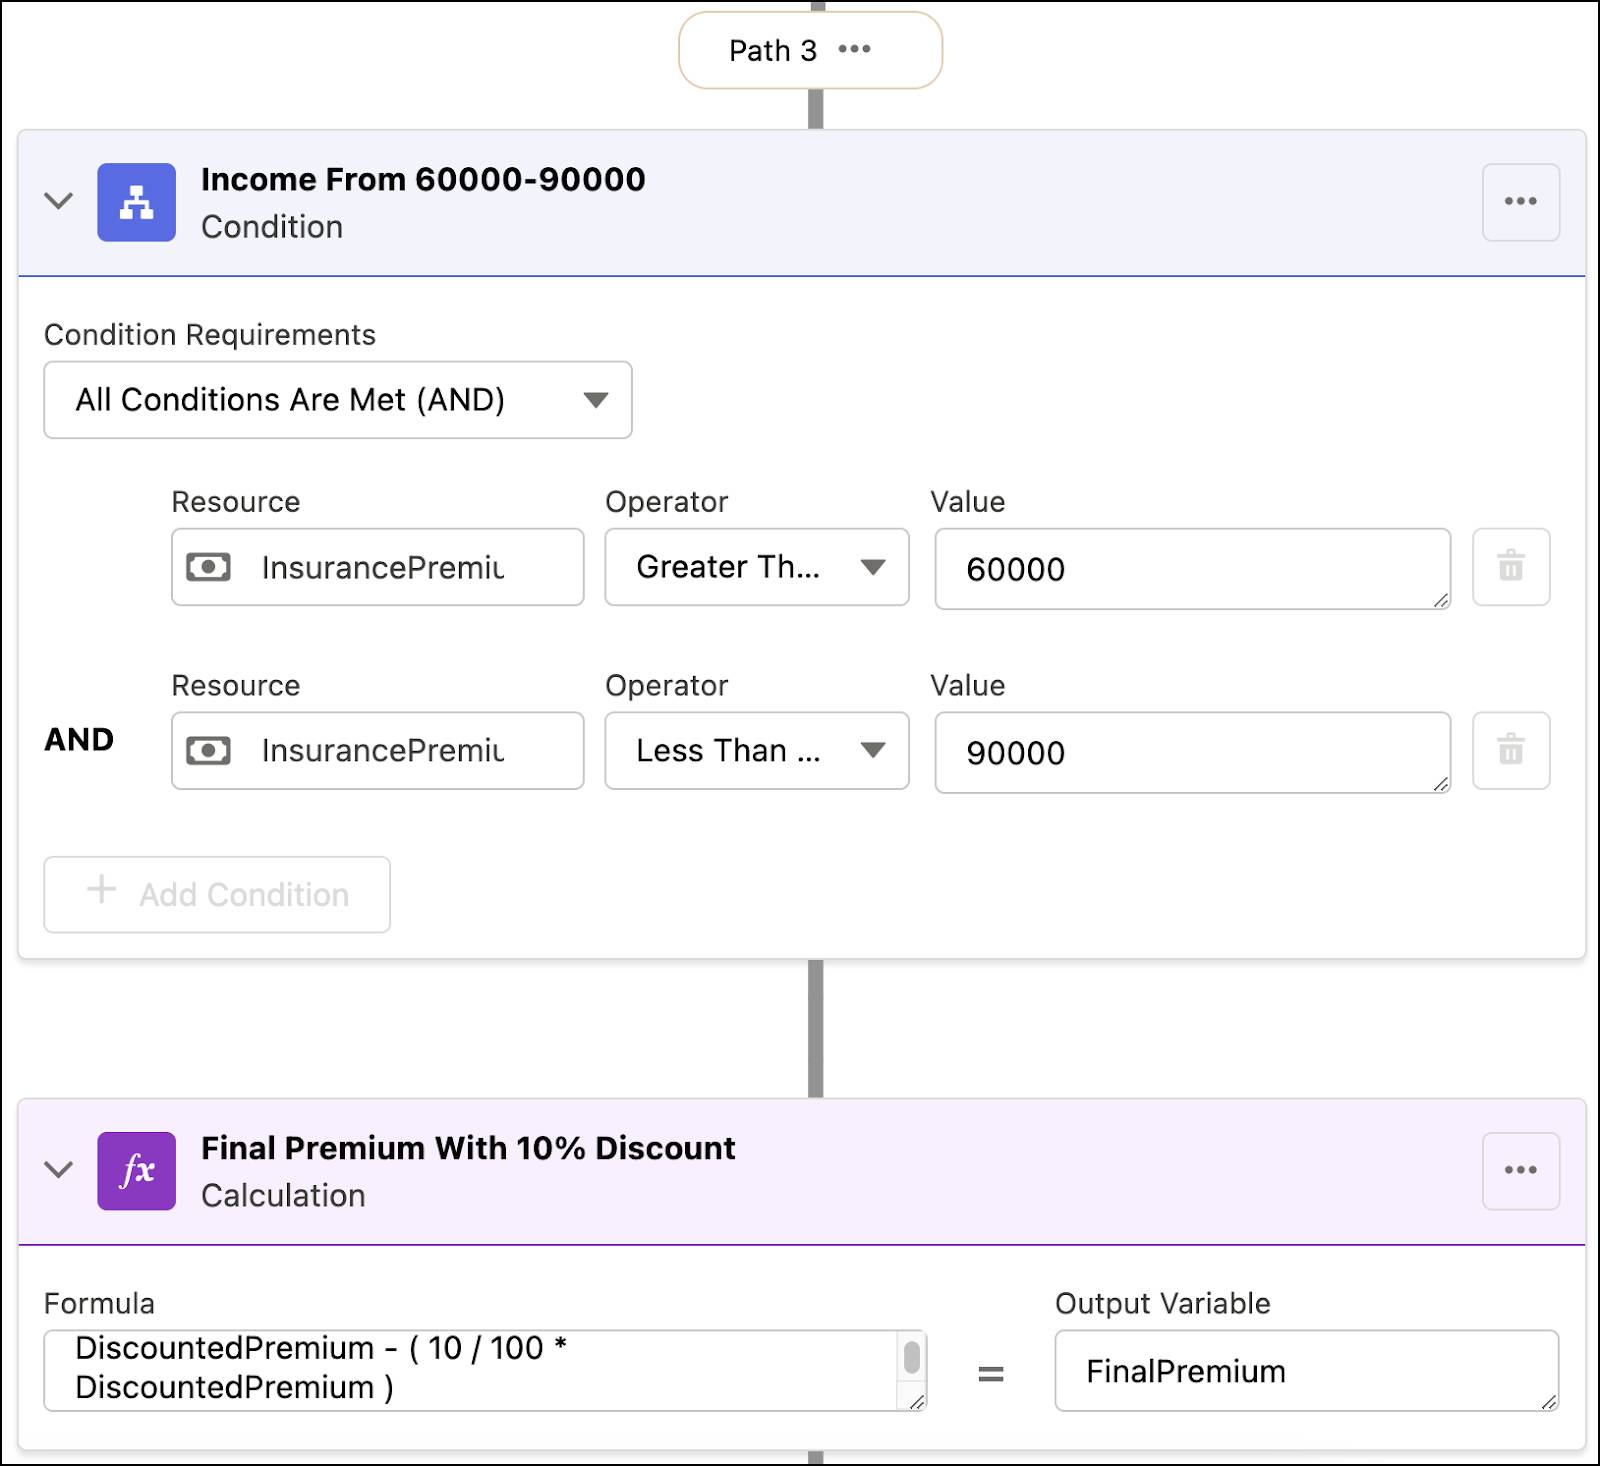
Path 3
In this scenario, Jessica sets the condition so that if the applicant’s annual income is greater than $60,000 and less than or equal to $90,000, they get an additional discount of 10% on the discounted premium. She then captures the final premium using a formula.
- Enter these details to the Income From 60000-90000 condition.
- Condition Requirements: All Conditions Are Met (AND)
- Resource: InsurancePremium > ApplicantIncome
- Operator: Greater Than
- Value:
60000
- Condition Requirements: All Conditions Are Met (AND)
- Click Add Condition and enter these details.
- Resource: InsurancePremium > ApplicantIncome
- Operator: Less Than or Equal
- Value:
90000
- Resource: InsurancePremium > ApplicantIncome
- Save your work.
- Click
 and add a Calculation element after the condition.
- Rename the calculation element to
Final Premium With 10% Discount.
- Enter these details in the calculation.
- Formula:
DiscountedPremium - ( 10 / 100 * DiscountedPremium ) - Output Variable: FinalPremium
- Formula:
- Save your work.
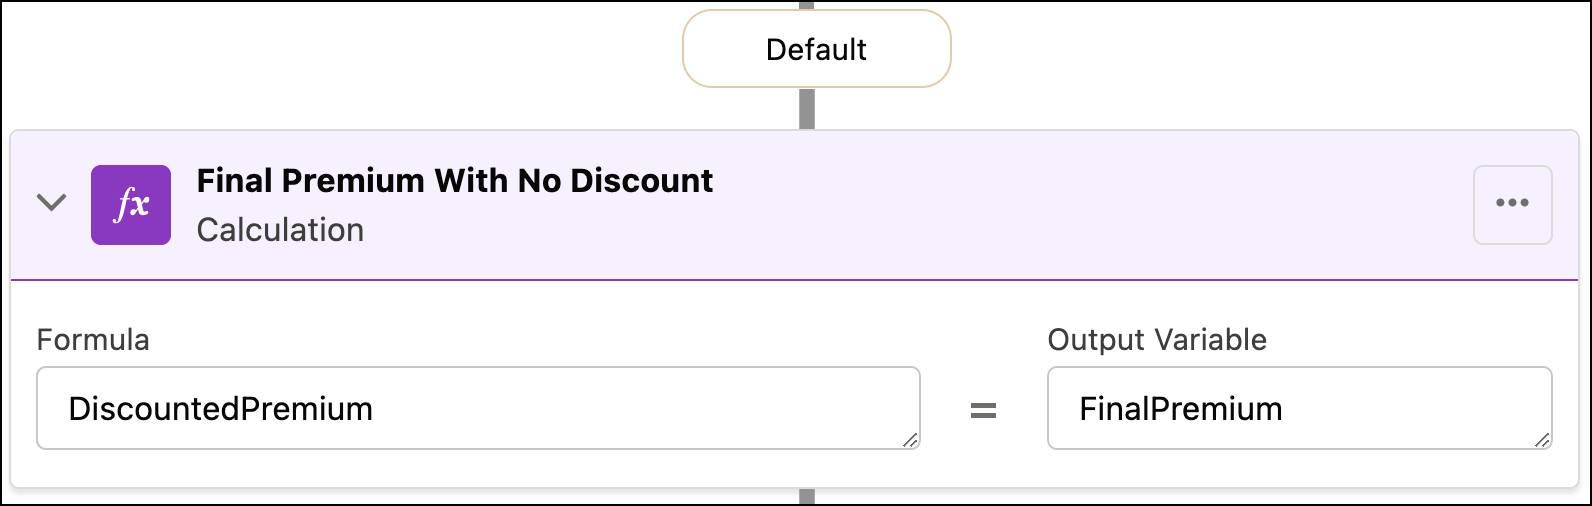
Default Path
In this scenario, if the applicant’s annual income is greater than $90,000, they don’t receive any additional discount on the discounted premium. So, the final premium amount is the same as the discounted premium amount.
- Click
 , and add a Calculation element to the default path
- Rename the calculation element to
Final Premium With No Discount - Enter these details to the calculation.
- Formula:
DiscountedPremium - Output Variable: FinalPremium
- Formula:
- Save your work.

Enable Elements to Be Available as Output
Finally, Jessica makes sure that each element in the expression set is available as output.
- Select the Base Premium lookup table element and click
 .
.
- Select Include in Output.
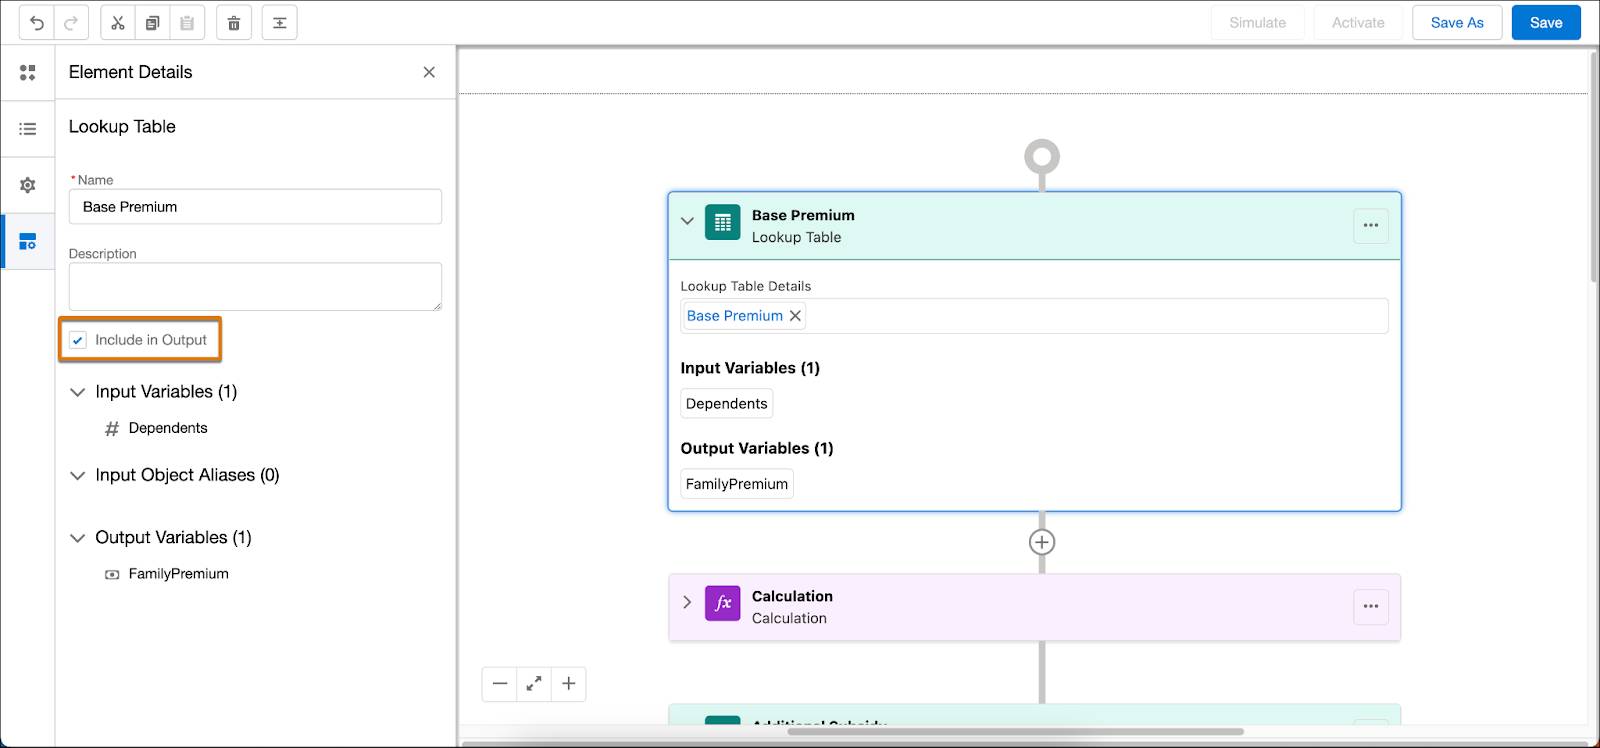
- Save your work.
- Select the Include in Output check box for each element in your expression set.
- Save your work.
To learn more about the branch element and how to configure it, check out Branch in Salesforce Help.
Simulate the Expression Set
Jessica has created all the steps of the expression set and wants to quickly check if she’s getting the expected results.
Follow along to simulate the expression set using sample input data.
- On the Insurance Premium Calculation V1 expression set version builder page, click Simulate.
- In the Input Variables section, under Variables, enter the following sample data.
- Dependents:
3
- Veteran: True
- Dependents:
- Under Field Aliases, enter the following sample data.
- InsurancePremium.DisabilitySeverity:
Mild
- InsurancePremium.ApplicantBirthdate: January 1, 1961
- InsurancePremium.ApplicantIncome:
50000
- InsurancePremium.DisabilitySeverity:
- Click Simulate.
The table shows the results of the output tab.
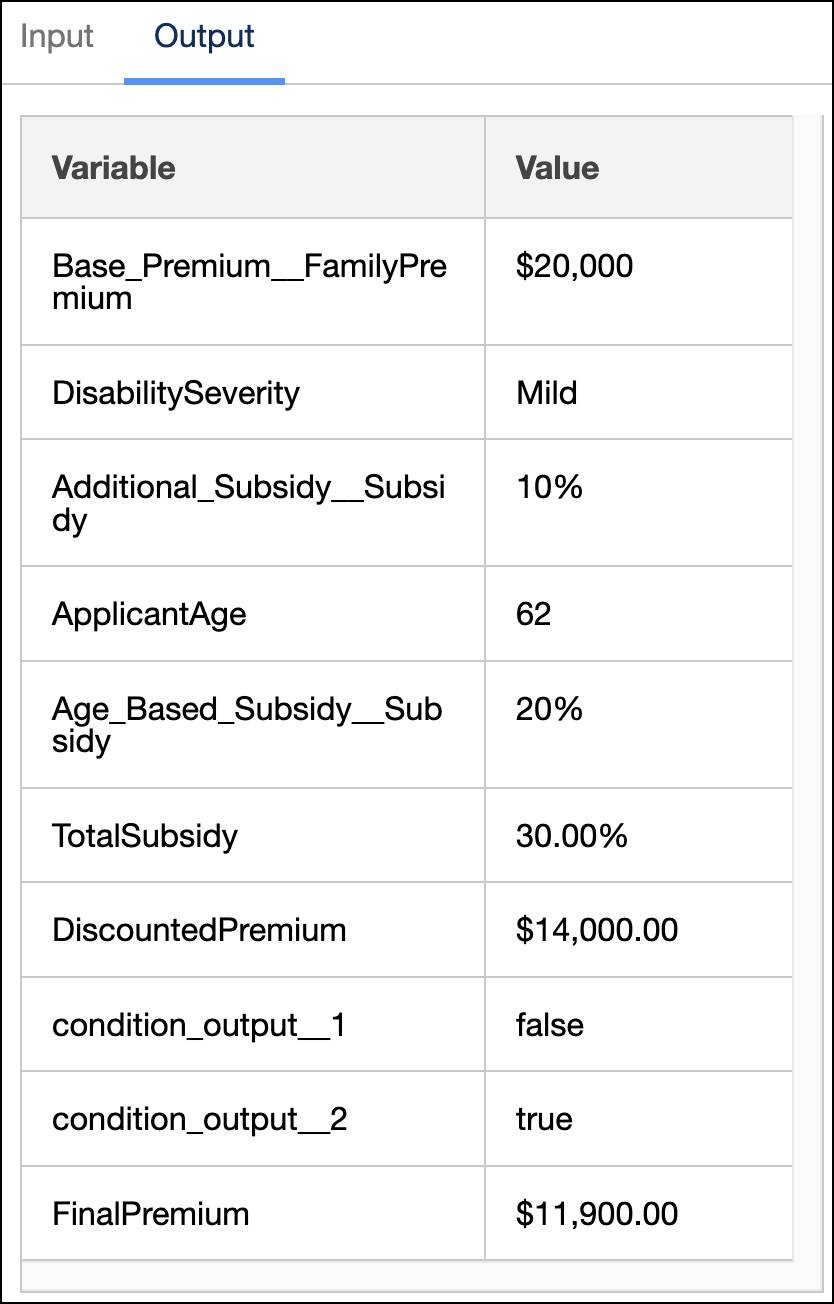
Jessica is happy to see the results are as expected. The total subsidy is 30%, the discount based on annual income is 15%, and the final insurance premium is $11,900. She tests the expression set with a few other input values to be sure it works correctly. When satisfied with the results, she informs her Salesforce admin that the expression set with the required rules is ready.
Zercovana’s Salesforce admin integrates the expression set in a Salesforce flow and embeds it into the public health portal. The micronation uses flows to configure their public health portal and deliver information to citizens.
Wow! Jessica got a lot done and following her along, you’ve learned how to create and simulate an expression set. In the next section, you learn how to use the expression set in a Salesforce flow.
Test Expression Sets Using Salesforce Flow
Jessica’s not done yet. There’s one final step, and that is to check if this expression set works when invoked using Salesforce Flow.
Before that, Jessica must assign a rank to the expression set and then activate it. An expression set can have multiple versions, and each version must have a rank. You can activate multiple versions of an expression set simultaneously. When an expression set is called and more than one activated version exists, the version with the highest rank is chosen. For example, if two activated versions have rank 1 and rank 2, the version with rank 2 is chosen.
Follow the steps to assign a rank to the expression set and activate it.
- In the Insurance Premium Calculation V1 expression set version builder page, click
 and in the Rank field, enter
 1.
- Click Save.
- Click Activate.
Zercovana’s Salesforce admin has already created a flow with the following citizen data for the Zercovana Administration account. He’s also given her the required access.
Contact Name |
DOB in MM/DD/YYYY |
Annual Income |
Disability |
|
|---|---|---|---|---|
Noel Raymonds |
noel_raymonds@zercovana.com |
11/1/1990 |
35,000 |
Severe |
Jason Mendes |
jason_mendes@zercovana.com |
4/2/1984 |
70,000 |
Mild |
Ruth Badger |
ruth_badger@zercovana.com |
9/13/1960 |
95,000 |
No Disability |
Jessica checks the flow against the data of Noel Raymonds.
- From Setup, in the Quick Find box, enter
Flows, and then select Flows.
- Click Insurance.
- Click Run.
- Enter the requested details.
- Applicant Email:
noel_raymonds@zercovana.com - No. of Dependents:
3 - Select Veteran
- Applicant Email:
- Click Next.
Jessica reviews each output based on these input conditions.
- Noel has three dependents, so his family insurance premium is $20,000.
- Noel’s disability severity status is Severe and his veteran status is True. This qualifies him for a subsidy of 20%.
- His birth date is November 1, 1990, so his age is 32. This qualifies him for an age-based subsidy of 5%.
- His annual income is $35,000. As per the annual income subsidy requirements, he qualifies for a subsidy of 15%.
The final insurance premium quote is calculated based on the total subsidy eligibility requirements of Noel.
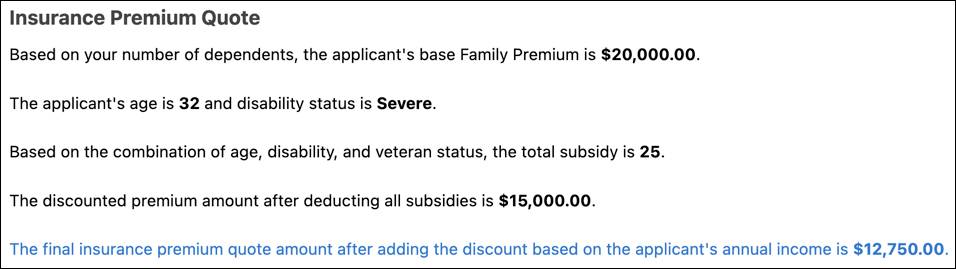
Noel is eligible for a total subsidy of 25% considering his age, disability, and veteran status. His premium amount after deducting the 25% subsidy is $15,000. He’s also eligible for an additional 15% subsidy based on his annual income. After deducting the 15% annual income subsidy, his final insurance premium is $12,750.
Jessica also tests the expression set for the other two sample citizen data, and it returns the right results for both citizens.
Jessica is satisfied that everything is running smoothly, and the expression set is ready for the Salesforce admin to use in Zercovana’s public health portal.
What’s Next
In this unit, you discovered how to configure a branch element with conditions and calculations in an expression set. You also learned how to test the expression set using a flow. In the next unit, find out how to add decision explanations to expression set elements.
Resources
- Salesforce Help: Branch
- Salesforce Help: Simulate and Activate Your Expression Set Version
- Salesforce Help: Invoke an Expression Set in a Flow