Customize How Records Get Approved
Learning Objectives
After completing this unit, you’ll be able to:
- Define an approval process, and list its key components.
- Plan the automation of a business process using an approval process.
Get Started with Approvals
An approval process automates how Salesforce records are approved in your org. In an approval process, you specify:
- The steps necessary for a record to be approved and who approves it at each step. For example, when an employee creates a time-off request, have Salesforce automatically send an approval request to the employee’s manager.
- The actions to take based on what happens during the approval process. For example, if a time-off request is approved, update fields on the employee’s record. But if the request is rejected, send a notification to the employee.
Let’s look at an example approval process to see how a record moves through various steps of the process. In this example, a user submits a request for a new position in a company.
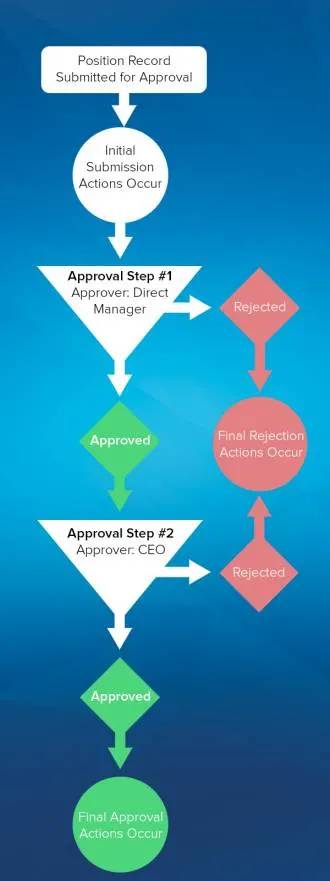
When a user first requests approval for a new position, initial submission actions occur. The default initial submission action locks the record. This action ensures that other users (except for approvers and admins) can’t change the record while it's pending approval. Other possible submission actions include sending an email alert, updating a field on a record, creating a task, sending an outbound message, and running a flow.
Approval steps assign approval requests to various users and define the chain of approval for a particular approval process. In this example, the first step assigns the approval request to the submitter's direct manager.
If the direct manager rejects the request, the final rejection actions are executed, setting the position’s approval status to Rejected.
If the direct manager approves the request, the record moves to the next step—approval from the CEO. If the CEO rejects the position, the same final rejection actions occur.
If the CEO approves the position, final approval actions are executed. They set the approval status to Approved, unlock the record for future updates, and notify the employee who requested the new position.
Final approval actions occur only when a record is approved and there are no further approval steps.
Build an Approval Process
Now that you’ve seen the basic outline of an approval process, let’s get your hands dirty. You need to make sure that a manager approves opportunities that are discounted more than 40%. The opportunity should reflect its approval status: Approved or Not Approved.

Preplanning
Before we dive in, let’s come up with a plan.
In Order to... |
We Need... |
|---|---|
Track each opportunity’s discount percent |
Custom field (Opportunity) |
Track each opportunity’s approval status |
Custom field (Opportunity) |
Request approval from managers when an opportunity discount is more than 40% |
Approval process (Opportunity) |
Notify managers when an opportunity discount needs approval |
Email template |
When managers respond, update the opportunity’s approval status |
Approval actions (Field Update) |
Resources
- Salesforce Help: Prepare to Create a Classic Approval Process
- Salesforce Help: Limits and Considerations for Classic Approval Processes